What QuarkXPress calls a Runaround, InDesign calls a Text Wrap. In QuarkXPress, every object has a runaround turned on by default. In InDesign, all objects have text wrap turned off by default.
QuarkXPress runarounds only work if the order in which objects are stacked on the page is correct. InDesign text wraps work regardless of the stacking order of objects.
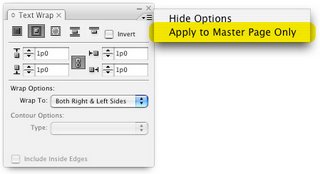
In InDesign CS2, if an object on a Master Page has a text wrap applied, it will only affect text frames that are also located on the master page. Text on document pages cannot wrap around master page items. A new feature of InDesign CS3 is the ability to choose whether text wraps applied to master page objects affect document page text. This option is located in the Text Wrap panel menu.

In InDesign, if you need to have a text wrap applied to a graphic frame, but then you need to put some text in a frame on top of the graphic, do this: select the text frame that you want to put on top of the graphic, right-click, and choose Text Frame Options from the context menu. Select the Ignore Text Wrap option in the Text Frame Options dialog box, and click OK. This will cause the text frame to ignore any text wrap that may be applied to other frames it encounters.

Thank you. You just really helped me out with this post!
ReplyDeleteThis is a great tip, however if you are using a Mac, you will need to click the text box and go under Object an select frame options (command B) and the click ignore text wrap.
ReplyDeleteholy crap! you have no idea how much you just helped me! thank you so much!
ReplyDeleteVery helpful! Thanks a ton, that's exactly what I was looking for!
ReplyDeleteThank you, exactly what I needed to figure out!
ReplyDeleteHooray for this tip. Thank you so much.
ReplyDeleteYou helped save me so much time. thank you thank you thank you!
ReplyDeleteI've been wondering how to do this for a long time. Even frustrating at times and now I finally know what to do! Thanks for the tip!
ReplyDeleteDitto Shelby .... HOLY CRAP!!! I knew there had to be an easier way then what I came up with :)
ReplyDeleteI've been banging my head against a brick wall over this for ages. Such a simple solution
ReplyDeleteThanks for the tip
wow thank you thank you....no more reshaping the text containers to wrap around images that need text on them wooohooo.
ReplyDeleteComments and thanks still coming in four years after the fact!
ReplyDeleteThis tip has helped me greatly in understanding how to achieve what had become a standard in Quark and seemingly problematic with InDesign.
May I add that if you have the text box and the shape 'grouped' that you make sure they are ungrouped before trying to apply the above tip then you can group them again after and it works fine. ITMS
Thank You!
ReplyDeletethks so muuuuuch!!!!
ReplyDeletethx!!!!!!!!!!! saved me a headache :)
ReplyDelete