Friday, April 27, 2007

InDesign CS3 backspace bug fix

If you are using InDesign CS3, you should be aware of this: InDesign CS3 will crash if you: a) have the Info panel displayed, b) are editing text in a story of more than 500 characters, and c) backspace quickly to delete a bunch of text characters.

Adobe has promised to fix this in a future patch, but in the meantime, the workaround is simple: close the Info panel when you don't need it.

The story behind this bug is kind of interesting:

Yesterday InDesign CS3 crashed repeatedly every time that I backspaced quickly to delete text in a lengthy file I spent all day editing. Each time that it crashed, I obediently submitted a description of the problem using the Adobe Crash Reporter.

Much to my delight, I received an email today from Adobe thanking me for submitting the reports, and informing me that after looking into it, they discovered the cause of the crash. They advised me to close the Info panel, and promised to fix the bug in a future dot release.

This is quite a nasty bug, but closing the Info palette DOES work around the problem. I was absolutely floored and amazed by the quick, personal reply to my crash reports. This prompt, customer-facing attitude is one reason why Adobe is successful.


Explore the world of Kuler

Visit kuler.adobe.com to view thousands of color themes created by a huge community of users. Create and contribute your own color themes, and download themes that you like as Adobe Swatch Exchange files for easy use in InDesign, Illustrator or Photoshop.

The interface used in Kuler to create new color themes is similar to the new Live Color feature in Illustrator CS3, which lets you create a color and then quickly find complementary colors, split complements, analogous colors, etc.

Illustrator CS3 communicates directly with Kuler via the new Kuler palette (found in Window > Adobe Labs > Kuler) in Illustrator.

Mac users can download the Kuler Dashboard Widget from the Kuler web site for another easy way to quickly access Kuler.

Tuesday, April 24, 2007

Adobe Swatch Exchange (ASE) files

InDesign, Illustrator and Photoshop CS2 and CS3 all support the exchange of colors via ASE files. In other words, you can easily use colors you've created in Illustrator in an InDesign project, or colors you've created in Photoshop in an Illustrator project, or vice versa. Here's how:

1. In any of these three applications, select the colors in the Swatches palette that you want to exchange.

2. In the Swatches palette or Swatches panel menu of InDesign, Illustrator or Photoshop, choose the following:

  • InDesign CS2: Save Swatches for Exchange
  • InDesign CS3: Save Swatches
  • Illustrator CS2: Save Swatches for Exchange
  • Illustrator CS3: Save Swatch Library as ASE
  • Photoshop CS2/CS3: Save Swatches for Exchange

This will create a small .ASE file that you can store wherever is convenient. Then, to use these colors in another InDesign, Illustrator or Photoshop project:

1. Choose one of the following from the Swatches palette or Swatches panel menu in InDesign, Illustrator or Photoshop:

  • InDesign CS2/CS3: Load Swatches
  • Illustrator CS2/CS3: Open Swatch Library: Other Library
  • Photoshop CS2/CS3: Load Swatches

2. Navigate to where you previously saved the ASE file, and select it. The colors you saved in the ASE file will be loaded into your swatches palette, ready for you to use.

Swatches in any color model (CMYK, RGB, PANTONE, etc.) can be saved and exchanged between projects in this manner. Tints of colors and gradient or pattern swatches cannot be saved as ASE files.

Friday, April 20, 2007

Adding color to grayscale images in InDesign

InDesign allows you to easily add color to a placed image, with certain restrictions:

  • The image must be saved as a grayscale or bitmap image. (Choose Image > Mode > Bitmap or Image > Mode > Grayscale in Photoshop).

  • The image must be saved in PSD, TIF, BMP or JPG format.

  • If the image is in PSD format, it may contain multiple layers, but the bottom layer must be opaque. In other words, you cannot apply color to a PSD image with a transparent background in InDesign.

To add color to an image, select the image with the Direct Selection (white arrow) tool, and then select a color from the Swatches palette or the Color palette.

Wednesday, April 18, 2007

Missing buttons in Acrobat 8

When you first run Adobe Acrobat 8 Standard or Professional, you will notice the new, streamlined interface. However, on closer examination, you may be frustrated because some of the buttons in the toolbar that you have become accustomed to in Acrobat 6 or 7 are missing in version 8. For example, Acrobat 8 no longer displays the buttons for switching to single page or two-up view, or to go forward or back.

The good news is that in Acrobat 8, you can choose Tools > Customize Toolbars to select exactly which buttons you want to display in each toolbar.

Monday, April 16, 2007

Converting QuarkXPress files to InDesign

Not new, but I keep getting questions about this: Adobe InDesign can convert QuarkXPress 4 or older files by simply choosing File > Open in InDesign, and opening the QuarkXPress file. The Quark file is converted on the fly, and opens as an untitled document. The conversion works pretty well. In general, the page geometry (master pages, location and size of text and graphic frames, style attributes and colors) converts well. For various technical reasons, the location of text and graphics within the boxes often will move and require adjustment. For further information on what can go wrong, and how to fix it, see the handout I've prepared on the topic here.

But what do you do about QuarkXPress 5, 6 or 7 files? Get yourself a copy of Q2ID from Markzware. This is a handy plug-in for InDesign that, once installed, quietly allows InDesign to open and convert any version of Quark file using File > Open in InDesign.

Adobe begins shipping CS3

Adobe began shipping the CS3 versions of the Design and Web suites today. As previously announced, the video suite (Production Premium) is promised for the third quarter of 2007.

Thursday, April 12, 2007

Enter is not Return

I was reminded of this today by a note from a training client (thanks Laurie!): don't get the Return and Enter keys on the keyboard mixed up. They are not interchangeable in InDesign and QuarkXPress. Here's why:

When you are typing text in either program, the Return key starts a new paragraph. Hitting the Enter key (on the numeric keypad) inserts a Column Break in InDesign and QuarkXPress, which forces the text that follows to jump to the top of the next column in a multi-column text box, or to flow out of the box if it is a single-column text box.

So if you accidentally, or out of habit, press the Enter key when you should press the Return key, your text may "disappear", jumping to an unexpected location.

Wednesday, April 11, 2007

@issue: A "must read"

Work came to a halt yesterday at Gilbert Consulting world headquarters when the latest copy of @issue: The Journal of Business & Design arrived in the mail. Published twice a year by the Corporate Design Foundation and sponsored by Sappi Fine Paper, this beautiful magazine is a "must read" for anyone allied with the design industry. Vol. 12, No. 1 contains in-depth articles about the application and integration of design at Herman Miller, McDonald's, Oakley and Target. You will want to save each issue of this no-cost, ad-free journal on your bookshelf. Subscribe on-line here.

Monday, April 09, 2007

Updating InDesign tables with new text

If you frequently use InDesign tables, you've probably encountered the need to update the data in a table without losing the table formatting. Here are two great solutions:

1. For InDesign CS and CS2, get the clever PopTabFmClip script from PDS Associates. Only $25, this handy script makes it effortless to copy a range of cells from an Excel spreadsheet, a Word table, or another InDesign table, and paste these the data from these cells into an existing InDesign table. All the cell, table and paragraph formatting of the destination table is faithfully preserved.

2. InDesign CS3 has much of this same capability built-in. It doesn't preserve merged cells and paragraph styles as nice as the PopTabFmClip script, but works well otherwise. For this to work, first choose Preferences > Clipboard Handling, and select When Pasting Text and Tables from Other Applications, Paste: Text Only. Then, copy a range of cells from an Excel spreadsheet, a Word table, or another InDesign table, select the table cell in the upper-left corner of where you want the new data to be pasted, and then choose Edit > Paste. The cell, table and paragraph formatting of the destination table is preserved.

(A quick way to select a single InDesign table cell is to click inside the table cell with the Type tool, and then hit the Esc key)

Friday, April 06, 2007

InDesign Text Wrap tips

I've had a lot of questions recently about how InDesign handles Text Wraps, so I thought I'd try to clarify this.

What QuarkXPress calls a Runaround, InDesign calls a Text Wrap. In QuarkXPress, every object has a runaround turned on by default. In InDesign, all objects have text wrap turned off by default.

QuarkXPress runarounds only work if the order in which objects are stacked on the page is correct. InDesign text wraps work regardless of the stacking order of objects.

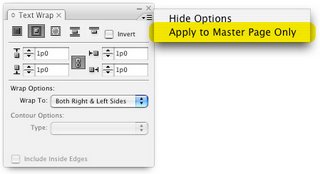
In InDesign CS2, if an object on a Master Page has a text wrap applied, it will only affect text frames that are also located on the master page. Text on document pages cannot wrap around master page items. A new feature of InDesign CS3 is the ability to choose whether text wraps applied to master page objects affect document page text. This option is located in the Text Wrap panel menu.

In InDesign, if you need to have a text wrap applied to a graphic frame, but then you need to put some text in a frame on top of the graphic, do this: select the text frame that you want to put on top of the graphic, right-click, and choose Text Frame Options from the context menu. Select the Ignore Text Wrap option in the Text Frame Options dialog box, and click OK. This will cause the text frame to ignore any text wrap that may be applied to other frames it encounters.

Wednesday, April 04, 2007

Take your text to the cleaners

Text Cleaner is an indispensable (Macintosh only) application that allows you to easily perform multiple find/change routines in text with one command. For example, you could change all multiple spaces to a single space, change all double dashes to em dashes, change three periods to ellipses and remove all extra returns in your text with one command.

Text Cleaner is a stand-alone application, but when you run it, you can tell it to "clean" the text that you have selected in InDesign or Quark. Or, to use it with other programs, you can copy text to the clipboard, "clean" it, and then paste the text back in place.

I highly recommend this handy program. The developers have told me that Text Cleaner will soon be available for InDesign CS3, as well as InCopy.

Monday, April 02, 2007

The InDesign text-scaling snafu

If you have ever encountered the dreaded parentheses-in-the-font-size-field problem in InDesign CS/CS2, you know how maddening this can be. This is where the font size field in the Control or Character palette displays something like "20 pt(11)". InDesign then refuses to allow you to enter a new exact type size in the field.

In CS2, here's how to avoid and fix the problem:

1. To avoid the parentheses-in-the-font-size-field problem, don't group your objects before you scale them. You can still scale multiple objects together without grouping them by either:

a. Command/Ctrl-Shift dragging a corner handle of a text box in your collection of multiple objects
b. Using the Scale Tool in the tool palette
c. Using the Scale fields in the Control palette or Transform palette
d. Using the Free Transform tool in the tool palette.

(In CS3, no matter how you group and scale your objects, you will never get the parentheses-in-the-font-size-field problem. You will only see this problem in CS3 if the objects were scaled incorrectly in CS2, and the file was converted to CS3.)

2. To fix the parentheses-in-the-font-size-field problem when it does occur, do the following:

a. Ungroup the objects
b. Select the text box with the Selection (black arrow) tool
c. Choose Scale Text Attributes (CS2) or Redefine Scaling as 100% (CS3) from the Control palette menu.