Showing posts with label Bridge. Show all posts

Wednesday, June 26, 2019

Adobe Bridge update adds support for Dimension files

The June 2019 update of Adobe Bridge CC adds support for the Dimension .DN file format, so Dimension files can be previewed in Bridge. Previews will only appear for files that have been saved with a recent version of Dimension—older files won't preview.


More information about the recent Bridge update can be found here.

Friday, November 12, 2010

Drag and drop is OK!

Did you know that you can drag and drop content (images, logos, text files, Word documents) from Adobe Bridge, the Macintosh Finder or Windows Explorer into Adobe InDesign or Illustrator? You can even drag and drop multiple files at once onto your pages this way.

What prompted this blog post is that I keep getting asked: "I know I can drag and drop content into InDesign, but I don't trust it...where does it put my files?"

It's perfectly OK to bring content into InDesign and Illustrator this way. If you look closely at the Links panel in InDesign, you'll see that a link to the graphics that have been dragged and dropped has been created, exactly as if you had done File > Place. There is absolutely no difference in the end result between File > Place and the drag and drop method.

In the case of Illustrator, dragging and dropping a graphic will result in a linked graphic, and adding the shift key during drag and drop will result in an embedded graphic.

Monday, June 21, 2010

Preview multiple pages in Bridge

The Preview panel (Window > Preview) of Bridge lets you view each page of multi-page documents.

1. You can view each page of a multi-page InDesign CS5 file. For this to work, in InDesign CS5 you must choose Preferences > File Handling, and choose All Pages from the Pages drop down list.

2. You can preview each page of any multipage PDF file

3. You can preview each artboard of a multiple-artboard Illustrator CS4 or newer file.

Tuesday, June 01, 2010

A nice touch

I was using Bridge CS5 today, and accidentally hit Command-d. To my surprise, the dialog box pictured below appeared.

I thought this was an awfully nice touch. Instead of just taking over the popular Command-d shortcut, which has been problematic because it is used for different things in the operating system, InDesign and Photoshop, Bridge gives you a choice. The first time you press Command-d in Bridge CS5, you are able to specify what you want the shortcut to do. No need to learn how to use a keyboard shortcut editor. Nice!

Friday, May 21, 2010

Quickly enter Metadata in Adobe Creative Suite

Command-option-shift-i (Macintosh) or ctrl-alt-shift-i (Windows), or File > File Info displays a dialog box that lets you view and enter metadata about the file you’re currently editing. This works in InDesign, InCopy, Illustrator, Photoshop and Bridge.

Unfortunately, Flash, Fireworks, Soundbooth and Acrobat march to the beat of a different drummer:

In Flash, the menu command is still File > File Info, but there's no keyboard shortcut assigned.

In Fireworks, the menu command is File > File Info, but the keyboard shortcut is command-option-shift-f/ctrl-alt-shift-f.

In Soundbooth, metadata is entered in the Metadata panel (Window > Metadata).

In Acrobat, you access the metadata for the current document by choosing File > Properties, or pressing command-d (Macintosh) or ctrl-d (Windows).

Wednesday, April 28, 2010

Spotlight sees PSD layer names, Adobe Bridge doesn't

Did you know that the Mac OS X Spotlight feature has the ability to "see" the layer names in Photoshop .psd files? If you have a layer named "timbuktu" in a Photoshop .psd image, and you do a spotlight search for "timbuktu" that image will be found. This could be useful if you misplace a file and for some strange reason you can't recall the filename but you do remember the name of one of the layers. Or, if you need to display all the files in a particular folder to which you've applied a Hue/Saturation adjustment layer.

You can also quickly view the layer names in a .psd file by selecting the file in the Macintosh Finder and choosing File > Get Info.

As an alternative to Spotlight, check out EasyFind. I use this free utility frequently and love it.

Alas, Adobe Bridge, with all of its metadata wonderfulness, can't search for or display Photoshop layer names.

Monday, January 25, 2010

Pimp my Image Processor

The Image Processor in Photoshop CS4 is a simple, fast way to quickly resize and convert a bunch of images to JPEG, PSD or TIFF format. One shortcoming of the Image Processor is that if you use it to export JPEG images, they're converted to RGB. Thankfully, this Photoshop feature is written in JavaScript, which means that anyone who knows a bit of JavaScript and Photoshop can modify it.

Well, Mike Hale has done just that. He's tweaked the Image Processor script to add support for exporting CMYK JPEGs as CMYK, as well as support for exporting PNG images. You can download his modified script here. To install the script:

1. Unzip the downloaded file. Rename the Image Processor CS4 PNG.jsx file to Image Processor.jsx

2. In your Adobe Photoshop CS4/Presets/Scripts/ folder, move the file Image Processor.jsx into another folder somewhere as a backup

3. Copy the Image Processor.jsx file from step 1 into the Adobe Photoshop CS4/Presets/Scripts folder.

You can access the Image Processor script from either File > Scripts > Image Processor in Photoshop, or, better yet, from Tools > Photoshop > Image Processor in Bridge.

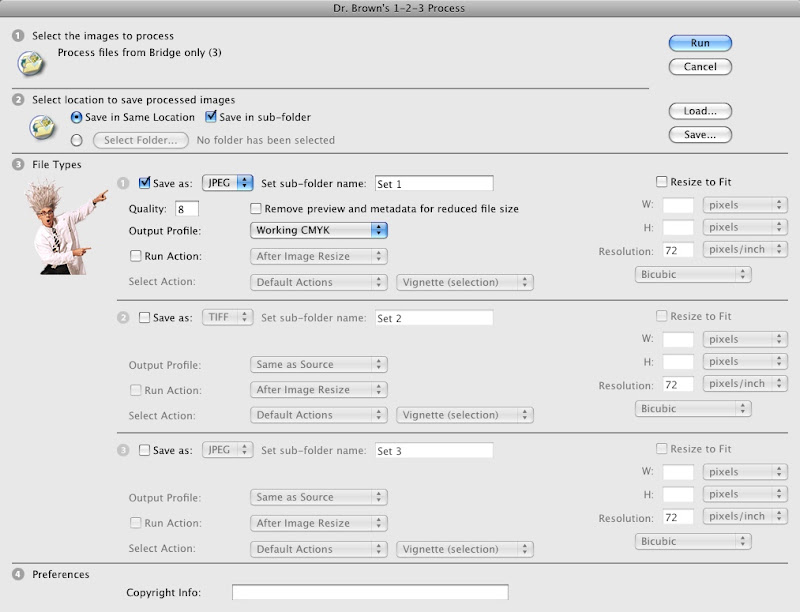
Another script for exporting CMYK JPEG images is the Dr. Brown's Services collection of scripts from Adobe's own Russell Brown. The Dr. Brown 1-2-3 Process script that's included with the collection allows you to not only export CMYK JPEGs as CMYK, but also to convert RGB to CYMK or vice versa while exporting.

Tuesday, December 22, 2009

Great digital photography resource

My neighbor and extremely talented architectural photographer Paul Crosby alerted me to the "dpBestflow.org" web site.

This amazing resource, developed by ASMP and funded by the Library of Congress, contains in-depth content about all things related to digital photography, with an emphasis on best practices and recommended workflows. If you're a photographer who wants to know more about how to shoot, organize, process and archive large volumes of images, you need to check this out.

Even if you aren't a photographer, you should check out the sections on color, data storage, an excellent section on metadata, backup, and the comprehensive glossary.

Thursday, October 23, 2008

Free vector artwork

Today, for your perusal and enjoyment, I give you three very different sources for free vector artwork:

First up, via Mordy Golding's excellent blog, is Go Media's Arsenal. Arsenal is heavy on skulls, zombies, horror, techno, etc. If that isn't your thing, scroll down further through their "vector packs", and you will see city skylines (including Minneapolis!), birds, lightning, amazing trees and more, all at very low cost. Visit their freebies page for a free sample pack of 42 pieces of art. Mordy has arranged a deal with Go Media for additional free art here. Go Media's blog is interesting reading as well.

Briar Press is on the total opposite end of the design spectrum. This is a community of printers and artists who are passionate about letterpress printing. The Cuts & Caps section of the Briar Press web site contains over 500 beautiful ornaments, initials, dingbats, and other artwork scanned from old specimen books and converted into vector line art. Note that these are free for non-commercial use governed by a Creative Commons license.

And finally, if you just need a "clip art" image of some random object, try the Open Clip Art Library. This is an "archive of user contributed clip art that can be freely used." Note that you can download a single package containing over 6000 pieces of art in the downloads section, or browse and keyword search thousands of newer images here. The quality of the artwork varies. Some is really nice, and some..., well, not so much. All the artwork is in SVG format. SVG files can be previewed and browsed in Bridge, and opened and edited in Illustrator, but will need to be re-saved as an .AI or .EPS file before placing in InDesign or other software for print use.

Wednesday, October 15, 2008

Adobe Creative Suite 4 now shipping

According to Adobe, Adobe Creative Suite 4 began shipping yesterday (October 15). You can read the official press release here. I expect that its the US English version that is shipping now. Often, versions localized to non-English languages ship later than the English version. But I don't see any information in the press release about this.

Wednesday, September 03, 2008

Adobe Creative Suite 4 "preannounced"

Adobe has taken the unusual (for them) step of "preannouncing" the announcement of CS4. In other words, they're telling the public that they will announce (not ship) CS4 on September 23. You can sign up to view a Web broadcast of the announcement here.

While this may seem awfully soon on the heels of CS3, its right on schedule with the timeline that Adobe has discussed publicly of releasing a new Suite every 18-24 months. CS3 was released in March of 2007.

Wednesday, August 06, 2008

A less-expensive Bridge

If you're reading this, you no doubt have a copy of Adobe Bridge, since it is included with every copy of Creative Suite 2 and 3, as well as many of the "point products" in the suite when they are purchased alone, such as InDesign, Photoshop and Illustrator.

But what if you have a colleague that would like to use Bridge, but they don't want to spend the money to purchase a point product, much less the entire Creative Suite? Perhaps a co-worker wants to add XMP metadata to images, or to visually search for graphics files, and Bridge would be the perfect tool for their needs. Unfortunately, Bridge is not available for purchase as a standalone product.

But, if you purchase a copy of Contribute CS3, which sells for $169 US single copy price in the Adobe Store, Adobe Bridge is included. So this is a less-expensive way to obtain a legal copy of Bridge, without shelling out $600 or more for a copy of Illustrator, Photoshop or InDesign.

Wednesday, July 09, 2008

Use that scroll wheel!

Anyone using creative applications on either a Macintosh or Windows computer should be using a two button mouse with a scroll wheel. The scroll wheel allows you to scroll horizontally and vertically as well as zoom in and out in most applications. Modifier keys for the scroll wheel were inconsistent in CS2 applications, and made more consistent in CS3. See the tables below for a summary of modifier keys for Macintosh and Windows.

Using a wheel mouse in Macintosh design applications

Scroll vertically Scroll horizontally Zoom
InDesign CS2 wheel only shift or option command
Illustrator CS2 wheel only command not available
Photoshop CS2 wheel only command option
Bridge CS2 wheel only not applicable control (resizes thumbnails)*
InDesign, Illustrator, Photoshop CS3 wheel only command option
Bridge CS3 wheel only not applicable control (resizes thumbnails), or wheel only (when viewing a preview with the loupe)*
Acrobat 7-9 wheel only not available option
* in order to use the control key plus the mouse wheel, the Mac "Keyboard & Mouse" System Preference for "Zoom using Scroll Wheel..." must be turned off


Using a wheel mouse in Windows design applications

Scroll vertically Scroll horizontally Zoom
InDesign CS2 wheel only alt ctrl
Illustrator CS2 wheel only ctrl alt
Photoshop CS2 wheel only ctrl alt
Bridge CS2 wheel only not applicable ctrl (resizes thumbnails)
InDesign, Illustrator, Photoshop CS3 wheel only ctrl alt
Bridge CS3 wheel only not applicable ctrl (resizes thumbnails), or wheel only (when viewing a preview with the loupe)
Acrobat 7-9 wheel only not available ctrl

Wednesday, June 25, 2008

Deleting files in Bridge

Amy wrote:

I'm working in Bridge and a couple of things perplex me. When you hit delete, where does the deleted file go? I don't find it in the trash. Is it completely deleted as soon as you hit the button? And, I'm now using Bridge instead of iPhoto. And I'm importing my images from my Canon camera directly into Bridge. Unlike iPhoto, I don't see a "delete images from camera" option. Does Bridge let you do that?

Bridge follows the same rules for deleting files as the Macintosh and Windows operating systems: files on your local hard drive are moved to the trash, files that reside on a server are deleted immediately. The one exception is Bridge CS3's "reject" label feature. If you choose InDesign > Preferences, choose General, and then click on the Reset all warning dialogs button, you will get receive additional dialog-box-based feedback and options the next time you press the delete key.

As Amy mentions, Bridge CS3 has a new feature (File > Get Photos from Camera) for transferring images from a digital camera or card reader, much like iPhoto. Unfortunately, Bridge cannot delete the images from the camera after they are transferred, so the images will have to be deleted manually using the controls on the camera.

Monday, April 07, 2008

Custom keyboard shortcuts in Bridge

InDesign, Photoshop and Illustrator all let you add custom keyboard shortcuts using the Edit > Keyboard Shortcuts command. Unfortunately, Bridge doesn't have such a command. If you use a Mac, there is a neat way to add keyboard shortcuts to Bridge menu items. As pointed out by a reader a few days ago, you can use an OS X Preference setting to do this. Here's how:

1. Launch an application that you want to add a keyboard shortcut to. Choose the menu command that you want to add a shortcut to, and write down the exact spelling of item the way it appears in the menu. If I wanted to add a shortcut to the File > Place > In Photoshop command in Bridge, I would write down In Photoshop.

2. Go to your Mac OS X System Preferences, and click on the Keyboard & Mouse preference.

3. Click on the Keyboard Shortcuts category at the top of the dialog box.

4. Click on the plus sign in the lower-left corner of the dialog box to add a keyboard shortcut.

5. For the "Application", choose your application if it is listed in the drop down menu, or choose Other at the bottom of the list and browse to find your application.

6. For the "Menu Title" type the exact name of the command you wrote down in step one.

7. Place your cursor in the "Keyboard Shortcut" field, and type the keyboard shortcut you want to assign. Be sure to choose a unique shortcut that is not already in use by the application or OS X.

8. Click the Add button, and you're finished!

This procedure will work with many OS X applications, but unfortunately does not work in Acrobat Professional 8.

Wednesday, February 20, 2008

Case sensitive searches in Bridge

One of the great features of Bridge is the ability to do a Find based on the metadata in your files. I generally try to add all keywords and other metadata all lowercase, except for proper names. But you may not know if the text you are searching for is upper or lowercase. Luckily, if you search for a word or phrase in any of the individual metadata fields in Bridge CS3, the search is not case-sensitive. However, if you select the "All Metadata" option, the search is case-sensitive.

For example, if you have some images with "Horse" with a capital "H" in the description field, if you search for "Description contains horse" (lowercase h) it will still find the image. However, if you search for "All Metadata contains horse" it will not find the image. You would need to choose "All Metadata contains Horse" (uppercase h) for the image to be found.

I can't think of any logical reason why Bridge would be intentionally designed this way, and have reported this as a bug to Adobe.

Monday, February 11, 2008

Drag and drop tricks with Bridge

One of the most useful features of Adobe Bridge is the ability to drag and drop assets (images, artwork, logos, and even text files) from Bridge into other Creative Suite programs, including InDesign, Illustrator, Dreamweaver, Flash and Fireworks, (as well as Word, Powerpoint and Publisher).

To make dragging and dropping easier, switch to “Compact Mode” in Bridge by clicking on the compact mode button in the upper-right corner of the window or hitting command-return (Mac) or ctrl-enter (Windows). This does three things:

1. It causes the Bridge window to stay on top of all other windows

2. It returns the Bridge window to the previous size and location from the last time you entered Compact Mode

3. It hides all other Bridge Panels except for the Content panel.

Here's another neat trick: Say you have a Photoshop file open, you're browsing through some images in Bridge, and you locate one that you want to add to your Photoshop file as a new layer. Unfortunately, you can't drag and drop from Bridge into Photoshop. But if you select an image in Bridge CS3 and choose File > Place > In Photoshop, the image will be added to your existing Photoshop file as a new Smart Object layer.

Monday, February 04, 2008

Adobe Stock Photos service to be discontinued

Adobe announced today that Adobe Stock Photos is being discontinued, effective April 1, 2008. I'm sorry to see this unique Web service go, as it integrated the Stock Photo search, comp, and purchasing experience seamlessly with Adobe Bridge, InDesign and Illustrator. More information and a utility for uninstalling the Adobe Stock Photos features from the Creative Suite can be found here.

Friday, November 16, 2007

Updates for Bridge, Photoshop & Camera Raw

Adobe has released updates for Photoshop (10.0.1), Bridge (2.1.1) and Camera Raw (4.3). In particular, the Bridge update claims to address a couple of things that can cause Bridge to crash. Access the updates through Help > Updates in any Creative Suite application.

Wednesday, October 24, 2007

InDesign's Info Panel to the rescue

I encountered a head-scratcher today. As I helped a client with a layout, we were trying to locate an elusive image on their file server. We were using Adobe Bridge (of course!) to browse the files visually, but we noticed that some of the images with a .JPG extension did not display thumbnail previews.

Photoshop gave me an error when I tried to any one of these images. But the same images could be placed in an InDesign layout. That seemed strange, so I selected a placed image and looked at the Info Panel (Window > Info) in InDesign. Sure enough, the Info panel said that the image Type was PNG, not JPEG. Someone had tried to change the image from PNG format to JPEG format by simply changing the filename extension. This, of course doesn't work. To change image file formats you need to use a conversion utility or open the image in Photoshop and choose File > Save As.

Without this bit of information in the Info Panel, I probably would have wrongly concluded that the files were damaged. Changing the filename extension back to PNG allowed the image to be opened in Photoshop.