Thursday, July 25, 2013

Measuring in Adobe Acrobat

I was setting up an InDesign template yesterday, and I had to match certain aspects of a client-provided PDF, such as margins, distance between various lines, etc. Sure, I could print the PDF and measure the items with an old-fashioned ruler. Or, I could place the PDF on a separate layer in my InDesign document, lock it, and position objects on top of it. Or, I could open the PDF in Illustrator and measure things there. But for this project, I found the measurement capabilities built in to Acrobat X and Acrobat X1 Pro to be the simplest. Here's how I did it:

(By the way, Acrobat has had measuring tools since Acrobat 8 pro, but the location and function of the measuring feature may be different in versions prior to Acrobat X).

1. In Acrobat, click on Tools to reveal the Tools pane.

ScreenSnapz001

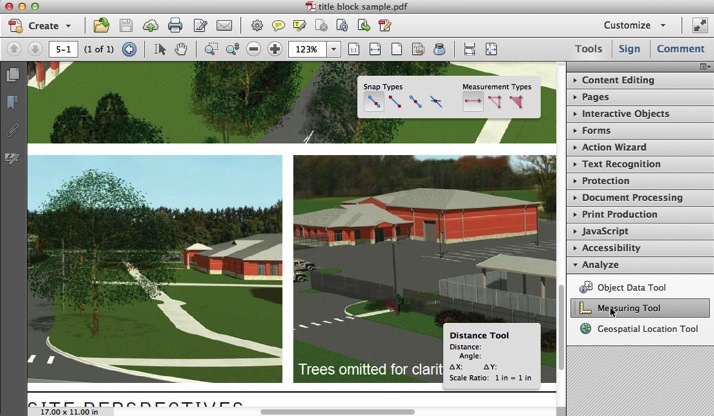
2. In the Panels menu, choose Analyze to display the Analyze pane.

ScreenSnapz002

3. Select the Measuring Tool. 

ScreenSnapz003

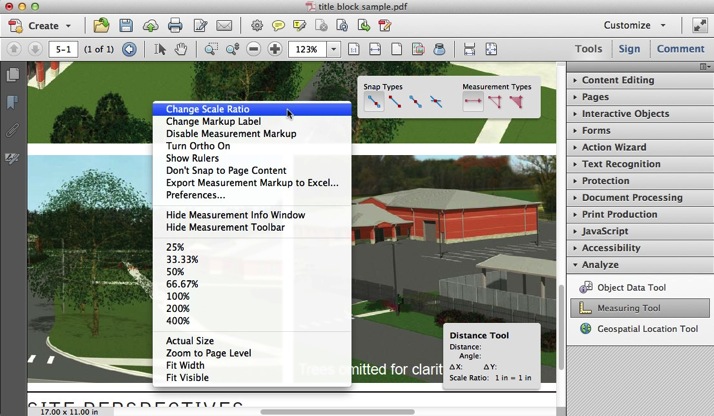
4. Right click on your document, and choose Change Scale Ratio to specify the measurement system you wish to use.

ScreenSnapz005

5. Click where you want to begin measuring, then click again where you want to end measuring. Click a third time to finalize the measurement, and you will see the distance displayed not only on the PDF file, but also in the Distance Tool "heads up display" on the screen.

ScreenSnapz004

Learn more details about the Acrobat Measuring Tool here.


Wednesday, July 17, 2013

Adobe looking for student reps

Adobe is "recruiting Adobe enthusiasts to help spread the Adobe Creative Cloud love on campus!"

According to Adobe, "as an Adobe Student Rep, you will teach your friends, classmates, and community tools and techniques to help them stand out with Adobe Creative Cloud. If you’re passionate about design or video and want hands-on marketing and event planning experience with a company that is changing the world through digital experiences, this program is for you."

Read more, and fill out an application here.

Wednesday, July 10, 2013

A shortcut and a warning

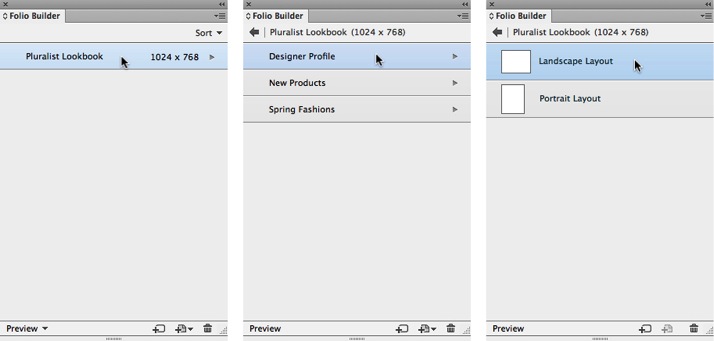
If you use InDesign and Adobe Digital Publishing Suite (DPS) to create tablet apps, you are no doubt familiar with the Folio Builder panel. The Folio Builder panel displays 3 "levels": the folio, article, and layout levels. You can navigate between these 3 levels by clicking on the forward and back arrows.

Views

A shortcut is that you can use the layout level to open InDesign files. In the article level of the panel, select the article you want to open, and click on the right pointing arrow. This will take you to the layout level. Double-click on the layout you wish to open, and the associated InDesign file will open in InDesign (assuming you haven't moved or renamed the InDesign file since you created the article). This is really handy.

However, here is the warning: If the InDesign file that you are opening with this method contains missing fonts or missing or outdated image links, the standard "missing links" and "missing fonts" warning dialogs that normally appear when opening a file with font or link problems will not appear. The missing fonts and links will still be flagged in Window > Output > Preflight, File > Package, Type > Find Font, and the Links panel, but you will not be alerted to problems as you open the file.

This is dangerous. I've filed this as a "bug report" with Adobe. Hopefully they will fix it!

Wednesday, July 03, 2013

Digital Publishing Pack scripts updated

On my web site I sell a package of scripts that I call "Digital publishing pack 1: scripts for Adobe DPS". These scripts take much of the pain out of using the Object States panel, and automates the creation of button-driven "reveal and hide" multi-state objects.

I just added a new script to the pack: this script allows you to add the selected object(s) to a selected multi-state object as a new state, with a single click. Without the script, you must copy your objects to the clipboard, select the multi-state object, select one of the states, duplicate the state, paste the objects into the state, and then delete the original objects from the state. Painful…but the script makes this painless.

If you frequently create multi-state objects for Digital Publishing Suite projects, these scripts are a "must-have". The package of 7 scripts is a bargain at $19.95/workstation. No knowledge of scripts required…full installation and use instructions are included.

ScreenSnapz001

Monday, July 01, 2013

Automatically extend a background in Photoshop

If you need to extend a photo by adding more sky, clouds, grass, snow or other organic "background", here's the easy way, using Photoshop CS5 or later:

1. Choose Image > Canvas Size. Increase the width or height of your image, choose the anchor, set the Canvas extension color to White, and click OK.

ScreenSnapz001


ScreenSnapz003

2. Choose the Quick Selection Tool (W) in the tool panel. Be sure that "Auto-Enhance" is selected in the Options bar at the top of the screen. Then select the additional white canvas you added to the photo by dragging through it with the Quick Selection Tool. 

3. Press the Delete key.

4. In the Fill dialog box, select Use "Content-Aware" for the Contents. Click the OK button.

ScreenSnapz004


ScreenSnapz005