Showing posts with label InDesign. Show all posts

Monday, August 28, 2017

Compatibility of InDesign scripts with future updates

One of the things that occupies a great deal of my time is writing custom scripts to automate Adobe InDesign. Most of these scripts are custom solutions to solve specific client workflows, but I have a handful of free public scripts available here.

The question I’m asked most frequently is this: “Will a script written for today’s version of InDesign continue to work in future versions of InDesign?" The short answer is “usually."

Scripts automate InDesign by accessing commands built into InDesign’s “document object model” or DOM. This DOM is an exhaustive, invisible-to-the-user list of commands available “under the hood” in InDesign that programmers can access to automate InDesign features and functions. 

There are no guarantees about what Adobe might do in the future—but this DOM has not undergone any type of wholesale change in many, many years. As Adobe adds and changes features in InDesign, typically only the commands in the DOM related to those features change.

So, for example, if you have a script that automates some sort of find/change function, you could reasonably expect this script to continue to function in future versions of InDesign until Adobe decides to change something with the way InDesign performs Edit > Find/Change. Many scripts originally written for InDesign CS3 10 years and 7 major versions ago still run perfectly today.

If Adobe does change something in the DOM that causes a script to cease working properly, typically the charge to update the script is a small fraction of the original development cost of the script.

Monday, December 12, 2016

Upcoming seminar series in Minneapolis: Digital Publishing with InDesign

In cooperation with the Twin Cities Creatives Group, I’m presenting a special January seminar series in Minneapolis about Digital Publishing with Adobe InDesign.

Screenshot 2016 12 12 19 10 40

This is a low-cost 3-session seminar series for graphic designers, production artists, art directors, and other creatives and communicators who want to learn how to create multi-screen, digital output from InDesign CC. You can attend one, two, or all three sessions held on three consecutive Wednesday mornings in downtown Minneapolis.

The fee is $50 per session, or register for all 3 sessions for $130.

If you have any interest in learning how to create digital output for Web sites, Web apps, Mobile apps, or EPUB, be sure to check out the seminar descriptions. I’d love to see you in January!

Monday, August 29, 2016

InDesign Publish Online: An excellent PDF alternative

Publish Online,a new feature first introduced in InDesign CC 2015, is by far the easiest and cheapest way to publish a pixel-perfect interactive document to the Web.

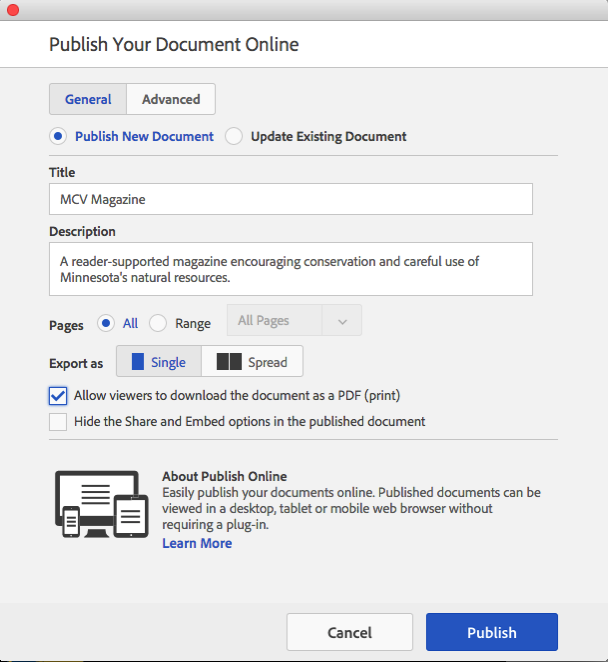
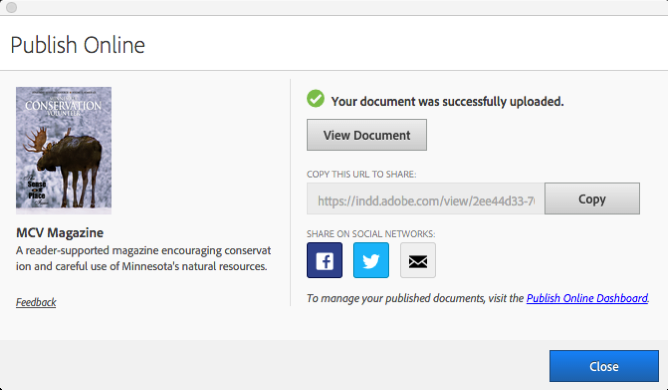
From any InDesign layout, just click the Publish Online button at the top right corner of the screen, answer a few questions, and the layout is uploaded to a Web site hosted by Adobe, and the URL is given to you. You can then include this URL on your Web site, in an email, or whatever you want to do with it to drive people to your content.

Screen Shot 2016 07 15 at 10 31 45 AM Screen Shot 2016 07 15 at 10 42 37 AM

Publish Online is ideal for richly formatted documents that include some interactivity and are free to the public. They are an excellent alternative to PDF for many uses. Here are a couple of really nice examples designed and created by my friend Brian Donahue, a talented Twin Cities-based designer.

Minneapolis Parks Foundation Annual Report

The Center for Irish Music Annual Report

Publish Online works really well. But the main drawback for many people is that the content must be hosted on Adobe’s servers. You cannot download the code and put it on your own Web server. Nor can you customize the URL. It will begin with the domain indd.adobe.com. There is no way to monetize the content, or protect it with a password.

Publish Online not the right fit for your requirements? I’ve written a comprehensive Digital Publishing Technology Guide to help you sort out your options for digital publishing from InDesign.

Need help creating interactive content for your Publish Online projects? These 4 courses from Lynda.com can show you how! 

Monday, June 27, 2016

Never stop learning

If you think you know everything you need to be a creative, efficient, effective graphic designer, art director, or production artist, think again. Even if you are totally on top of your game, there is certainly more you can learn about the tools you use everyday, such as Adobe InDesign, Illustrator, or Photoshop.

I want to be sure that you know about 2 exciting educational opportunities that are coming in 2 weeks to the Minneapolis/St. Paul, Minnesota area.

First, July 10-13 is a rare opportunity to learn Illustrator and Photoshop techniques from pros such as Deke McClelland, Bert Monroy, Von Glitschka, and Sharon Steuer. The Creative Pro Conference is specifically for Creative Professionals who use Illustrator and Photoshop. You can choose to attend the entire conference, just the preconference, just the Illustrator sessions, or just the PhotoShop sessions. This is going to be a great conference!

Conference image

Second, at 7pm on July 13, Anne-Marie Concepcion is going to be the featured speaker at the popular Twin Cities InDesign User Group meeting at Concordia University of St. Paul. Anne-Marie is co-founder of the Creative Publishing Network, owner of Seneca Design & Training in Chicago, popular Lynda.com author, and co-host with David Blatner of the popular InDesignSecrets podcast and Web site. Don't miss this opportunity to hear one of the best InDesign presenters around!

I hope to see you at one of these events!

Wednesday, December 16, 2015

I've been busy!

I spent many hours the last few months writing and recording 2 brand-new courses for Lynda.com, and completely updated and re-recorded an existing course. All 3 courses have now been released. Check them out!

Screen Shot 2015 12 16 at 8 30 45 AM

In InDesign Scripting Made Easy I’ve created a course for InDesign users to learn how to obtain, install, use, create, and modify scripts to help automate repetitive design and production tasks. Every InDesign user should watch this course!

Screen Shot 2015 12 16 at 8 31 10 AM

In InDesign: Fixed-Layout EPUB Interactive Techniques & Publish Online I show how to add a wide variety of interactive effects to InDesign documents that will be output as either fixed-layou EPUB or Publish Online projects. I show how to create slideshows, animation, quizzes, audio and video, buttons that trigger actions, and much more.

Screen Shot 2015 12 16 at 8 32 17 AM

My popular Up and Running with Dropbox course has been viewed by thousands since I released it in April of 2014. Since the initial recording, a lot has changed in Dropbox-land, so I updated and re-recorded the entire course. Think you know how to use Dropbox? Watch the course, and I can almost guarantee that you’ll learn something!

Tuesday, November 10, 2015

DPS 2015 splash screen template

Every Adobe Digital Publishing Solution app for iOS must contain 6 splash screens in the following sizes: 1536 x 2048, 2048 x 1536, 640 x 960, 640 x 1136, 1242 x 2208, and 2208 x 1242  pixels. These splash screens must be saved in the PNG format. The splash screen appears on the screen momentarily while the app loads.


Screen Shot 2015 11 10 at 8 48 20 PM


I’ve created an InDesign template to make creating these various sizes of the splash screens quick and easy. You can download the template here.


Screen Shot 2015 11 10 at 8 43 03 PM


The template contains 6 pages in each of the pixel dimensions listed above. Create your desired artwork on the pages, then choose File > Export and export the pages in PNG format. Fill in the Export PNG dialog box as shown below, and PNGs with the exact dimensions required will be output.


Screen Shot 2015 11 10 at 8 44 58 PM


If you are looking for a similar template for DPS 2014, see this post.

Monday, November 02, 2015

New tablet publishing article

The latest issue of InDesign Magazine is out, and I wrote the feature article this month! In the article “Tablet Apps InDepth” I compare 6 solutions for publishing content into native apps for tablets (and phones). I compare and contrast Adobe DPS, App Studio, Aquafadas, in5, Mag+, and Twixl Publisher, and then draw some conclusions about which solutions are best for which types of content, budget, and workflow.

IDM Issue 79 Page 01

Not a subscriber? You should be. Subscribe, or purchase single issues, at indesignsecrets.com/issues

Monday, October 26, 2015

Wow - I love Marcel Script!

Talented Twin Cities-based designer Carolyn Porter has designed a fantastic typeface, with a riveting back story. The typeface is called Marcel Script Pro, and is available from P22 Type Foundry. 

I love this script! It has extremely comprehensive OpenType support which can be accessed in InDesign, Illustrator, and Photoshop. The font consists of more than 1300 glyphs that capture the texture of ink on paper. 

Screen Shot 2015 10 26 at 8 21 22 PM

Along with the usual OpenType support such as discretionary ligatures, contextual alternates, swashes, and stylistic sets, Marcel Script Pro contains some unusual OpenType features:

A “www” ligature is included, to make that pesky and ugly world-wide-web acronym more attractive:

Screen Shot 2015 10 26 at 8 26 04 PM

You can add swashes before and/or after almost any glyph by typing @ and # one or more times to adjust the length of the swash:

Screen Shot 2015 10 26 at 8 31 04 PM

With Stylistic Set 11 applied, some cool things happen:

Typing ink* creates an ink spot. The font cycles through different spots each time you press the asterisk key:

Screen Shot 2015 10 26 at 8 36 05 PM

Typing “orn!” creates an ornamental swash. Each type you press the !, a different swash from a list of about 20 appears:

Screen Shot 2015 10 26 at 8 40 24 PM

The font has such a great back story: Here’s a short summary from the P22 Web site:

The font Marcel is named in honor of Marcel HeuzĂ©, a Frenchman who was conscripted into labor during World War II. During the months Marcel was in Germany, he wrote letters to his beloved wife and daughters back home in rural France. Marcel’s letters contain rare first-person testimony of day-to-day survival within a labor camp, along with the most beautiful expressions of love imaginable. The letters — stained and scarred with censor marks — were the original source documents used by designer Carolyn Porter to create a script font that retains the expressive character of Marcel HeuzĂ©’s original handwriting. 

In fact, the story is so compelling that it prompted Carolyn to write a book titled “Marcel’s Letters”. Read more about Carolyn's fascinating book project here.

I can’t imagine the labor of love this font must have been, and the countless hours that Carolyn put into researching and crafting the font. Good work Carolyn!

Wednesday, June 24, 2015

How to convert an image sequence to an animated GIF

Image sequences are an excellent way to create animation for Adobe Digital Publishing Suite. But an image sequence will not work in content exported to fixed layout EPUB from InDesign, or content exported using the new Publish Online functionality in InDesign CC 2015. So you might need to convert an image sequence to an animated GIF, which does work in fixed layout EPUB and Publish Online. Here’s how to do it.

1. Launch Photoshop (these instruction are written using Photoshop CC 2015, but the process is similar in several recent versions)

2. Choose File > Scripts > Load Files into Stack

3. Click Browse to select all the PNG or JPEG files in the image sequence, then click the OK button. If you have a lot of files making up the sequence, this step may take a few minutes.

Screen Shot 2015 06 24 at 11 53 24 AM

4. When it is finished, you’ll see that a single file has been created, with each image loaded into a separate layer. Choose Window > Timeline to display the Timeline panel.

5. Click the Create Frame Animation button in the Timeline panel. This will create a single frame in the Timeline panel.

6. In the Timeline panel menu, choose Make Frames From Layers

7. Choose File > Export > Save For Web

8. Choose one of the GIF Presets, choose the desired Looping option, and then click the Save button.

Screen Shot 2015 06 24 at 12 02 01 PM

Friday, May 22, 2015

A fix for the disappearing File Info dialog in InDesign

I’ve had a recurring problem for awhile where occasionally the File > File Info dialog box in InDesign CC gets “stuck” somewhere outside the bounds of my monitor. In other words, I’ll choose File > File Info, and the dialog box will apparently launch, because all my menu items get grayed out and I can’t do anything, but the box isn’t visible on the screen. But, since hitting the Esc key cancels any dialog box, I’m able to hit Esc and continue working.

But I need the File Info box for my work.

I discovered today that there is a file named “DVADialogPrefs.xml” located in the User Library folder in Preferences/Adobe InDesign/Version 10.0/en_US/DVADialogPrefs. (Hold down the Option key and choose Go > Library in the Finder to display the Library folder). Quitting InDesign, deleting the “DVADialogPrefs.xml” file, and restarting InDesign fixes the problem, and allows the File Info dialog box to display properly.

I suspect that InDesign gets confused about how many monitors I have, and where they are located, because I’m constantly plugging into different projection systems as I travel to do training and seminars. Hopefully this won’t happen to you, but if it does, at least you know how to fix it!

Friday, September 19, 2014

Adobe DPS preview bug

Beware of this bug when previewing DPS articles on a USB-tethered iPad...

When you tether an iPad to your computer with a USB cable, you can get immediate feedback of exactly how your layout looks on the iPad screen. If you’ve never done this before, here’s how:

1. Connect your iPad via a USB cable to your computer

2. Make sure that the iPad is turned on and “awake”

3. Run Adobe Content Viewer on the iPad

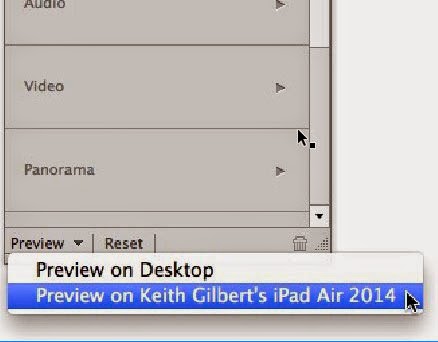
4. At the bottom of the Folio Overlays panel, click the Preview button. After a brief pause, a drop-down menu will appear with the name of your iPad listed. Choose this, and after a short delay the InDesign file you are working on will appear on the iPad screen.

ScreenSnapz001

But here’s the bug…If you have a Master Page displayed on your screen, the preview doesn’t work. The “Preview on [your iPad name]” option still appears in the drop-down menu, but the preview never displays on the iPad. The Desktop preview still works in this case, but not the iPad preview. 

So be sure to turn to an actual document page, not a master page, before previewing content on your iPad!

Thursday, August 21, 2014

How to create dual-orientation fixed layout EPUB from InDesign

The 2014 release of InDesign CC creates really nice fixed layout EPUBs that will work on iOS and Android devices. However, when you view your fixed layout EPUB on an iPad with iBooks, our content will appear in only a single orientation, either portrait only or landscape only, depending on the orientation of your InDesign layout and what you choose for the “Spread Control” option in the EPUB - Fixed Layout Export Options dialog box. 

If you want your readers to be able to view your content in either portrait or landscape view, do the following:

1. Export your fixed layout EPUB from InDesign

2. Use eCanCrusher to expand the exported .epub file into a folder

3. Open the folder created by eCanCrusher, and locate the file named “content.opf” in the “OEPS” folder

4. Open this file with a text editor. Edge Code (part of your Creative Cloud subscription) is a good tool for opening and editing this type of file

5. Find the line <meta property="rendition:orientation”>landscape</meta> or <meta property="rendition:orientation”>portrait</meta> near the beginning of the file

6. Change landscape or portrait in this line to “auto”, so that the line appears as <meta property="rendition:orientation”>auto</meta>

7. Save and close the content.opf file

8. Use eCanCrusher to compress the folder back into an .epub file


Wednesday, August 13, 2014

10 things to know about multi-state objects and buttons in InDesign and DPS

Mastering how to create multi-state objects controlled by buttons is the key to creating all kinds of rich interaction in InDesign and Adobe Digital Publishing Suite. To that end, here are 10 things that you need to know about multi-state objects (MSOs) and buttons:

1. Always keep the Buttons and Forms, Object States, and Layers panels open and visible when creating interactive effects.

You will need to refer to these panels frequently, so for your own sanity, open them up, park them on your screen, and leave them there. The Layers panel, not often used for print projects, is used heavily in interactive projects for locating, selecting, or moving page items that are within groups, object states, or buttons.
 

2. Always work with Frame Edges displayed

Choose View > Extras > Show Frame Edges so that you can easily see the edges of the “hidden” states of MSOs and clear buttons.
 

3. Always name your MSOs, states, and buttons

Yes, InDesign will ensure that your MSOs, states, and buttons are given unique names, so that everything will work as it should. But the more complex your interaction gets, the more you will appreciate having an MSO named “national parks mso” and states named “yosemite”, “rocky mountain”, and “joshua tree” rather than “Multi-state 23” and “State 1”, “State 2”, and “State 3”. The names that you give these MSOs, states, and buttons will appear in the Layers panel, making selecting objects through the Layers panel easy.
 

4. Double-click to “dive” down into the objects in an MSO, hit the Esc key to “climb” back out

With an MSO selected, double click on an object to dive into the MSO state that contains that object and select the object. Then, hit the Esc key once to select the state, and again to select the “parent” MSO. Depending on how objects within the states are grouped, you may need to double-click repeatedly to access the objects within groups, and then hit the Esc key repeatedly to climb back out. This simple technique is a huge time- and effort-saver once you master it.
 

5. There is no such thing as a multi-state object with one state

It should be no surprise that a multi-state object must have multiple states. This can be useful. If you select a single page item, and choose New State from the Object States panel menu, a 2-state MSO will be created, with the page item you selected in each state.
 

6. There is no such thing as an empty state in a multi-state object

Every state in an MSO must have at least one page item in it. So, if you need a state that consists of “nothing”, you will need to create a frame that has no fill and no stroke, and add that to the state. This is a common technique for creating “pop-up” or “overlay” boxes that appear on the screen when a button is tapped.
 

7. The initial display of an MSO is always its first state

Regardless of which state is selected in the Object States panel, when the page appears on a mobile device, the first state (the state at the top of the Object States panel) is the state that will be initially displayed.
 

8. Buttons located outside an MSO can only “see” MSOs on the current page

In other words, there is no way for a button on page 2 to control an MSO on page 3.
 

9. Buttons located inside an MSO state can only “see” states within the parent MSO

In other words, a button that is in an MSO state can’t control a different MSO on the page.
 

10. Button objects are always converted to raster data when displayed

If you convert vector artwork, type, or an InDesign frame, line, polygon, etc. to a button, the nice crisp vector objects will be rasterized when viewed on a mobile device. For this reason, whenever possible I leave the artwork untouched, and create a clear frame over the artwork and use this frame for the button instead. This has the added benefit of allowing you to have small button artwork with a large tap zone.
 

Bonus tip: Save your sanity and purchase Digital Publishing Pack 1, Digital Publishing Pack 2, and Object States Assistant.

These scripts and plug-ins take a lot of the repetitive pain out of working with complex MSOs and buttons.

Thursday, August 07, 2014

How to Use in5 to Include InDesign-generated Animation in DPS Articles

As you may know, I contribute to the InDesignSecrets blog, run by my friends David Blatner and Anne-Marie Concepcion. I just posted a detailed article there about how to use the InDesign extension in5 to export native InDesign-created animation for use in Adobe DPS articles. If you work with Adobe DPS, you need to check this out!

Tuesday, July 29, 2014

How to type a tab character in an InDesign table

When you are working with a table in Adobe InDesign, pressing the Tab key moves you from cell to cell within the table. But what if you want to actually include a tab character in the text within a cell?

On the Mac, you can simply press option-tab to insert a tab character in a table cell. But in Windows, alt-tab is reserved for switching between running apps (try it, its really useful!). So in Windows InDesign, you can insert a tab character in a table cell by choosing Type > Insert Special Character > Other > Tab. If you need to do this frequently, consider adding a keyboard shortcut for this command. Here’s how:

1. In InDesign, choose Edit > Keyboard Shortcuts.

2. Fill in the dialog box as show below, and then click the Assign button.

ScreenSnapz002 copy

3. When prompted to create a new set, click Yes.

ScreenSnapz003

4. Give the set a name, and click OK.

ScreenSnapz004

Now, you can just press ctrl-tab to insert a tab character within a table cell.

Friday, July 11, 2014

Easily create DPS splash screens

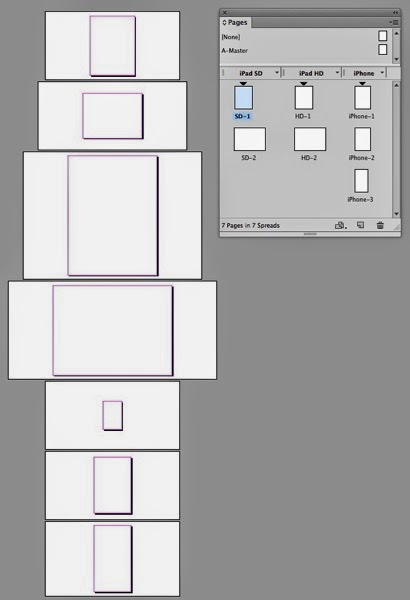
Every Adobe Digital Publishing Suite app for the iPad must contain 4 splash screens in the following sizes: 768 x 1024 pixel, 1024 x 768 pixel, 1536 x 2048 pixel, and 2048 x 1536 pixel. For iPhone apps, you must include 3 splash screens sized to 320x480, 640x960, and 640x1136 pixels. These splash screens must be saved in the PNG format. The splash screen appears on the screen momentarily while the app loads.

I’ve created an InDesign template to make creating these various sizes of the splash screens quick and easy. You can download the template here

ScreenSnapz001

The template contains 7 pages in each of the pixel dimensions listed above. Create your desired artwork on the pages corresponding to the sizes that you need, then choose File > Export and export the pages in PNG format. Fill in the Export PNG dialog box as shown below, and PNGs with the exact dimensions required will be output.

ScreenSnapz002

Unfortunately, InDesign only exports PNG-24 images. To save on file size in your app, you should open each of these PNG images in Photoshop, choose File > Save for Web, and save each file in PNG-8 format.

Thursday, June 12, 2014

How to embed video in a DPS scrollable frame

When creating scrollable frame content for Adobe DPS, the scrolling content can be a group of any type of InDesign objects, both static and interactive. You can group together text frames, images, buttons, and multi-state objects, and then make the group scrollable. However, if you try to include video in the scrollable frame group, you’ll find that it doesn’t work. After you paste the group into the “container frame” and go to the Folio Overlays panel, you’ll see that the options for video are displayed, not the options for scrollable frames.

Here’s a workaround that makes it possible to include embedded video in scrollable frames:

1. Group all the content together that you want as scrolling content, except for the video

2. Create a frame the same size as the outer bounds of the scrolling content, and name this frame “Container frame” in the Layers panel

3. Cut the scrolling content group

4. Select the Container frame, and choose Edit > Paste Into

5. In the Folio Overlays panel, choose Scrollable Frame, and select the desired scroll direction and other options

6. Place the video that you want to include in the scrolling content

7. In the Layers panel, drag the video into the Group that is inside the Container frame

ScreenSnapz001

ScreenSnapz002

8.  In the Folio Overlays panel, set your video playback options as desired

9. Position the video where you want it to be in the scrolling content

10. Resize the Container frame so that it is smaller the the scrolling content group.

Tuesday, May 27, 2014

How to add YouTube streaming video to a DPS article (part 2)

There are several ways to add video to Adobe Digital Publishing Suite projects. This blog post assumes that you want to add a video that will stream into the article from YouTube, and you want the video to play full screen when tapped. Video configured this way will require the user to have an internet connection. If you want the video to play within a frame of a specific size within your layout, see this previous post.

1. Create your layout in InDesign, place a high-qulity still image, or a screen shot from a selected frame of the video in the layout. The size and location of this image can be anything you want, since the video is going to play full-screen.

ScreenSnapz001

2. Locate the video on YouTube that you wish to embed.

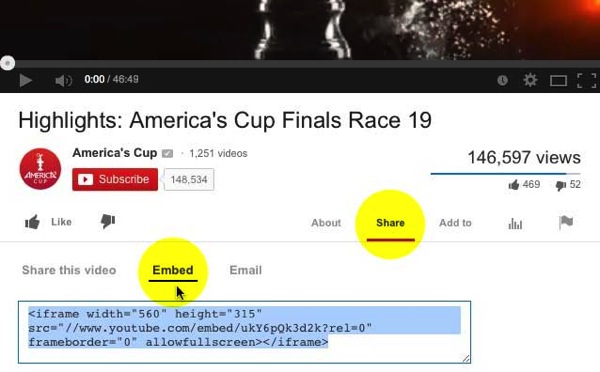
3. On the YouTube page beneath the video, click on Share, and then click on Embed.

Screenshot1

4. Select only the portion of the embed code that is highlighted in blue below, and copy it to the clipboard

ScreenSnapz004

5. In InDesign, select the frame from step 1, and select the Go To URL action

ScreenSnapz002

6. Paste the text you copied in step 4 into the URL field, directly after the http://

ScreenSnapz005

7. Add some artwork to indicate that the user can tap the image to play the video.

ScreenSnapz006

That’s it. Now when the user taps the image, the web browser that is built into DPS will overlay the page content, with the YouTube video queued up and ready to play. Then the user will need to tap again to play the video.

Tuesday, May 20, 2014

How to add YouTube streaming video to a DPS article (part 1)

There are several ways to add video to Adobe Digital Publishing Suite projects. This blog post assumes that you want to add a video that will stream into the article from YouTube, and you want the video to play in within a frame of a specific size in your layout. Video configured this way will require the user to have an internet connection. 

Technically, what you will be doing is “embedding” a streaming YouTube video in your DPS article. There are a couple of different ways to do this. Google occasionally changes the way this video embedding works, but this is the best way at the time of this writing.

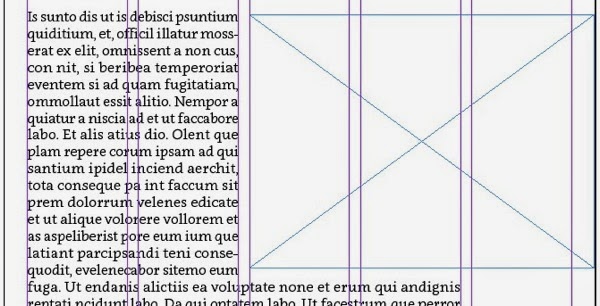
1. Create your layout in InDesign, and create a frame on the page that is the exact dimensions that you want the video. Make a note of the width of this frame in pixels.

ScreenSnapz001

2. Locate the video on YouTube that you wish to embed.

3. On the YouTube page beneath the video, click on Share, and then click on Embed.

Screenshot1

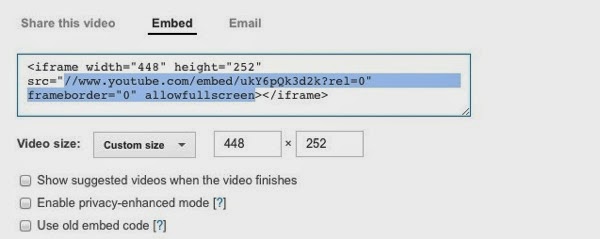
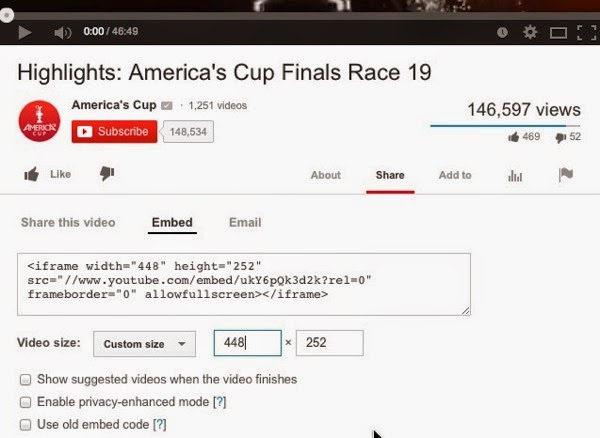
4. Still on the YouTube page, choose “Custom Size” for the the Video size, and enter the width of your InDesign frame, and make note of the value that is generated for the height.

ScreenSnapz002


5. Select only the portion of the embed code that is highlighted in blue below, and copy it to the clipboard

ScreenSnapz003

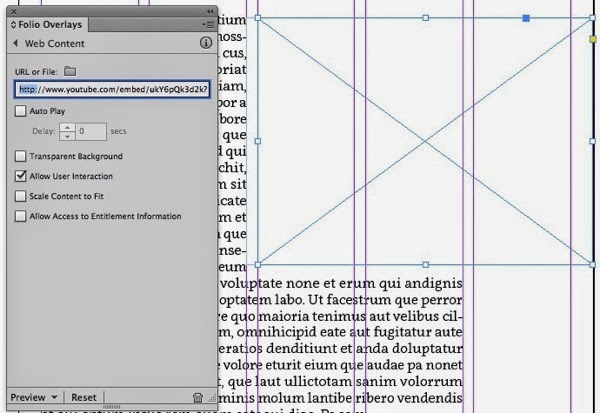
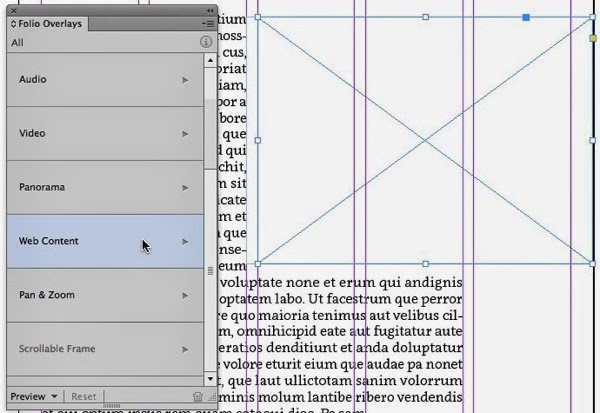
6. In InDesign, select the frame you drew in step one, and click on Web Content in the Folio Overlays panel.

ScreenSnapz005

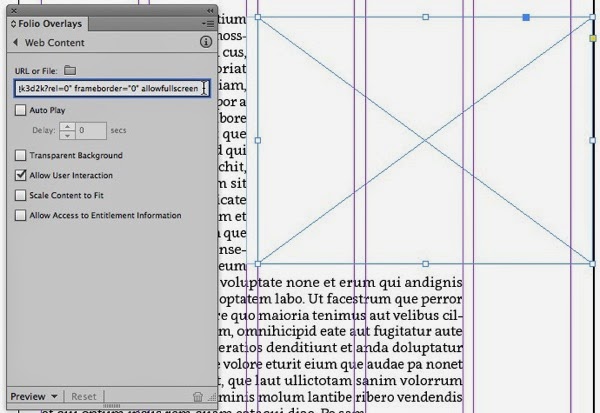
7. Paste the embed code into the URL field of the Folio Overlays panel

ScreenSnapz006

8. Use the left-arrow key on the keyboard to move the cursor to the start of the URL you just pasted, and type http: immediately before the double slash in the url.

ScreenSnapz007

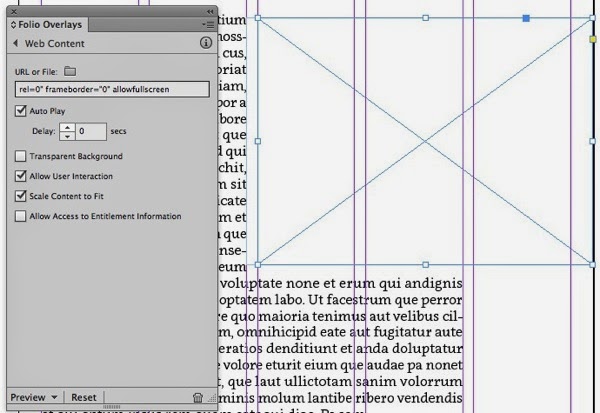
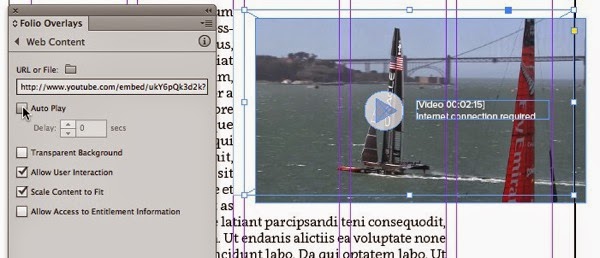
9. Select the Auto Play, Allow User Interaction, and Scale Content to Fit options. The Auto Play option will not cause the video to auto play, but will only cause the video to load into the frame automatically.
ScreenSnapz008

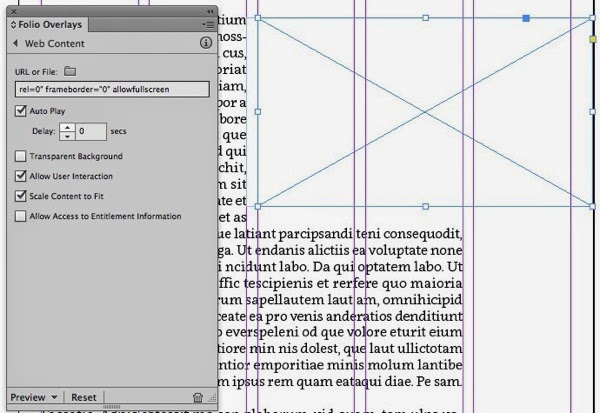
10. Change the height of the frame to match the value that YouTube generated in step 4.

ScreenSnapz009

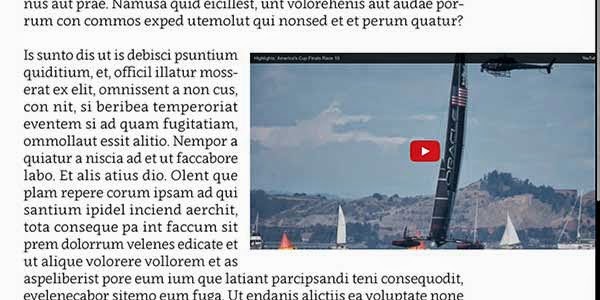
11. That’s all that is required. You won’t see anything other than an empty frame in InDesign, but when you preview the article, you’ll see a single frame of the video along with the YouTube play button. Tapping anywhere in the video frame will play the video.

Photo

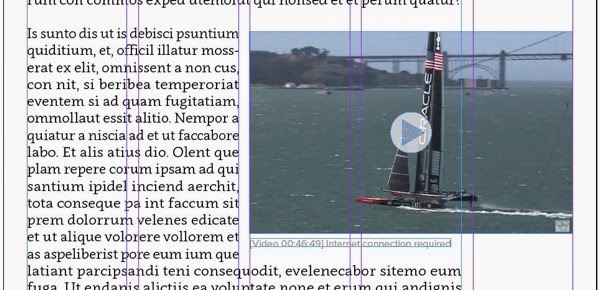
12. Usually, the random frame from the video that YouTube displays isn’t attractive. So I prefer to return to the YouTube website, play the video full-screen on my computer, and take a screen shot of a good frame from the video. Then I place that screen shot on top of the Web Content frame in InDesign, along with some artwork that looks like a play button. Then, I deselect the Auto Play option for the video frame. I’ve offset the screen shot in the image below so that you can see that it is separate artwork on top of the Web Content frame. Now, when the page is displayed, the user will see the screen shot image. When the user taps the screen shot, the Web Content will “play” and load the video, and Web Content frame will jump to the front and obscure the screen shot. Then the user will need to tap again to play the YouTube video. Another benefit of this approach is that the user will see the screen shot even if they don’t have an internet connection.

ScreenSnapz011


Thursday, May 08, 2014

Create multiples while dragging an object in InDesign

InDesign CS5 and later has an obscure keyboard/mouse maneuver that allows you to create multiple duplicates of an object as you drag. Here’s how:

1. Select one or more objects with the Selection tool

ScreenSnapz001

2. Hold down the option key (Mac) or alt key (Windows), and THEN grab one of the selected objects. It is very important to hold down the option/alt key BEFORE you grab any of the objects.
3. Begin dragging the object(s) horizontally or vertically, and you’ll see a duplicate of the object appear, because you’re holding down the option/alt key

4. While continuing to hold down option/alt, hit the right arrow or up arrow key on the keyboard once to create one duplicate, twice to create 2 duplicates, three times to create 3 duplicates, etc. You will see a dotted outline appear on the screen indicating that duplicates are being created.

ScreenSnapz002

5. When the correct number of duplicates is positioned the way you want them, release the mouse and the option/alt key

ScreenSnapz003

Note that this is a different technique than the more well-known technique of being able to tap the up-arrow and right-arrow keys while dragging out a frame on the page to create a grid of boxes, or while dragging out a frame with the loaded place cursor. The technique I’m describing above is useful when the object or objects you want to duplicate are already on the page, and now they need to be duplicated or stepped and repeated.