Wednesday, December 30, 2009

Photoshop CS4 and Photo CD

A client who recently upgraded discovered that she can no longer open Kodak Photo CD scans in Photoshop CS4. She asked if there was any way to make this work.

Quick summary of the situation:

Kodak has stopped supporting Photo CD and the related plug-ins so Adobe stopped including the plug-ins with Photoshop CS4.

If you are fortunate enough to have a Photoshop CS3 installation DVD, you can retrieve the CS3 plug-in from there and install it in Photoshop CS4. This will work with Windows XP and Vista, and on non-Intel Macs.

If you have an Intel Mac, you need to run Photoshop under Rosetta to use the plug-in.

Other conversion possibilities:

The latest version of GraphicConverter, a low-cost Macintosh shareware program, will convert Photo CD images into other standard formats such as JPEG or TIFF.

Apparently some versions of iPhoto will open PhotoCD images (iPhoto '08 doesn't on my Intel Mac).

Pcdtojpeg is a Macintosh and Windows command-line conversion program for converting Photo CD images to JPEG format.

Other helpful links:

Brian Lawler's excellent article on Photo CD workarounds

Adobe Help: How to open a Photo CD file in Photoshop CS3

Adobe TechNote on opening Photo CD files in Photoshop CS3 and running CS3 under Rosetta

Ted Felix's Photo CD site


Tuesday, December 22, 2009

Great digital photography resource

My neighbor and extremely talented architectural photographer Paul Crosby alerted me to the "dpBestflow.org" web site.

This amazing resource, developed by ASMP and funded by the Library of Congress, contains in-depth content about all things related to digital photography, with an emphasis on best practices and recommended workflows. If you're a photographer who wants to know more about how to shoot, organize, process and archive large volumes of images, you need to check this out.

Even if you aren't a photographer, you should check out the sections on color, data storage, an excellent section on metadata, backup, and the comprehensive glossary.

Wednesday, December 16, 2009

A couple of neat color tools

Here are a couple of interesting tools for color inspiration:

Think Ink is an iPhone app from Neenah Paper that will generate an RGB or CMYK color palette from an iPhone photo. You just shoot a photo or choose one from your photo library, choose a base color in the image, and the application does the rest. You can generate color palettes from photos, a base color you create, from Neenah paper colors, or using Dewey Attributes.

You no doubt are familiar with Kuler, Adobe's color inspiration Web application. (I've written previously about Kuler here). Here's an interesting twist: Daily Duluth is a blog run by a woman who lives and works in the city of Duluth, MN on the shores of beautiful Lake Superior. Each day, she takes a photograph of the ever-changing lake, builds a color palette, and uploads the palette to Kuler. You can view (and download) each of the palettes she's created here.

Monday, December 14, 2009

Twin Cities InDesign User Group meeting

I've just finalized the details for the next meeting of the Twin Cities InDesign User Group. The next meeting will be January 13, 2010 at 7:00 p.m. in auditorium 150 at MCAD.

This will be a great meeting. There will be two presentations: one by James Fritz on long document design and production, and the other by yours truly on using the obscure "Balance Ragged Lines" feature correctly. In addition, cake will be served in honor of the 10th birthday of InDesign. A full agenda for the meeting can be found here.

As always, the InDesign User Group meetings are FREE and open to the public, thanks to generous support from MCAD and Central Coast Solutions, but registration is required.

I hope to see you there!

Blatner Tools InDesign Plug-in released

David Blatner, in partnership with DTP Tools, has released Blatner Tools, a suite of 12 InDesign plug-ins that adds over 100 new features to InDesign CS3 and CS4. I haven't had time to try these yet, but they look really useful. Features that appeal to me include the ability to apply keyboard shortcuts to color swatches and layers, a "text controls" panel, and some serious automation for creating and using paragraph and character styles.

Monday, December 07, 2009

InDesign script for Balance Ragged Lines

In a recent podcast, David Blatner and Anne Marie Concepcion, proprietors of the excellent InDesignSecrets blog, talked about how InDesign's "Balance Ragged Lines" feature works. They discussed how the feature tends to favor a longer first line and a shorter second line, but that "under the hood" InDesign has the code to balance the lines differently.

I've whipped up a script that "exposes" this functionality in InDesign CS3/CS4. With this script you can tell InDesign to favor a shorter first line and a longer second line, or to try to make all lines the same length. See the documentation and example files that are packaged with the script for more detailed information.

Friday, December 04, 2009

Find and extract text from InDesign and Quark Files

Markzware, creators of the popular Q2ID, ID2Q and PUB2ID file conversion plug-ins, has just released PageZephyr, a Macintosh-only program that will index your Quark 6 (or newer) and InDesign CS (or newer) files, and then allow you to search and view the text content in the files, and extract the found content to RTF or TXT files.

Potential uses include: quickly locating layout files based on content on a large storage volume, quick text extraction for repurposing or archiving content, or sifting through large volumes of Quark and InDesign content for legal discovery purposes.

I'll be evaluating PageZephyr in the near future, and will provide a more detailed post soon.

* Full disclosure: I'm a Markzware affiliate. This means that if you visit their site from here, and eventually buy something, I might make a few bucks. Thanks.

Thursday, December 03, 2009

The magazine of the future?

TechCrunch has a couple of nice writeups about Time Inc's new digital magazine concept, showing a copy of Sports Illustrated running as a touchscreen application. Such an application could go nicely with the upcoming rumored color tablet computers from Apple and others.

According to the articles, the technology used to run the application is Adobe AIR.

Read this post, and then this one. Be sure to watch the included videos for powerful insight into what the brain trust at Time Inc. thinks magazines of the not-too-distant-future might look like.

Wednesday, December 02, 2009

An InDesign GREP tutorial

Steve (who attended my "Power through your work with InDesign Styles" seminar in September) wrote:

"I am trying to find an InDesign GREP style that would find select every character (paragraphs included) between any amount of tabs and the next instance of a bullet. Any Ideas?"

The GREP string that I came up with to do what Steve asks is this:

(?<=\t)[^~8\t]+(?=~8)

I'll take this apart and try to help you understand it piece by piece.

(?<=\t)

The \t means to look for a tab character. The (?<=) is called a "positive lookbehind," which tells InDesign to not include the thing it finds in the search result. So (?<=\t) means to "look back" for a tab character, but don't include the tab character in the search result.

[^~8\t]+

The square brackets create what is called a "character class," which means to "match any of the things in these brackets". In this case, in the brackets we have a ~8 which is a bullet, and a \t which is a tab character. So [~8\t] would mean to match any character that is a bullet or tab. But if you look closely, we have a ^ before the bullet in the character class. This means "not". So [^~8\t] means to match any character that is NOT a bullet or tab.

Finally, you'll notice a + after the character class. This means to match the character class "one or more times". So [^~8\t]+ means to match "one or more characters that are not bullet or tab characters".

(?=~8)

As we saw above, the ~8 is a bullet character. The (?=) is a "positive lookahead," which, like a "positive lookbehind" tells InDesign to not include the thing it finds in the search result. So (?=~8) means to "look ahead" for a bullet character, but don't include the bullet character in the search results.

Putting it all together, we have (?<=\t)[^~8\t]+(?=~8) which means to:

Look for one or more characters that are not bullets or tabs, that are preceded by a tab character and followed by a bullet, (but don't include the tab or bullet in the search results).

The (?<=\t)[^~8\t]+(?=~8) string can be used in InDesign in two different places:

1. The GREP tab of the Find/Change dialog box, to do a search based on the GREP expression, or

2. The GREP Style tab of the Paragraph Style Options dialog box, which allows you to have InDesign assign a character style automatically any time that the GREP expression is matched.

Tuesday, December 01, 2009

Create interactive maps with Illustrator

See this post from John Nack about using an Illustrator plug-in called MAPublisher to create interactive Flash maps like this one.

I know that many of you have been looking for ways to easily produce maps such as this, so thought I'd point it out.

Related items:

ESRI offers a free beta Make a Map service for creating an interactive Flash map like the one below, based on your location, desired map size and demographic data set.


There is lots of good Mapping/Illustrator/Flash info at Kelso's Corner.

Tuesday, November 24, 2009

Disk icons in the Paragraph Styles panel

Have you ever noticed the little disk icons that sometimes appear to the right of your Paragraph or Character Styles in InDesign/InCopy? Have you wondered what these mean?

These icons, when displayed next to a Character or Paragraph style, indicate that the style wasn't created in InDesign, but came into the Styles panel with placed text, most likely from Microsoft Word.

The disk icon also indicates that the Character or Paragraph style hasn't been modified in InDesign. If you double-click on the style name and edit the style, the disk icon disappears.

I imagine that the disk symbol isn't recognizable to many people anymore. When was the last time you touched a 3.5-inch floppy disk? Adobe is going to need to find a new symbol for this pretty soon!

Off-topic, but I just have to share this photo of another cutting-edge use of floppy disks, in this case the totally old-school 5.25-inch variety:

Monday, November 23, 2009

Upcoming seminar

Ikon Office Solutions is hosting a special event called "Graphic Arts Digital Discovery" on December 11 at the Ramada in Brooklyn Park, MN. I'm speaking at the event, and would love to see you there. I'll be presenting a two-hour seminar on Adobe Photoshop Tips & Tricks from 10:00 a.m. - noon, and a two-hour seminar on InDesign & Illustrator Production Techniques from 1:00 - 3:00 p.m.

The event is free, but space is limited and registration is required.

Wednesday, November 18, 2009

InDesign's "Import Options" dialog

Sandra writes:

"I can place a completed InDesign .indd file into my InDesign layout, but I see only the first page. What if I want only page 4 or page 6?"

The answer to this, and more, lies in the amazing, often-overlooked Import Options dialog box. Choose File > Place, and then either:

Select the Show Import Options option in the bottom-left corner of the Place dialog, select a file to place, and click the Open button,

- or -

Select a file to place, and then hold down the shift key while you click the Open button.

The dialog box that will appear next depends on the type of file you're placing. This is what the dialog box looks like when you place an InDesign file into another InDesign file. Note that you can browse page thumbnails and specify which page(s) to place, among other useful options.

This is what the dialog box looks like when you place a Word file:

This is what the dialog box looks like when you place an Adobe Illustrator AI file:

You get the idea. Keep in mind that these Import Options are "sticky", meaning that once you set them, they stay selected when you place other files of the same type in the future.

Tuesday, November 10, 2009

Automatically place multiple images in a grid

One of the nicest new features of InDesign CS4 is the ability to automatically place multiple images at once, arranged neatly in a grid of frames automatically created to your specifications. Here's how:

1. With nothing selected on your page, choose File > Place, and select multiple images by clicking on one image, and then command-clicking (Mac) or ctrl-clicking (Windows) on subsequent images.

2. Click the Open button. InDesign will import all the images you selected, and then display the "place cursor" with a number showing how many images you've imported.

3. Hold down command-shift (Mac) or ctrl-shift (Windows), and drag out a rectangle. You will see a grid of frames appear. Don't release the mouse button, but you can now release the command/ctrl-shift keys.

4. Now, while continuing to hold the mouse button down, you can adjust the number of rows and columns using the cursor (arrow) keys on the keyboard. The up/down arrows increase/decrease the number of rows in the grid, and the right/left arrows increase/decrease the number of columns in the grid.

Again, while continuing to hold the mouse button you can adjust the space between the rows and columns using shift+the cursor keys on the keyboard. Shift + the up/down arrows increases/decreases the vertical space between rows, and shift + the right/left arrows increases/decreases the horizontal space between columns.

5. Release the mouse button, and a precise grid of frames will be created, with an image placed in each frame.

Only as many frames as you have images selected will be created. In other words, no empty frames will be created. So if you've dragged out a 10 x 10 grid, but only have 15 images selected, only 15 frames will be created, not 100.

Conversely, if you have more images selected than the number of frames you specified in your grid, after the first grid is created, you will see another "place cursor", and then you can repeat steps 3-5 to create a second grid.

Friday, November 06, 2009

Free Stock Photography

Free is good. Here are a few thoughts on where to obtain free high-quality, high-resolution stock images and artwork.

Freerange Stock is an advertising-supported site that encourages photographers to upload their content, and ad revenue is shared with the photographers.

Flickr is the granddaddy of all photo-sharing sites. The site contains millions of images, ranging from really bad to really good. If you need an image for a commercial project, limit your search to images with a Creative Commons license. Instead of using Flickr's slow, cumbersome search engine, try Compfight, a blazingly fast search engine for Flickr images.

Shutterstock* claims to be the "largest subscription-based stock photo agency in the world." They offer a new "Free Photo of the Week" and "Free Vector of the Week" every week on their front page.

Crestock* has a large collection of both photography and vector images that cost from $5-$15 each. They also offer a new photo or vector image free to download every day.

morgueFile is another popular collection of user-submitted photography with a clear license and a good variety of images.

* Full disclosure: I'm an affiliate of Shutterstock and Crestock. This means that if you visit either site from here, and eventually buy something, I might make a few bucks.

Wednesday, November 04, 2009

Transform Sequence Again Individually

InDesign's Transform Again commands are very powerful. When you choose Object > Transform Again you'll see four options: Transform Again, Transform Again Individually, Transform Sequence Again, and Transform Sequence Again Individually. How these commands work is far from obvious, so I'll explain them here:

First, you need to understand what, exactly, a transformation is. In the world of InDesign, a transformation is a move, rotate, scale, flip, shear or fitting command. These transformations can be applied to a selected object through the Control panel, the Transform panel, interactively with the Selection, Direct Selection, Free Transform, Scale, Rotate and Shear tools, or via the commands in Object > Transform.

Transform Again

This one's simple. It just repeats the last single transformation you applied to an object. In the example below, I've option/alt-dragged the left-hand photo straight up to create a duplicate.

Now, leaving the duplicated photo selected, I choose Object > Transform Again > Transform Again and the object is duplicated and moved the same amount as the first copy.

You can also use the Transform Again command to apply a transformation to a different object other than the one that was originally transformed. In the example below, I selected the third, fourth and fifth photos, and then chose Object > Transform Again > Transform Again twice.

Transform Sequence Again

This command behaves exactly like Transform Again, except that it can apply a "sequence" of transformations. In the example below, I've rotated, scaled and moved the left-hand photo.

Next, I select the second photo, and choose Object > Transform Again > Transform Sequence Again, and the same sequence of transformations (rotation, scaling and moving) is applied to the second photo.

Transform Again Individually

This will allow you to apply a single transformation to multiple objects, but with the transformations applied individually to each object. In the example below, I've rotated the left-hand photo.

If I select the other five photos and choose Object > Transform > Transform Again, the five photos are rotated as a group, as if they were one object.

If I undo this, and then select the other five photos and choose Object > Transform > Transform Again Individually, each rectangle is rotated separately.

Transform Sequence Again Individually

This command is just like Transform Again Individually, except that you can apply a Sequence of transformations individually to each object. In the example below, I've rotated, scaled and moved the left-hand photo.

Next, I select the other five photos, and choose Object > Transform > Transform Sequence Again Individually, and each object is rotated, scaled and moved individually.

These commands, particularly Transform Sequence Again Individually, have saved me lots of time and grief on various production projects over the years. Store this information in a corner of your brain somewhere, ready to use when you encounter the need to transform multiple objects.

Tuesday, October 27, 2009

Sneak peek at future Adobe technology

If you're curious what might be in store for a future version of Photoshop, or other Adobe products, here are three resources you should check out:

1. My friend Rick sent me this link to a cool video on the Photoshop Facebook page. The video shows a preview of "PatchMatch: Content-Aware spot Healing and Fill tools" or "intelligent hole filling". You've got to see this in action...it's pretty cool.

2. More info about PatchMatch, and all kinds of other technologies, are discussed and demonstrated at Adobe's Advanced Technology Labs.

3. Future versions of actual products (as opposed to "technologies" are presented, and sometimes available for download, at Adobe Labs.

Tuesday, October 20, 2009

How to identify a font in a PDF

Have you ever received a PDF and wanted help identifying a font used in the file? If you have Acrobat 9 Professional, here's an easy way:

1. Open the PDF, and choose Advanced > Print Production > Output Preview

2. Select "Object Inspector" for the Preview.

3. Click on the text you're wondering about, and the font that was used should be displayed in the Output Preview panel.

If the font isn't displayed, then the type has been converted to outlines or is a raster image.

If several objects are stacked on top of one another, the lowest object in the stack is listed at the top of the dialog box.

Monday, October 12, 2009

Use GREP find to truncate lines of text

A student from one of my on-site InDesign training classes asked how to remove the end of each line of text in an InDesign-created directory listing, as shown in the example below. Each line of the directory consists of some text, a tab character, more text, and then a paragraph return.

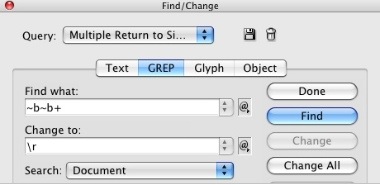
In her email, she said "there are thousands, nay, millions of these pesky things...can Indesign find and replace wildcard strings?"

InDesign CS3/CS4's GREP Find/Change feature is made for just this sort of thing. Choose Edit > Find/Change, and fill in the dialog box as shown below.

In this case, \t represents a tab character, and the plus sign after it means to look for "one or more" tab characters. The period stands for "any character", and the asterisk after the period means to look for "zero or more" of "any character". So the entire Find phrase means "look for one or more tab characters that may or may not be followed by additional characters." Since the "Change to" field is empty, the found text will be replaced by nothing.

Tuesday, October 06, 2009

Photoshop brush size shortcuts

A good shortcut to know for changing the brush size in Photoshop CS2-CS4 is to use the [ and ] (left and right square bracket) keys. Each time you press one of these keys, the current brush will decrease or increase in size. Add the shift key to change the hardness of the brush edge. This works with most other tools besides the Brush tool, such as the Magnetic Lasso, Erasor, History Brush, Blur, Dodge/Burn, etc.

If you have Photoshop CS4 running on a computer that supports OpenGL (choose Preferences > Performance to see if your computer supports this) there is an even better shortcut.

With any brush or painting tool active, use the shortcuts below to precisely change the brush size by dragging with the mouse. You will see immediate, interactive on-screen feedback as you drag.

Macintosh:
Change brush size: option-ctrl-drag
Change brush edge softness: command-option-ctrl-drag

Windows:
Change brush size: alt-right mouse button drag
Change brush edge softness: shift-alt-right mouse button drag

Wednesday, September 30, 2009

How to tell if an image has been scaled in InDesign

When you work with images in your layout, you need to be aware of the effective resolution of those images. The effective resolution is the resolution of the image after it has been scaled. You also need to know if you've unintentionally stretched the image non-proportionally. InDesign has five ways to tell you if an image has been scaled, by how much, and if the scaling was proportional. Choose the method that is most convenient for you.

1. The Control panel or Transform panel (CS3/CS4)
The Scale fields in the Control and Transform panels will display how much a selected image has been scaled, but only if the image is selected with the Direct Selection (white arrow) tool. In the screen shot below, the selected image has been scaled non-proportionally: 76% horizontally and 80% vertically.

2. The Info panel (CS3/CS4)
The Info panel (Window > Info) will display both the original resolution and the effective resolution for a selected image. In the example below, the selected image has been shrunk non-proportionally, so the effective resolution is different in the X and Y directions.

3. The Links panel (CS4)
The Links panel displays not only the original and effective resolution of the image, but also the scale percentage. If these values aren't displayed in your Links panel, you need to choose Panel Options from the Links panel menu, and place a check mark next to these items in the Show in Link Info column.

4. The Preflight panel (CS4)
The Preflight panel (Window > Output > Preflight) can alert you when images have been scaled non-proportionally, or when images don't meet minimum effective resolution standards. To use this, you will need to choose Define Profiles from the Preflight panel menu, and select options for Image Resolution and Non-Proportional Scaling of Placed Object in the IMAGES and OBJECTS category.

5. Preflight & Package (CS3/CS4)
When you choose File > Preflight in InDesign CS3, or File > Package in InDesign CS4 and click on the Links and Images category on the left side of the dialog box, each image in the file will be displayed on the right. When you click on an image in the list, the resolution and the effective resolution for that image will be displayed.

Wednesday, September 23, 2009

Two oldies but goodies

I'd like to bring to your attention today two fantastic keyboard shortcuts in InDesign. These aren't new, but they're valuable time- and grief-savers.

Shortcut #1: command-6 (Mac), ctrl-6 (Windows)

This shortcut will highlight the first field of the Control Panel at the top of the screen. So if you have text selected, the typeface field will be highlighted. You can then choose a typeface by typing the first few letters for the typeface name, or you can hit the tab key to move to the next field. If you have an object selected, the x: field will be highlighted. Whichever is the first field of the Control Panel at the moment is the field that will be highlighted. You might want to consider changing this shortcut to something you can easily reach with one hand, as I have. Here's how:

1. Choose Edit > Keyboard Shortcuts
2. Choose Views, Navigation for the "Product Area"
3. Choose Toggle Keyboard Focus In Control Panel in the list of commands
4. Click in the "New Shortcut" field, and press the keyboard shortcut you want to use (I use command-3 (Mac) and ctrl-3 (Windows))
5. Click the Assign button. You may be asked if you want to create a new set. If so, answer Yes.
6. Click the OK button.

Shortcut #2: command-option-~ (Mac), ctrl-alt-~ (Windows)

This shortcut will highlight whichever numeric field you last edited in a panel. So if you have a stroke selected and type .5 in the Stroke Weight field in the Control Panel or the Stoke panel, and then change your mind and decide you want it to be 2 point, just hit this shortcut and your cursor will highlight the Stroke Weight field again ready for you to type a new value. Sweet!

Monday, September 14, 2009

Photoshop Masking plug-ins

In my Photoshop Masking seminar last week I showed how to mask difficult subjects such as hair, fur and feathers. Doing this successfully requires you to evaluate your image and choose the best tool/approach for that particular image. One useful tool for certain masking situations is the Filter > Extract command, which is in Photoshop CS2 and CS3, but was removed from CS4.

However, you can still use this command. Just download the "Photoshop CS4 Optional Plug-ins" (Mac link) (Windows link). Install the "ExtractPlus" plug-in, and the Extract command will appear in the Filter menu in Photoshop CS4.

Greg wrote to me after the seminar and pointed out the "Photoshop legacy optional plug-Ins" (Mac link). Download this, and install the Macintosh only "Overscroll always" plug-in. This plug-in lets you scroll over to reveal the gray backdrop around your image, even if your image is larger than your active window. Normally, you can't scroll past the edge of the image, but sometimes you need to in order to make a quick selection with the polygon lasso or Pen tool, for example. Thanks Greg!

Monday, September 07, 2009

Resource for scientific stock photos

There are myriad vendors of stock photography. But if you need images about scientific topics such as Medicine, Genetics, Pollution, Physics or Microscopy, browse the large image collection at the Science Photo Library. They sell both Royalty Free and Rights Managed images, and have a team of in-house researchers to help you locate the right image for your needs. They bill themselves as "the world's leading provider of science photos covering all aspects of science, health & medicine, space exploration & astronomy, technology & industry, earth science, satellite imagery, and nature & wildlife."

Tuesday, September 01, 2009

A few seminar spots remain!

The response to the "Back to School Fall Seminar Series" has exceeded my expectations. There are over 50 people registered in each of the four half-day sessions! I have room for 60, so a few spots remain. Register today!

The seminar series will be held in the Twin Cities next week. They are open to everyone who wants to do more with less, to be more productive, more efficient and more effective in Adobe Creative Suite. The seminars are:

Session 1: Power through your work with InDesign Styles
Wednesday, September 9, 8:30 a.m. - 12:00 noon

Session 2: InDesign typography
Wednesday, September 9, 1:00 p.m. - 4:30 p.m.

Session 3: Photoshop masking techniques
Friday, September 11, 8:30 a.m. - 12:00 noon

Session 4: Introduction to Flash for print designers
Friday, September 11, 1:00 p.m. - 4:30 p.m.

The seminars are very inexpensive, thanks to the generous support of my friends at Adobe, Central Coast Solutions and Data Print Distribution (DPD).

Please consider coming to one or more of the seminars. I'd love to see you there!

Tuesday, August 25, 2009

How to force a PDF to open at a particular view

A couple of weeks ago I wrote about how to set your Acrobat preferences so that all PDFs open at the magnification you want them to. Today's post is about how you as the creator of a PDF can specify the opening view of that particular PDF. I always like my PDFs to open in Fit Page view, so that the recipient gets a bird's eye view of the whole page. If I've included bookmarks in the file, I want the bookmarks pane to appear on the left side of the screen so that the recipient sees and uses the bookmarks.

1. After you've created your PDF file in InDesign, Word, QuarkXPress, or whatever, open it in Adobe Acrobat Standard or Professional (you can't use the free Adobe Reader to do the steps below).

2. Choose File > Properties

3. In the Document Properties dialog box, click on the Initial View tab at the top. Then set the options for Layout and Magnification as desired. Note that you can specify which Navigation Panels open at the left side of the screen, the page layout, the magnification, which page the PDF opens to, whether or not you want the Acrobat window to resize to the size of the page, whether the window should be centered on the screen, and whether or not you want the document to open in Full Screen mode (useful for presentations).

4. Click the OK button. Nothing magnification and layout of the document will not change at this point.

5. Save the PDF, close it, and reopen it. It should reopen with the options you specified in step three. These options will override any settings specified by the user in Preferences as described in my previous post.

Tuesday, August 18, 2009

Sorting the Glyphs panel display

InDesign's Glyphs panel (Window > Type & Tables > Glyphs) is indespensible for locating and inserting foreign-language characters, alternate characters, symbols and dingbats. Yesterday I noticed a strange thing about the display order of the Glyphs in the panel. The default sort order is to sort the Glyphs by their Unicode value. Here's what the Glyphs panel looks like for Adobe Caslon Pro Regular, sorted by Unicode value. (Click the graphic to enlarge.)

Note that the various ornaments in the typeface are scattered throughout the panel, making them difficult to locate. But if you choose Sort Glyphs > By CID / GID from the Glyphs panel menu in the upper right corner of the panel, the panel changes to look like this:

This view may be more useful for some fonts. Depending on the typeface you are using, and what you are trying to do, one sort order may be better than the other. Give it a try!

By the way, Illustrator also has a Glyphs panel (Window > Type > Glyphs). But the Glyphs panel in Illustrator is always sorted by CID/GID and cannot be sorted any other way. Also, both InDesign and Illustrator allow you to choose a subset of glyphs using the "Show" drop down menu in the upper-left corner to display just the currency or symbols for example.

Wednesday, August 12, 2009

LiveSurface Image Templates

Here's a cool resource that I've been evaluating: The LiveSurface Image Template Library. These are not just stock photos. They're pre-masked, multi-layered high-res photos of billboards, stationary, packaging, vehicles, etc. that contain built-in 3D surfaces. What this means is that you can use the photos to quickly visualize what your designs will look like in context, create high-quality client presentations, or create final high-res images for use in print or Web marketing materials.

The images take advantage of the vanishing point feature of Photoshop CS2-CS4.

The layers and masks are well-labeled and well-organized, and instructions are included.

It took me just a matter of minutes to create the images below.

Future versions of Creative Suite Intel-only

Adobe posted a FAQ today on their Website titled Support for the PowerPC platform, in which they state that:

"Adobe intends for future versions of the Creative Suite range of products to run on Intel based Macs with no support for their installation on PowerPC systems."

This means that if you are a Macintosh user, and you're still running a non-Intel Mac (aka a "PowerPC" system), you won't be able to run the next version of the Creative Suite.

This shouldn't come as a big surprise, since even Apple is dropping support for non-Intel Macs with the upcoming "Snow Leopard" version of Mac OS X, due in September.

Friday, August 07, 2009

How to control the opening view in Acrobat

Like me, you probably spend a great deal of time opening and viewing PDFs. You might as well make this as simple and painless as possible. You can easily set your preferences to make PDFs appear just they way you want them to, every time. Here's how:

In Acrobat, choose Acrobat > Preferences (Macintosh) or Edit > Preferences (Windows) or press command-k (Macintosh) or ctrl-k (Windows). In the Preferences dialog box, choose the Page Display category, and then change the Page Layout and Zoom settings to whatever you want them to be. I prefer to have the Page Layout set to Single Page, and the Zoom set to Fit Page.

This will make most PDF files open the way you want them to, but there's one exception. The creator of a PDF file can specify the opening view of a PDF. When this is done, it will override the preferences on your computer for that PDF file. In other words, the creator of a PDF can specify that a particular PDF always should open at 200%, facing pages view on everyone's computer, regardless of their preferences. But the vast majority of PDF files specify this, in which case your preference settings apply.

In my next post, I'll show how you as the creator of a PDF can specify the opening view for your audience.

Monday, August 03, 2009

Advice for designers during tough times

The 2009 AIGA|Aquent Survey of Design Salaries 2009 is available now. In addition to the usual tables that summarize average salary ranges for designers, art directors, production artists and copywriters around the United States, this year's issue contains insightful commentary from top designers on how to stay competitive during an economic downturn.

A few excerpts:

"Position yourself narrowly so that you are less relevant to the majority but deeply sought by a minority that values expertise." -- David C. Baker

"Focusing does not mean cutting back on what you know—only perhaps on what you do. There’s a big difference." -- Alexander Isley

"Many of us designers look down our noses at the business aspect of our profession, in which creativity reigns supreme. Never forget that if you do not operate your practice like a business, there will be no place for your creativity to live." -- Judy Kirpich

"When was the last time you picked up the phone and connected in person with your most important contacts? If you have people out there advising and advocating for you, be sure to keep them apprised of how you’re doing, thank them often and stay in touch regularly—no matter where you’re at with employment. This is one of the most valuable uses of downtime, but it’s actually something designers should be doing at all times!" -- Monica Little

You can download the entire report in PDF format here.

Tuesday, July 28, 2009

Easily delete text in InDesign/InCopy

Bonnie wrote today and pointed out that on my InDesign CS4 keyboard shortcut reference guide, I've listed the same keyboard shortcut (command-delete) for both "Delete one word to the left" and "Delete one word to the right".

Believe it or not Bonnie, this isn't a typo (though I'll admit it could be more clear!) This brings up an issue that many people don't understand, so I thought it would be worth explaining here.

Some Macintosh keyboards have two delete keys, one that's two rows above the return key, and another that is between the main keys and the numeric keypad, directly above the cursor keys.

On this type of keyboard, the left-most delete key deletes a single character to the left of the text cursor, and the right-most delete key deletes a single character to the right of the text cursor. Likewise, command-left delete key deletes a word to the left of the text cursor, and command-right delete key deletes a word to the right of the text cursor.

If you have a Mac laptop or a smaller Mac keyboard that only has a single delete key, fn-delete deletes one character to the right, and fn-command-delete deletes one word to the right.

On most Windows keyboards, the left-deleting delete key is labeled as "Backspace" and the right-deleting key is labeled as "Delete" so Windows users don't have this confusion.

I've updated the InDesign CS4 keyboard shortcut reference guide to clarify this issue.

Thursday, July 23, 2009

Fall Seminar Series

I'm excited to announce the "Back to School Fall Seminar Series" that I'm holding in the Twin Cities on 9/9/2009 and 9/11/2009. This series of four low-cost half-day seminars is open to everyone who wants to do more with less, to be more productive, more efficient and more effective in Adobe Creative Suite. The seminars are:

Session 1: Power through your work with InDesign Styles
Wednesday, September 9, 8:30 a.m. - 12:00 noon

Session 2: InDesign typography
Wednesday, September 9, 1:00 p.m. - 4:30 p.m.

Session 3: Photoshop masking techniques
Friday, September 11, 8:30 a.m. - 12:00 noon

Session 4: Introduction to Flash for print designers
Friday, September 11, 1:00 p.m. - 4:30 p.m.

The seminars are very inexpensive, thanks to the generous support of my friends at Adobe, Central Coast Solutions and Data Print Distribution (DPD).

Please consider coming to one or more of the seminars. I'd love to see you there!

Tuesday, July 21, 2009

Where to find Adobe PDF icons

Julie wrote:

Where in the world can I get an Adobe .pdf icon? I need to add the little icon to our website... There are so many variations on the web that I don't know which is official and which is not!

I get asked this frequently, so thought I'd write about it here. The "official" Adobe pdf icons can be found at www.adobe.com/misc/linking.html. You will also find icons for "Get Adobe Reader" and "Get Adobe Flash Player" there.

Tuesday, July 14, 2009

Font identification help

Have you ever run across some text set in an interesting typeface, and wondered what font was used? Gone are the days of poring through font specimen books or endless font samples on web sites. Instead, try WhatTheFont.

This free tool from Bitstream lets you upload a scan of a type sample, and then it automatically tries to identify the font from the sample you've uploaded. Depending on the quality of the sample you've scanned, it works amazingly well.

If the automatic recognition doesn't work, you can submit the image to the WhatTheFont Forum, where real live actual people will help you solve the case.

If you have an iPhone, you can just snap a photo of the font in question and use the WhatTheFont for iPhone app to quickly identify it, no scanning and web uploading required. Near instant gratification!

As an alternative, Identifont and Fonts.com both help identify a font by asking you a series of questions about the appearance of certain characters in your sample.

Fontscape helps you choose a typeface by organizing typefaces into many different categories, such as appearance, dimensions, mood, etc.

Thursday, July 09, 2009

New web site

I just spent the last few days hunkered down in my office wrestling with the intricacies of CSS while rebuilding the Gilbert Consulting web site. My previous web site used tables for layout and positioning. I decided to join the 21st century and bring my site up to modern standards with CSS. Hopefully the new site also does a better job of explaining who I am, what I do and how I do it.

A few interesting items I ran across while sweating through the web site rebuild:

  • Adobe's Dreamweaver Developer Center houses all kinds of CSS goodness, tutorials and links.

  • I found Pop Menu Magic 2 from Project Seven very helpful for creating the menu system. The newsgroups run by Project Seven at forums.projectseven.com were invaluable for troubleshooting a couple of thorny issues with the menus and CSS.

  • The inclusion of the O'Reilly CSS Reference Guide in the Dreamweaver CS4 Reference panel is great. Concise O'Reilly guides for HTML, JavaScript, XML, PHP and other syntax are also included in the Reference panel.

Wednesday, July 08, 2009

Minneapolis InDesign User Group meeting

I've scheduled the next meeting of the Minneapolis InDesign User Group for Tuesday evening, August 4, from 7:00 - 9:00 p.m. at the Minneapolis College of Art & Design (MCAD). The agenda is still being finalized, and will be posted on the IDUG web site soon. If you're in the Twin Cities area, please save the date and plan to attend!

Minneapolis InDesign User Group meetings are free and open to the public, but registration is required. Hope to see you there.

Wednesday, July 01, 2009

How to format a Table of Contents

I've written a feature article for the latest issue of InDesign Magazine (Issue 30) about how to format a Table of Contents (TOC). The seven-page article is about how to format many different types of TOC layouts. Even if you never work with TOCs, you will learn something new from the article about tabs, indents, special characters, GREP and other formatting options. Of course, Issue 30 is chock-a-block full of other great articles and tips too!

Use coupon code FRIEND to receive $20 off a one-year subscription, or code FRIEND2 for $15 off a two-year subscription.

You can also purchase single issues at InDesignMag.com

If you're serious about taking your InDesign skills up a notch, I highly recommend this magazine.

Tuesday, June 30, 2009

Photoshop CS4 Adjustments Panel shortcut

The new Adjustments panel in Photoshop CS4 (Window > Adjustments) contains seven categories of adjustment presets. These adjustment presets can help you learn you to use the various adjustment options, or to quickly achieve a particular effect with a single click.

To use an adjustment preset, just click on one of the right-pointing "flippy triangles" next to one of the categories, then click on a preset.

Here's a handy shortcut, that lets you quickly browse through all the categories at once: option-click (Mac) or alt-click (Windows) on a flippy triangle, and all the categories will flip open at once.

This definitely falls into the "now how was I supposed to know that" category, but is a useful shortcut!

Thursday, June 25, 2009

Amazing, inexpensive drive adapter

Real life story: A consulting client of mine called in a panic: her Macintosh wouldn't start up. This is every designer's nightmare! It was an older Mac, she was planning on upgrading soon anyway, so this accelerated her purchase of a new Mac. But she had lots of valuable data on her old Mac.

Based on her description of the non-responsive Mac, I suspected the hard drive was OK. When her new Mac arrived, I pulled the hard drive out of the old Mac, and used the $29.99 USB 2.0 Universal Drive Adapter from Other World Computing to temporarily connect the old drive to the new Mac. It worked flawlessly. I was thrilled by how quick and simple it was, and she was thrilled to have her data back.

Yes, there are other ways to do this, but the Universal Drive Adapter is inexpensive, quick and easy. It allows almost any 2.5", 3.5" or 5.25" hard drive or optical drive to be temporarily connected via USB to a Mac or Windows computer. Highly recommended if you need this sort of thing.

Monday, June 22, 2009

How to Create a Flag Graphic with Type in InDesign

I've just had another article published over on the Vectortuts+ plus blog titled How to Create a Flag Graphic with Type in InDesign. I had fun creating this one. The beginner-to-intermediate-level tutorial explains how to use several InDesign techniques such as type on a path, step and repeat and gradients to create the image below. I'd encourage you to follow the tutorial and see if you learn something!

Wednesday, June 17, 2009

A spreadsheet app from Adobe?

Yes, it's true. Adobe has created a spreadsheet program, of all things. It's an on-line application called Acrobat.com Tables, currently in early pre-release beta on Adobe Labs. It joins Adobe Buzzword and Acrobat.com Presentations, which I've written about previously. All three applications are intended to be collaboration tools, allowing multiple users to work simultaneously on the same spreadsheet, word processing file, or presentation. See this press release for more information about Adobe's direction with all of this. More background about the development of Tables can be found here.

Tuesday, June 16, 2009

How to use multi-layered Illustrator artwork in InDesign

I just finished an article for the Vectortuts+ blog titled How to Use Multi-Layered Illustrator Artwork in InDesign. It's a quick tutorial about how to correctly save layered Illustrator artwork, and then how to change the visibility of the Illustrator layers from within InDesign. Check it out!

Thursday, June 11, 2009

The best way to separate paragraphs

In word processing programs, people often type two returns to separate each paragraph. In page layout programs like InDesign and QuarkXPress, it's better to create space between paragraphs using the Space Before and Space After attributes in the Control panel or Paragraph panel.

Here are three reasons why Space Before/After works better than extra returns.

1. An extra return between each paragraph is by default a "whole line". In other words, if you are using 12 points of leading in your paragraph, you will have an extra 12 points of leading between your paragraphs. But what if you want 11 points, or 13 points? This is easy to adjust if you are using Space Before/After, and a pain to adjust if you are using returns.

2. Extra returns between paragraphs, in long text, will sometimes end up at the top of a column or a page, moving the text that follows down from the top of the frame, creating uneven tops of columns or pages. With Space Before/After, space is never added at the top of a frame.

3. Using extra returns between paragraphs prevents you from being able to use the Keep Options properly. These handy controls allow you to ensure that subheads always "stick" with the following paragraphs, and never get separated at the bottoms of columns or pages.

To easily get rid of all the extra returns in your text in InDesign CS3 or CS4, choose Edit > Find/Change. Then choose Multiple Return to Single Return from the Query drop down, and click the Change All button.