Showing posts with label InCopy. Show all posts

Monday, May 06, 2013

News from Adobe MAX day 1

I'm at the Adobe MAX conference this week. At the keynote session this morning, Adobe made a LOT of announcements. If you are interested in Adobe's vision of the future of graphic design (and you should be) watch the recording of the keynote here.

I'll no doubt be writing much more about this here in weeks to come. But here are a few hightlights of particular note to readers of this blog:

CS6 is the final version of Creative Suite

Future versions of InDesign, Illustrator, Photoshop and other programs will be named InDesign CC, Illustrator CC, Photoshop CC, etc. The only way to stay up to date with these programs will be via a Creative Cloud membership. Many of the Creative Cloud revisions will be rolled out in June.

Previous versions

When CC versions of programs are released, CS6 versions will also remain available for download as part of your Creative Cloud subscription.

Fireworks is dead

Adobe has ceased further development of Fireworks. They will continue to sell Fireworks CS6, and it will remain downloadable for Creative Cloud members.

InCopy is part of Creative Cloud

At long last, InCopy, the editorial version of InDesign, will be part of your Creative Cloud subscription.

Typekit fonts for the desktop

Typekit, Adobe's platform for serving fonts to Web sites, is being extended to make many of the Typekit fonts available for desktop use in InDesign, Illustrator and Photoshop. With a technology called "Sync fonts" you can locate a Typekit font, sync it to your system, and it will be available immediately for use.

Upgrade for CS6 users

There will likely be a variety of upgrade paths and offers to Creative Cloud, but a $19.95/month "first year" price for owners of CS6 was announced.

Wednesday, February 22, 2012

How to break links between InCopy and InDesign

Lance wrote and asked:

"How do I break existing links between InCopy and InDesign? I have picked up a file from a previous design group that requires me to check in and check out every time I open and try to edit the content."

If you are sure that you want to sever the link between InCopy and InDesign, and do all further editing of all stories in InDesign, you can just go to the Links panel, and select any .icml, .icma, or .incx files you find there (the file types vary depending on your version of InDesign/InCopy). Then just choose Unlink from the Links panel menu.

Links

Monday, August 15, 2011

Clean text in InDesign

I first wrote about Text Cleaner way back in 2007 on this blog. Text Cleaner is a cool Macintosh program that makes it easy to "clean" text of multiple spaces, double hyphens, multiple tabs, line breaks, etc. It's a standalone application, but will clean the text you have selected in InDesign, InCopy or Quark without screwing up the formatting.

Alas, this handy app was never updated to work beyond InDesign CS2. But I just received notice from the developer that they've finally updated it to work with InDesign/InCopy CS3 - CS5.5, as well as Mac OSX 10.4 to 10.7.

You can download the pre-release version here, which is free and will work until 10/1/2011.

I really like this app, and used it heavily back in the days of InDesign CS2. In addition to working with text in InDesign, InCopy and Quark files, it will clean text on the clipboard or in a text file.


An alternative to Text Cleaner is the excellent Multi-Find/Change for InDesign from my friend Martinho da Gloria. This cool plug-in lets you string together and save sets of multiple InDesign find/change queries for quick recall. Highly recommended also!

Tuesday, November 30, 2010

ePub best practices: Capitalization

The ePub format has a number of formatting restrictions. When designing documents that may one day be repurposed for ePub output, it's in your best interest to follow some InDesign page layout "best practices".

One such "best practice" is in how capitalization is handled. It's not uncommon for manuscripts to be supplied with all kinds of goofy capitalization of head, subheads and body text. For example, an author may type a heading in a manuscript in any of these forms:

1. The Boy Who Died From Eating All His Vegetables

2. The boy who died from eating all his vegetables

3. THE BOY WHO DIED FROM EATING ALL HIS VEGETABLES

4. THE BOY who died from EATiig aLL HiS veGeTables

This is often "fixed" in the InDesign layout by using the All Caps attribute [command-shift-k (Mac) or ctrl-shift-k (Windows)]. This will cause all the selected text to appear in all caps, but in reality, the underlying text is still the original capitalization, as it was originally typed.

BEST PRACTICE: If text is typed in a goofy combination of mixed upper and lower case, don't just fix it with the All Caps attribute. Instead, use the Type > Change Case command to make the text appear in Title Case or Sentence case, as you want it to appear in the ePub output, and then use the All Caps attribute if you want it to appear in all caps in your print document.

Remember, if you have a lot of capitalization fixing to do, you can add a keyboard shortcut (Edit > Keyboard Shortcuts) to any of the Change Case commands to make them easier to access quickly.

Monday, June 28, 2010

Becoming an ACE

I'm frequently asked about the best way to prepare to become ACE certified in Adobe InDesign, Photoshop, Illustrator, Acrobat or other Adobe products.

An Adobe Certified Expert (ACE) "is a person who has demonstrated a professional level in proficiency with one or more Adobe software products." The steps to become an ACE are listed here. The primary task is to complete a "product proficiency exam" on the product for which you're seeking certification.

These exams aren't easy. They involve setting up a testing appointment at your closest Adobe-affiliated testing center, going to the testing location, and completing a 1-2 hour test. The tests are multiple-choice, presented on a computer screen. The toughest part is that you will not have the software in front of you to refer to while you're taking the test. So you have to know your stuff.

The key to preparation is to study the exam preparation guides. These guides detail exactly what topic areas of the program will be covered on the test, as well as what percentages of the test questions will pertain to each topic. In addition, each guide contains several sample questions.

For example, the InDesign CS4 guide says that there will be 4 questions (6% of the total test questions) on "working with tables". It goes on to say that you need to know how to modify tables, edit and format a table, create, apply, import, modify, and organize cell and table styles, and update the information in a table when the original data has changed. The exam guide gives similar detail for the other seven topic areas that will be covered.

So the key to passing the test is to study the exam guide, and learn and practice the topic areas that you don't know well.

Other helpful resources:

* Mike Rankin has written The InDesignSecrets Guide to the InDesign CS4 ACE Exam, helpful in preparing for that exam.

* exam aids has created simulated ACE tests for many Adobe products to help users prepare for the ACE exams.

Friday, May 21, 2010

Quickly enter Metadata in Adobe Creative Suite

Command-option-shift-i (Macintosh) or ctrl-alt-shift-i (Windows), or File > File Info displays a dialog box that lets you view and enter metadata about the file you’re currently editing. This works in InDesign, InCopy, Illustrator, Photoshop and Bridge.

Unfortunately, Flash, Fireworks, Soundbooth and Acrobat march to the beat of a different drummer:

In Flash, the menu command is still File > File Info, but there's no keyboard shortcut assigned.

In Fireworks, the menu command is File > File Info, but the keyboard shortcut is command-option-shift-f/ctrl-alt-shift-f.

In Soundbooth, metadata is entered in the Metadata panel (Window > Metadata).

In Acrobat, you access the metadata for the current document by choosing File > Properties, or pressing command-d (Macintosh) or ctrl-d (Windows).

Wednesday, April 21, 2010

Add new capabilities to InDesign & InCopy

I've been doing a lot of writing lately. I usually start a writing project in Word or NeoOffice, so that I can use an outliner to quickly organize and rearrange my thoughts. I also rely on the thesaurus in those programs.

But sometimes for various reasons I do my writing in InDesign. But InDesign doesn't have a Thesaurus, and I miss that. But thanks to Mac OS X "Services", I can access a thesaurus from within InDesign. Just select a word, and choose InDesign > Services > Look Up in Dictionary. The Apple Dictionary application will be launched, and the selected word will be looked up in the dictionary. From there, I can click on Thesaurus to explore alternate words, or Wikipedia to learn more about the word.

Other services that I've sometimes used in InDesign or InCopy include Show Address in Google Maps, Search With Google and Open URL.

These options in the Services section of theInDesign menu (aka the Application menu) are provided by OS X, and work in many Macintosh applications (but not Illustrator, Photoshop or Flash unfortunately). So this is a Macintosh-only feature. I don't know of a similar technology available on Windows.

In OS X 10.6, you may need to choose InDesign > Services > Services Preferences to turn on some of the services mentioned above. Only services that have a check mark next to them will show up in your Services menu.

I've also installed WordService and CalcService from DEVONtechnologies. These free downloads add a bunch of text and number processing features to the Services menu. Particularly handy is the ability to quickly insert the current date and time into your text, and the ability to do math in InDesign.

If you frequently need to shorten URLs in your text, check out this solution for Bit.ly, This is really slick. You just select a long URL in InDesign, choose InDesign > Services > Shorten URL with Bit.ly, and Bit.ly is contacted, the URL is shortened, and your long URL is replaced with the short URL. Click here for solutions for TinyURL and various other URL shorteners.

Warning, I encountered one serious bug while messing around with this. If I have a cell or any other portion of a table selected, and I choose InDesign > Services, InDesign crashes immediately. I'm running InDesign CS4 6.0.4 on Mac OS X 10.6.3.

Monday, April 12, 2010

Creative Suite 5 announced

Finally, the cat's out of the bag. Adobe announced Creative Suite 5 today. I'm really impressed with this release. For designers, there's something for everyone. But you might have to dig beyond Adobe's marketing messaging to discover the features and improvements that will affect you.

Begin by watching the 35 minute launch video. This will give you a general idea of where Adobe thinks the design market is headed in the future. Don't expect to see a lot of coverage of InDesign, Photoshop and Illustrator. In fact, at least the first 5 and last 5 minutes are devoted to Flash Player 10.1, Adobe Omniture, Flash Media Server, Scene7 and Business Catalyst. These are all products that don't directly impact the lives of most designers...today. But don't despair! There are HUGE improvements for designers using InDesign, Illustrator, Photoshop, Flash and Dreamweaver in CS5.

Much will be written about the many new features both here and elsewhere in the upcoming weeks and months. But right now, one way to get a sense of what's new is to view AdobeTV and visit the "What's New" page on Adobe.com for each product. Here are some links directly to that content.

InDesign [AdobeTV] [What's New]
Photoshop [AdobeTV] [What's New]
Illustrator [AdobeTV] [What's New]
Flash Professional [AdobeTV] [What's New]
Dreamweaver [AdobeTV] [What's New]

My friends over at InDesignSecrets have compiled a detailed writeup of many of the new features of InDesign. A must-read if you use InDesign.

Flash Catalyst is a brand-new application that's bundled with Creative Suite Design Premium, Web Premium and Master Collection. I'm really excited about this application. I've been using it a lot and will be writing more about it here in the future. Flash Catalyst allows designers to create interactive content without writing code, using Illustrator and Photoshop as a starting point. Learn more about it here, or see it on AdobeTV.

Besides the big shiny new features for each product, the InDesign, Illustrator and Photoshop development teams all spent a lot of time smoothing off rough edges, polishing existing features, and adding "little things" that customers have been requesting. The Photoshop team called this process JDI (Just Do It). One could argue that for some users, these little things equal the big shiny features in importance for day-to-day productivity.

If it seems hard to keep up, consider this. Adobe has released 5 versions of the Suite in less than 7 years! The first verson of Creative Suite was released in October 2003. Whew!

Adobe expects to ship English language versions of Creative Suite 5 by mid-May 2010.

Monday, February 22, 2010

How to control the "View PDF After Exporting" setting in InDesign

Deb wrote and asked:

"Do you know where I change the setting to automatically open a PDF when it is created? I tried changing it in my preferences and printing settings, but the PDFs still automatically open."

If you use File > Export to create PDFs from InDesign or InCopy, you may find it helpful to have the resulting PDF automatically displayed in Acrobat after it's created. Or, like Deb, perhaps this behavior annoys you and you'd prefer to turn it off. This pesky setting often leads to confusion and frustration, because it behaves unlike any other setting in InDesign.

The View PDF After Exporting option in the Export Adobe PDF dialog box is the key to making this work the way you want it to. If this option is checked, then PDFs created from InDesign will automatically be displayed on the screen after they're created. If this option isn't checked, the PDFs won't be displayed.

The tricky thing about this setting is that it is NOT memorized with any PDF Presets that you create. To enable or disable this setting, you need to open an InDesign file, and then choose File > Export and select Adobe PDF for the format (or choose File > Adobe PDF Presets and select a preset). Then, in the Export Adobe PDF dialog box, select or deselect "View PDF After Exporting", and click the Export button.

You must create at least one PDF with the setting selected the way you want, and then it will "stick" that way until you change it again.

Monday, January 11, 2010

InDesign drag and drop tricks

You can "drag and drop" to cut and paste text from one location on the page to another in Adobe InDesign, but the feature is disabled by default. To enable it, visit Preferences > Type, and select the "Enable in Layout View" option under the "Drag and Drop Text Editing" heading. Then, if you select some text with the Type tool, you can drag the text to a new location, and the text will be cut out of the original location and pasted in the new location. In other words, the same results as choosing Edit > Cut and then Edit > Paste, but easier.

Here are some useful modifier keys that you can use with drag and drop:

Hold down the option (Mac) or alt (Windows) key after you begin to drag to enable a copy and paste, leaving the text in the original location and copying it to the new location.

Add the command (Mac) or ctrl (Windows) key while dragging to create a new frame for the text you are dragging.

Add the shift key while dragging to cut or copy the text as “unformatted” text, so it inherits the formatting of the surrounding text (this is new in InDesign CS3).

Of course, you can combine any of these shortcuts. For example, add option-command (Mac) or alt-ctrl (Windows) to copy the text to a new frame.

Wednesday, December 02, 2009

An InDesign GREP tutorial

Steve (who attended my "Power through your work with InDesign Styles" seminar in September) wrote:

"I am trying to find an InDesign GREP style that would find select every character (paragraphs included) between any amount of tabs and the next instance of a bullet. Any Ideas?"

The GREP string that I came up with to do what Steve asks is this:

(?<=\t)[^~8\t]+(?=~8)

I'll take this apart and try to help you understand it piece by piece.

(?<=\t)

The \t means to look for a tab character. The (?<=) is called a "positive lookbehind," which tells InDesign to not include the thing it finds in the search result. So (?<=\t) means to "look back" for a tab character, but don't include the tab character in the search result.

[^~8\t]+

The square brackets create what is called a "character class," which means to "match any of the things in these brackets". In this case, in the brackets we have a ~8 which is a bullet, and a \t which is a tab character. So [~8\t] would mean to match any character that is a bullet or tab. But if you look closely, we have a ^ before the bullet in the character class. This means "not". So [^~8\t] means to match any character that is NOT a bullet or tab.

Finally, you'll notice a + after the character class. This means to match the character class "one or more times". So [^~8\t]+ means to match "one or more characters that are not bullet or tab characters".

(?=~8)

As we saw above, the ~8 is a bullet character. The (?=) is a "positive lookahead," which, like a "positive lookbehind" tells InDesign to not include the thing it finds in the search result. So (?=~8) means to "look ahead" for a bullet character, but don't include the bullet character in the search results.

Putting it all together, we have (?<=\t)[^~8\t]+(?=~8) which means to:

Look for one or more characters that are not bullets or tabs, that are preceded by a tab character and followed by a bullet, (but don't include the tab or bullet in the search results).

The (?<=\t)[^~8\t]+(?=~8) string can be used in InDesign in two different places:

1. The GREP tab of the Find/Change dialog box, to do a search based on the GREP expression, or

2. The GREP Style tab of the Paragraph Style Options dialog box, which allows you to have InDesign assign a character style automatically any time that the GREP expression is matched.

Tuesday, November 24, 2009

Disk icons in the Paragraph Styles panel

Have you ever noticed the little disk icons that sometimes appear to the right of your Paragraph or Character Styles in InDesign/InCopy? Have you wondered what these mean?

These icons, when displayed next to a Character or Paragraph style, indicate that the style wasn't created in InDesign, but came into the Styles panel with placed text, most likely from Microsoft Word.

The disk icon also indicates that the Character or Paragraph style hasn't been modified in InDesign. If you double-click on the style name and edit the style, the disk icon disappears.

I imagine that the disk symbol isn't recognizable to many people anymore. When was the last time you touched a 3.5-inch floppy disk? Adobe is going to need to find a new symbol for this pretty soon!

Off-topic, but I just have to share this photo of another cutting-edge use of floppy disks, in this case the totally old-school 5.25-inch variety:

Monday, October 12, 2009

Use GREP find to truncate lines of text

A student from one of my on-site InDesign training classes asked how to remove the end of each line of text in an InDesign-created directory listing, as shown in the example below. Each line of the directory consists of some text, a tab character, more text, and then a paragraph return.

In her email, she said "there are thousands, nay, millions of these pesky things...can Indesign find and replace wildcard strings?"

InDesign CS3/CS4's GREP Find/Change feature is made for just this sort of thing. Choose Edit > Find/Change, and fill in the dialog box as shown below.

In this case, \t represents a tab character, and the plus sign after it means to look for "one or more" tab characters. The period stands for "any character", and the asterisk after the period means to look for "zero or more" of "any character". So the entire Find phrase means "look for one or more tab characters that may or may not be followed by additional characters." Since the "Change to" field is empty, the found text will be replaced by nothing.

Tuesday, July 28, 2009

Easily delete text in InDesign/InCopy

Bonnie wrote today and pointed out that on my InDesign CS4 keyboard shortcut reference guide, I've listed the same keyboard shortcut (command-delete) for both "Delete one word to the left" and "Delete one word to the right".

Believe it or not Bonnie, this isn't a typo (though I'll admit it could be more clear!) This brings up an issue that many people don't understand, so I thought it would be worth explaining here.

Some Macintosh keyboards have two delete keys, one that's two rows above the return key, and another that is between the main keys and the numeric keypad, directly above the cursor keys.

On this type of keyboard, the left-most delete key deletes a single character to the left of the text cursor, and the right-most delete key deletes a single character to the right of the text cursor. Likewise, command-left delete key deletes a word to the left of the text cursor, and command-right delete key deletes a word to the right of the text cursor.

If you have a Mac laptop or a smaller Mac keyboard that only has a single delete key, fn-delete deletes one character to the right, and fn-command-delete deletes one word to the right.

On most Windows keyboards, the left-deleting delete key is labeled as "Backspace" and the right-deleting key is labeled as "Delete" so Windows users don't have this confusion.

I've updated the InDesign CS4 keyboard shortcut reference guide to clarify this issue.

Thursday, June 11, 2009

The best way to separate paragraphs

In word processing programs, people often type two returns to separate each paragraph. In page layout programs like InDesign and QuarkXPress, it's better to create space between paragraphs using the Space Before and Space After attributes in the Control panel or Paragraph panel.

Here are three reasons why Space Before/After works better than extra returns.

1. An extra return between each paragraph is by default a "whole line". In other words, if you are using 12 points of leading in your paragraph, you will have an extra 12 points of leading between your paragraphs. But what if you want 11 points, or 13 points? This is easy to adjust if you are using Space Before/After, and a pain to adjust if you are using returns.

2. Extra returns between paragraphs, in long text, will sometimes end up at the top of a column or a page, moving the text that follows down from the top of the frame, creating uneven tops of columns or pages. With Space Before/After, space is never added at the top of a frame.

3. Using extra returns between paragraphs prevents you from being able to use the Keep Options properly. These handy controls allow you to ensure that subheads always "stick" with the following paragraphs, and never get separated at the bottoms of columns or pages.

To easily get rid of all the extra returns in your text in InDesign CS3 or CS4, choose Edit > Find/Change. Then choose Multiple Return to Single Return from the Query drop down, and click the Change All button.

Wednesday, April 15, 2009

Tips for using the NEW panel icon

Many of the panels in InDesign, InCopy, Illustrator, Photoshop, Flash and Fireworks have a small icon at the bottom that looks like a page with a dog-eared bottom-left corner.

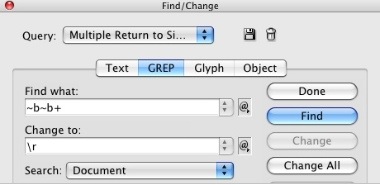
Whenever you see this icon in one of these programs, the icon means "new". If it's at the bottom of the Pages panel, it means New Page, at the bottom of the swatches panel, it means New Swatch, etc. You can click on this icon to create a new page, swatch, layer, or whatever.

Here's a nifty trick. If you option-click (Mac) or alt-click (Windows) on the New icon in certain panels, you will get a new page, or swatch, or layer or whatever, but first you will be presented with some options (thus the option/alt key) that will control how the resulting page, layer, swatch etc. is named or what it looks like.

For example, clicking on the New icon at the bottom of the InDesign/InCopy Paragraph Styles panel creates a new style named Paragraph Style 1. But if you option/alt-click on the New icon, the New Paragraph Style dialog will appear, giving you a chance to name the Paragraph Style and set other style options.

Option/alt-clicking on the New icon at the bottom of the Layers panel in InDesign, Illustrator or Photoshop displays the New Layer dialog box, giving you a chance to name the layer before it is created.

Likewise, option/alt-clicking on the New icon at the bottom of the Paths or Channels panels in Photoshop gives you a chance to name the Path or Channel as it is created.

So, two things to remember:

1. Look for the dog-eared page icon in many of the panels in Adobe Products. It always means New.

2. Try option/alt-clicking on this icon, to see if it provides additional functionality that can make you faster and more efficient.

Tuesday, March 10, 2009

Creating a Table of Contents, part 2

In part 1 of this series I described the best way to create and format a simple table of contents. The result is pictured below.

I don't like the way the multi-line TOC entries crowd the page numbers near the right edge of the frame. Most people would fix this by manually inserting line breaks (shift-return) in the text to cause it to break early. This isn't efficient for a long TOC, and it makes the text more difficult to edit in the future. Here's a better way.

1. Select the TOC text with the Type tool, and enter a value in the Right Indent field of the Control panel or Paragraph panel. This will push all the right edge of all the text to the left.

2. Enter the same value you entered in step 1, but negative, in the Last Line Right Indent field of the Control panel or Paragraph panel. This will pull the last line of text back out to the right edge of the text frame.

Using this method will make it easy to revise the TOC at any time without having to fuss with the formatting.

Thursday, March 05, 2009

Creating a Table of Contents, part 1

I've been getting a lot of questions lately about the best way to format a Table of Contents (TOC) in InDesign. Here is the best way to create and format a simple Table of Contents.

1. Create a frame the width that you want your TOC to be.

2. Type the first TOC entry in the frame, followed by a shift-tab, followed by the page number for that entry, followed by a return. Repeat this for each TOC entry. The shift-tab creates a "right indent tab", a special kind of tab stop that causes the text after the tab stop to always right-align with the right edge of the frame. If you have hidden characters displayed (Type > Show Hidden Characters), the right indent tab will display like a regular tab character but with a vertical line through it, as shown below.

3. It's easy to add a dot leader before each page number, to help guide the reader's eye across the page from the TOC entry to the page number. Select all the lines of the TOC with the Type tool, and choose Type > Tabs to display the Tabs ruler on the screen.

4. Click in the white space above the ruler increments in the Tabs ruler to place a tab stop somewhere near the right edge of the ruler. With this tab stop selected, type a period or a period and a space in the Leader field in the Tabs ruler. (It doesn't really matter where you put the tab stop, or whether it is a left, right, center or decimal tab stop. InDesign CS2 and later uses the leader attributes of the last tab stop before the right indent for any right indent tabs that are created in the text.)

The beauty of this method is that you can change the width of the frame, or the size of the text, and the page numbers will still right-align neatly with the right edge of the frame.

Of course, for long TOCs, you should learn how to use Paragraph Styles and InDesign's automatic Table of Contents feature. But the best practices described here for formatting the resulting TOC still apply.

In the example above, I don't like the way the multi-line TOC entries crowd the page numbers near the right edge of the frame. Next week, in part two, I'll describe an obscure feature that will automatically prevent this from happening.

Monday, January 05, 2009

InDesign Special Character Guide

Over at the incredibly-useful InDesignSecrets Blog, my friend Anne-Marie has posted a concise visual reference to all of InDesign's on-screen hidden characters and markers. These are InDesign's visual clues that indicate that you've entered a space, non-breaking space, line break, tab, or other difficult-to-recognize character. In order to see these characters on the screen, Type > Show Hidden Characters must be chosen.

In this well-organized, downloadable PDF reference, Anne-Marie shows 43 different doo-dads that may leave you scratching your head when you see them on the screen. Now you can just look them up in this handy reference. Thanks Anne-Marie!

Friday, November 14, 2008

InDesign Keyboard Shortcut Reference

I've just finished updating my Keyboard Shortcut Reference sheets for Adobe InDesign CS4. I've managed to fit all 375 or so shortcuts on two U.S. letter-sized pages. I like to have a printed copy of this handy by my computers at all times. I've given a lot of thought to how the shortcuts should be organized and grouped in this latest version of the Shortcut Reference. You may download a Macintosh version here, or a Windows version here, as a free PDF. You can also find versions for CS2 and CS3 here.

BONUS TIP: while researching the keyboard shortcuts for this project, I stumbled across one undocumented shortcut: On the Macintosh, Option+Enter (on the numeric keypad) inserts an "End Nested Style Here" character in both CS3 and CS4. Pretty obscure, but this might be useful for someone.