Showing posts with label Photoshop. Show all posts

Friday, January 29, 2021

The end of the road for PostScript Type 1 fonts

Adobe is dropping support for the old PostScript Type 1 fonts in January 2023. See this announcement. Support for PostScript Type 1 fonts in Photoshop will happen even sooner (this year).

If you are still using old PostScript Type 1 fonts in your workflow, now is the time to begin planning for replacing them with OpenType versions.

Monday, June 27, 2016

Never stop learning

If you think you know everything you need to be a creative, efficient, effective graphic designer, art director, or production artist, think again. Even if you are totally on top of your game, there is certainly more you can learn about the tools you use everyday, such as Adobe InDesign, Illustrator, or Photoshop.

I want to be sure that you know about 2 exciting educational opportunities that are coming in 2 weeks to the Minneapolis/St. Paul, Minnesota area.

First, July 10-13 is a rare opportunity to learn Illustrator and Photoshop techniques from pros such as Deke McClelland, Bert Monroy, Von Glitschka, and Sharon Steuer. The Creative Pro Conference is specifically for Creative Professionals who use Illustrator and Photoshop. You can choose to attend the entire conference, just the preconference, just the Illustrator sessions, or just the PhotoShop sessions. This is going to be a great conference!

Conference image

Second, at 7pm on July 13, Anne-Marie Concepcion is going to be the featured speaker at the popular Twin Cities InDesign User Group meeting at Concordia University of St. Paul. Anne-Marie is co-founder of the Creative Publishing Network, owner of Seneca Design & Training in Chicago, popular Lynda.com author, and co-host with David Blatner of the popular InDesignSecrets podcast and Web site. Don't miss this opportunity to hear one of the best InDesign presenters around!

I hope to see you at one of these events!

Tuesday, April 12, 2016

Camera RAW for Designers

Photoshop’s “Camera Raw” dialog box was created specifically for the needs of photographers. The controls in this box are presented in terminology that avid photographers are familiar with, so it can be intimidating to graphic designers and others who aren’t photographers.

But there are many things that that this dialog box does much easier than anywhere else in Photoshop. And with the ability to use the Camera Raw dialog box on any photo in Photoshop via Filter > Camera Raw Filter, these features are accessible to anyone. Here are 5 of my favorites:

Upright

1. Open a photo that exhibits “fall away”, which happens when you shoot a photo of a tall building from street level

2. Choose File > Camera Raw Filter

3. Click the Lens Corrections tab

Screen Shot 2016 04 12 at 5 25 45 PM

4. Click the “A” icon. This will attempt to fix the photo, applying a “balanced” amount of perspective correction. Compare the image below to the image above.

Screen Shot 2016 04 12 at 5 34 03 PM

Post crop vignette

Adding a bit of vignette to photos, especially portraits, can help focus the viewer’s eye on the subject. Camera Raw makes this simple.

1. Click the Effects tab

Screen Shot 2016 04 12 at 5 43 36 PM

2. Find the “Post crop vignette” slider, and drag it to the right to add white, or to the left to add black. I’ve purposely overdone the amount of vignette in the example below to make the effect obvious.

Screen Shot 2016 04 12 at 5 48 28 PM

White balance

Sometimes photos taken under incandescent lighting are too warm and yellow, and photos taken under fluorescent lighting are too cold and blue. This is easily fixed with Camera Raw’s “White Balance” settings.

1. Click the Basic tab

Screen Shot 2016 04 12 at 5 55 21 PM

2. In the “White Balance” drop-down, choose Auto, and then further tweak the Temperature and Tint sliders as desired.

Screen Shot 2016 04 12 at 5 56 02 PM

Clarity

The Clarity feature applies a local contrast algorithm to the image, which often makes the image look sharper and more vibrant.

1. Click the Basic tab 

Screen Shot 2016 04 12 at 6 07 16 PM

2. Locate the Clarity slider and drag it to the right until the image looks good.

Screen Shot 2016 04 12 at 6 07 46 PM

Dehaze

Dehaze is amazing. It excels at removing haze from outdoor scenes.

1. Click the Effects tab

Screen Shot 2016 04 12 at 6 21 03 PM

2. Locate the Dehaze control, and drag the Amount slider to the right.

Screen Shot 2016 04 12 at 6 21 34 PM

Want to learn more Photoshop? Join me at the CreativePro Conference in Minneapolis in July!

Wednesday, June 24, 2015

How to convert an image sequence to an animated GIF

Image sequences are an excellent way to create animation for Adobe Digital Publishing Suite. But an image sequence will not work in content exported to fixed layout EPUB from InDesign, or content exported using the new Publish Online functionality in InDesign CC 2015. So you might need to convert an image sequence to an animated GIF, which does work in fixed layout EPUB and Publish Online. Here’s how to do it.

1. Launch Photoshop (these instruction are written using Photoshop CC 2015, but the process is similar in several recent versions)

2. Choose File > Scripts > Load Files into Stack

3. Click Browse to select all the PNG or JPEG files in the image sequence, then click the OK button. If you have a lot of files making up the sequence, this step may take a few minutes.

Screen Shot 2015 06 24 at 11 53 24 AM

4. When it is finished, you’ll see that a single file has been created, with each image loaded into a separate layer. Choose Window > Timeline to display the Timeline panel.

5. Click the Create Frame Animation button in the Timeline panel. This will create a single frame in the Timeline panel.

6. In the Timeline panel menu, choose Make Frames From Layers

7. Choose File > Export > Save For Web

8. Choose one of the GIF Presets, choose the desired Looping option, and then click the Save button.

Screen Shot 2015 06 24 at 12 02 01 PM

Sunday, June 01, 2014

How to make the Photoshop Crop tool behave like older versions

I did some Photoshop training last week, and was reminded again how much some people dislike the behavior of the “new and improved” crop tool that was introduced in Photoshop CS6.

What people dislike the most is the new behavior where Photoshop continuously centers the crop area on the screen as you resize and reposition the crop boundary. If this bothers you, pick up the crop tool, click on the gear icon in the Options bar, and uncheck the Auto Center Preview option. This will turn off the auto centering behavior, and the crop tool will behave similar to previous versions.

ScreenSnapz001

Another complaint I hear is that people dislike the way Photoshop applies a crop boundary to the image as soon as you click on the Crop tool. If you don’t like where the crop boundary is positioned, it takes longer to move and resize the boundary than to just create a new one. But did you know that you can just ignore the crop boundary that Photoshop creates, and drag to create an entirely new boundary? You don’t need to resize/reposition the boundary that is there.

In case you’ve missed it, I’d like to point out the Delete Cropped Pixels choice in the Options bar. If you uncheck this option, cropping is non-destructive. In other words, as long as you save your image as a layered PSD or TIFF file, the pixels outside the crop boundary are retained, so that you can adjust the crop boundary in the future. 

Thursday, December 12, 2013

Blend mode trick

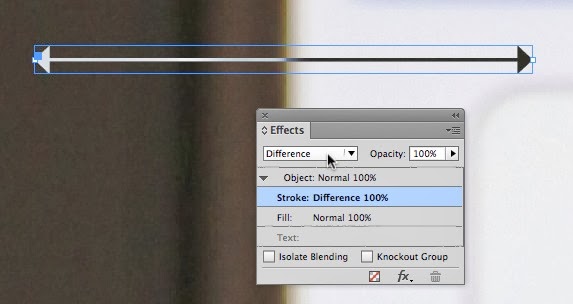
I was working on an InDesign project, and was using white arrows and black arrows on top of various images to indicate swipe direction for an Adobe Digital Publishing Suite project. The white arrow worked great on dark images, and the black arrow worked great on light images. But then I ran into an image that had a half dark/half light background. What to do? InDesign's Blend Modes to the rescue.

1. Create an arrow, and fill it with white (the [Paper] color in most projects)

ScreenSnapz004

2. Use the Effects panel (Window > Effects) to change the Blend Mode of the stroke to Difference.

ScreenSnapz005

3. The result? An arrow that is light where it appears on a dark background, and dark on a light background.

ScreenSnapz006

This technique will also work in Illustrator, Photoshop, and After Effects, since these programs all feature a "Difference" blend mode.

Wednesday, November 20, 2013

How to apply multiple gradients to a Photoshop layer mask

Its easy to mask part of an image by creating a layer mask and dragging a white to black gradient on the mask. But what if you want to had 2 or more gradients in a single mask? This can be a bit of a head-scratcher. Here's how:

1. Create a new, blank layer mask by choosing Layer > Layer Mask > Reveal All.

ScreenSnapz001

2. Click on the mask in the Layers panel. 

3. Select the Gradient tool in the Tools panel.

ScreenSnapz002

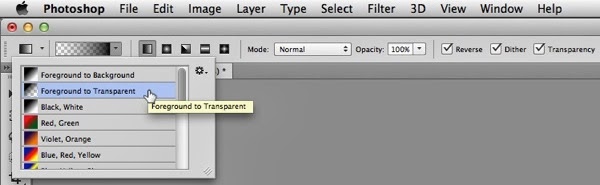
4. In the Options bar, choose Foreground to Transparent for the type of Gradient, and set the other options in the bar as shown below.

ScreenSnapz005

5. Choose black for your foreground color.

ScreenSnapz004

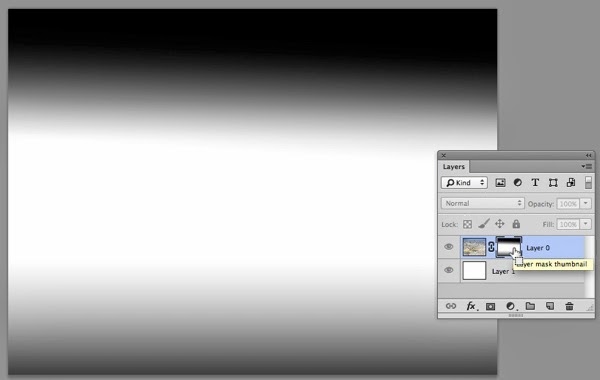
6. To achieve the result below, I dragged from just above the center of the image to the top edge of the image, and then again from just below the center of the image past the bottom edge of the image, masking the top and bottom areas of the image and revealing the white layer underneath.

ScreenSnapz006

7. Option/Alt-click on the layer mask icon in the Layers panel to view the mask full-size. Option/Alt-click on the icon a second time to view the completed image.

ScreenSnapz007

Wednesday, October 30, 2013

Change Photoshop's Undo shortcut to match other Adobe programs

Most of the Adobe creative applications feature unlimited undos. And to access these multiple undos, you can use the command-z (Mac) and ctrl-z (Windows) shortcuts. To redo, use command-shift-z (Mac) and ctrl-shift-z (Windows). However, Photoshop is different. Photoshop offers only a single undo. But, in its place, it features a History Panel, allowing you to move forward and back in history. But you can change Photoshop's keyboard shortcuts so that undo works like you'd expect it to. Here's how:

1. Choose Edit > Keyboard Shortcuts

ScreenSnapz001

2. In the Keyboard Shortcuts dialog box, click on the triangle to the left of the word Edit to spin the Edit category open. 

3. Click in the Shortcut field to the right of Undo/Redo, and press the delete key to remove the keyboard shortcut assigned to Undo/Redo.

4. Click in the Shortcut field to the right of Step Backward, and press command-z (Mac) or ctrl-z (Windows)

5. Click the Accept button.

ScreenSnapz003

6. Click on the Save icon at the top of the dialog box, give your shortcut set a name and click the Save button.

ScreenSnapz004

Now, command-z (Mac) or ctrl-z (Windows) will step backward through the History panel, giving you multiple Undo capability. Add the shift key to step forward through the History panel.

Monday, July 01, 2013

Automatically extend a background in Photoshop

If you need to extend a photo by adding more sky, clouds, grass, snow or other organic "background", here's the easy way, using Photoshop CS5 or later:

1. Choose Image > Canvas Size. Increase the width or height of your image, choose the anchor, set the Canvas extension color to White, and click OK.

ScreenSnapz001


ScreenSnapz003

2. Choose the Quick Selection Tool (W) in the tool panel. Be sure that "Auto-Enhance" is selected in the Options bar at the top of the screen. Then select the additional white canvas you added to the photo by dragging through it with the Quick Selection Tool. 

3. Press the Delete key.

4. In the Fill dialog box, select Use "Content-Aware" for the Contents. Click the OK button.

ScreenSnapz004


ScreenSnapz005

Monday, May 13, 2013

Photoshop workshop this Thursday!

This Thursday, May 16, from 2:00 - 5:00 pm in downtown Minneapolis I'll be presenting a "Photoshop Techniques for Architectural Photography" workshop. In the workshop, which is open to the public, I'll share Adobe Photoshop tips and techniques that are particularly helpful for editing and enhancing architectural photography. Techniques will be shown using Photoshop CS6 Extended, but many of the techniques will apply to earlier versions of Photoshop also.

Topics will include:

  • How to swap the sky in one photo with the sky in another, how to create artificial sky, and how to change the color of the sky.
  • How to easily remove unwanted objects such as date stamps, power lines, trash cans, exit signs, and security cameras.
  • Easy techniques for color and tone correction.
  • How to adjust for the distortion introduced by wide angle lenses.
  • How to stitch multiple images together to create a larger image
  • How to bring out details lost in the shadows.
  • Two fantastic techniques to help you batch process multiple images at once.
  • How and why you might want to paste from InDesign to Photoshop
  • Why and when you should use Smart Objects.
  • Advanced cropping techniques

...and much more!

You can register for the workshop here.

Monday, May 06, 2013

News from Adobe MAX day 1

I'm at the Adobe MAX conference this week. At the keynote session this morning, Adobe made a LOT of announcements. If you are interested in Adobe's vision of the future of graphic design (and you should be) watch the recording of the keynote here.

I'll no doubt be writing much more about this here in weeks to come. But here are a few hightlights of particular note to readers of this blog:

CS6 is the final version of Creative Suite

Future versions of InDesign, Illustrator, Photoshop and other programs will be named InDesign CC, Illustrator CC, Photoshop CC, etc. The only way to stay up to date with these programs will be via a Creative Cloud membership. Many of the Creative Cloud revisions will be rolled out in June.

Previous versions

When CC versions of programs are released, CS6 versions will also remain available for download as part of your Creative Cloud subscription.

Fireworks is dead

Adobe has ceased further development of Fireworks. They will continue to sell Fireworks CS6, and it will remain downloadable for Creative Cloud members.

InCopy is part of Creative Cloud

At long last, InCopy, the editorial version of InDesign, will be part of your Creative Cloud subscription.

Typekit fonts for the desktop

Typekit, Adobe's platform for serving fonts to Web sites, is being extended to make many of the Typekit fonts available for desktop use in InDesign, Illustrator and Photoshop. With a technology called "Sync fonts" you can locate a Typekit font, sync it to your system, and it will be available immediately for use.

Upgrade for CS6 users

There will likely be a variety of upgrade paths and offers to Creative Cloud, but a $19.95/month "first year" price for owners of CS6 was announced.

Tuesday, March 12, 2013

Upcoming speaking gigs

When it rains, it pours! I've got a full slate of conferences that I'm speaking at in the upcoming weeks. If you can get to any of these conferences, I highly recommend them!


AAF Central MN Event (St. Cloud, MN)

3/28/2013, 2:00 - 5:00 pm

Session: 5+4+3: 5 things every designer MUST know about InDesign, 4 about Photoshop, and 3 about Illustrator


MMPA Summit & Expo (Minneapolis, MN)

4/25/2013

Session: How to create "immersive reading experiences" in tablet publications

Session: 5 ways to add animation to Adobe DPS publications


PePcon: The Print + ePublishing Conference (Austin, TX)

4/28/2013 - 5/1/2013

Panel Session: Moving Your Publication from Print to Tablet

Tutorial: Publishing Your iPad app: The Hardest Step Explained

Use the code TXKG88 to save $25 off the registration cost.


Adobe MAX (Los Angeles, CA)

5/4/2013 - 5/8/2013

Hands-on Labs: L7939: Designing for iPad: A Step-by-Step Guide for Print Designers


Monday, February 11, 2013

How to add a "spin" animation to a DPS project

I recently wrote up a detailed step-by-step tutorial for Adobe's SWAPP iPad app about how to use the 3D and animation features of Photoshop CS6 Extended to make an object rotate 360º, and then how to include that animated rotation in a Digital Publishing Suite iPad app.

If you don't have access to an iPad, you can view the tutorial online here.

Spin image

Friday, August 31, 2012

Paste from InDesign into Photoshop

Did you know that you can copy and paste objects from InDesign into Photoshop? Why would you want to copy something from InDesign into Photoshop? Perhaps you need some multi-column text in Photoshop, or something else that you know how to easily do in InDesign but not in Photoshop. Here's how it works:

In InDesign, be sure that in Preferences > Clipboard Handling, Copy PDF to Clipboard is selected. Then, select one or more objects in InDesign, and choose Edit > Copy. Next, in Photoshop choose File > Paste. The object will appear in Photoshop with a bounding box around it. Move or resize this bounding box as desired, then hit the return key. The object will appear in the Photoshop Layers panel as a Vector Smart Object.

If you choose Layer > Smart Object > Edit Contents, the contents of the layer will open in Illustrator, not InDesign, unfortunately. This is because the content is copied out of InDesign as PDF content. So we don't have the holy grail of "round trip" content editing between InDesign and Photoshop, but this can still be useful for certain tasks.

Tuesday, June 26, 2012

Fantastic resource for creating App icons

If you create Apps for the iPad, iPhone, or Android devices, you are faced with the tedious task of creating App icons at various sizes. In order to submit an iPad app to the App store, for example, you need to submit your App icon in PNG format in seven different sizes.

To make this process much, much easier, Johannes Henseler has created a free Photoshop template. To use the template, you open a smart object on one of the Photoshop layers, and create your artwork in Illustrator or Photoshop in the smart object. Then, with a single click you can export icons in 15 different sizes all at once. Thanks Johannes!

If you've previously used this template, note that Johannes updated the template on 6/22/2012.


Template

Wednesday, May 23, 2012

Join me in St. Cloud tomorrow!

Tomorrow (5-24-2012) from 12:00 - 1:00 p.m. I'll be speaking at an AAF (American Advertising Federation) Central Minnesota event. If you're in the St. Cloud area, come for lunch and a chance to learn more about Photoshop. My topic is "Five Things You MUST Know About Photoshop". I hope to see you there. Details and registration info here.

Wednesday, February 29, 2012

Adobe to discontinue Adobe CS Review

When CS5 was released approximately two years ago, Adobe included a free trial of what they call the "CS Live" services. They've now announced that two of those services, Adobe CS Review and SiteCatalyst® NetAverages™ will be discontinued on 4/12/2012.

The CS Live services are accessed via a link in the upper right corner of the screen in InDesign, Illustrator, Photoshop, or Adobe Premiere Pro.


Cslive


Adobe CS Review allowed you to share an InDesign layout (or Photoshop image, Illustrator artwork, or Adobe Premiere Pro video) over the Web with a client or co-worker. They could add comments and markup to the layout, and you could then gather those comments and markups and see them displayed right on the InDesign page. It provided a simpler, more integrated review process than doing a PDF review.

I didn't see any clients or acquaintances of mine get excited about this and actually use it. I suspect that this was true for many others as well, and thus the demise of Adobe CS Review. The service was difficult to explain and demonstrate, and was somewhat clunky in execution.

The remaining CS Live services: Adobe BrowserLab, Acrobat.com, and Adobe Story will remain. See this FAQ for more information about CS Live online services and the services that are being discontinued.

Monday, October 17, 2011

A peek at things to come?

I had the good fortune to attend Adobe MAX 2011 two weeks ago in Los Angeles. My head is stuffed full of all kinds of new stuff that I learned at this amazing event.

A highlight of the conference was the "Sneak Peek" presentations, where Adobe engineers shared bits of technology that "may, or may not, make it into future versions of Adobe products."

These amazing sneak peeks have now been posted here for anyone to view.

Don't miss "Image Deblurring", "Local Layer Ordering" and "InDesign Liquid Layout". Cool!

Wednesday, September 14, 2011

Photoshop Extended for DPS

If you are planning creating apps with Adobe InDesign and Adobe Digital Publishing Suite, I strongly recommend that you have Adobe Photoshop CS5 Extended in your tool set. Here's why.

If you're not aware, Adobe Photoshop CS4 and newer comes in two "flavors": Photoshop and Photoshop Extended. Both versions are exactly the same in every way, except that Photoshop CS5 Extended has some extra features specifically for:

1) 3D image creation, editing, and painting
2) Motion graphics editing
3) Scientific image analysis.

If you're creating Apps with Adobe Digital Publishing Suite, you'll probably be including video in some capacity. Yes, Adobe After Effects, Adobe Premiere Pro, and Adobe Media Encoder all are wonderful tools for working with video, if you know how to use them. But Photoshop is a tool that most of us are reasonably adept with. So it's really nice that Photoshop CS5 Extended has some features for working with video and animation.

Specifically, here are some tasks that I've used Photoshop Extended for recently on DPS app projects:

* Extracting the last frame of a video sequence and saving it out as a JPEG. This is a necessary step with DPS if you want to make a video appear to stop on the last frame.

* Saving each frame of a video clip to a separate, sequentially numbered JPEG file to use with the DPS image sequence feature.

* Cropping a completed video to a new aspect ratio to better fit a DPS screen layout.

If you have Creative Suite Design Premium, Web Premium, Production Premium, or Master Collection, you have Photoshop Extended. If you have Creative Suite Design Standard, you only have Photoshop. Information on how to upgrade can be found here.

Tuesday, August 30, 2011

A use for Photoshop's Polar Coordinates filter

In a recent Photoshop training session at a manufacturing client, they had some artwork that they needed to "wrap" around a roughly-cone-shaped vase. They had the artwork below, which shows the artwork as you would see it looking at the side of the vase.

However, their vendor wanted the artwork supplied as it would look viewed straight up from the bottom of the vase. They wanted the artwork to appear like this:


The client had tried numerous solutions to no avail. They had tried some of the 3d features of Photoshop Extended, but while good for creating a package mockup, that wasn't exactly what they needed. Here is how we solved the problem:

1. Choose Image > Canvas Size, and make the canvas as tall as it is wide.

2. Select the image, and use Edit > Free Transform to stretch the image to fill the new canvas.


3. Choose Filter > Distort > Polar Coordinates, and choose the Rectangular to Polar option, and click the OK button.

That's all there is to it!