Tuesday, December 18, 2007

View spreads in Acrobat 8

Acrobat 8 displays side-by-side pages differently than previous versions of Acrobat. When you choose View>Page Display>Two-Up, Acrobat 8 displays two pages side by side, but with odd pages (including the cover) on the left and even pages on the right. This prevents two-page spreads from displaying as they appear in a print document. To change this, choose View>Page Display>Show Cover Page During Two-Up.

Of course, if you are creating a PDF to distribute to others, you can control the initial view of the document. Choose File > Properties. Click on the Initial View tab, and choose Two-Up (Cover Page) for the Page Layout. Click the OK button, and save the PDF.

Tuesday, December 11, 2007

An alternative to Live Trace

The Live Trace feature introduced in Adobe Illustrator CS2 works great in many situations for converting bitmap images to editable vector artwork. But when Live Trace doesn't give you good results, or you have difficult-to-trace artwork, here is an alternative.

VectorMagic, a Web site produced as a result of a Stanford University Artificial Intelligence Laboratory research project, allows you to upload a bitmap image to the site in JPG, GIF, PNG, BMP or TIFF format. Next, you answer a few questions about the file, the file is traced, and a vector EPS file is returned to you. In many cases, the results are superior to Live Trace, especially when tracing small, low-res images.

(Thanks to Chuck Green's excellent blog for the head's up on this amazing resource.)

Wednesday, December 05, 2007

Convert ANYTHING to InDesign

Now you can convert almost any type of page layout file to InDesign format. Here's how:

1. Out of the box, InDesign can convert QuarkXPress 4 or older files, as well as Adobe PageMaker 6 or 7 files.

2. The Q2ID plug-in from Markzware does a great job of converting Quark 7.2 or older files to InDesign.

3. The just-released PUB2ID plug-in from Markzware will convert Microsoft Publisher 2002-2007 files to InDesign.

4. The brand-new MIF Filter for InDesign from DTP Tools promises to convert FrameMaker MIF files to InDesign.

5. PDF2ID from RecoSoft is a tool for converting PDF files to InDesign format.

Your mileage may vary with these tools, depending on the complexity of your documents and how they are constructed. But even if the conversion only gets you halfway there, it can still save you some significant time.

Monday, December 03, 2007

Ads for Adobe PDF

Here is some interesting technology you should be aware of: Adobe has announced Ads for Adobe PDF. With this technology, currently in beta, publishers can elect to allow Yahoo to place context-sensitive ads next to PDF files as they are viewed. This provides essentially the same technology to PDF content as is already available for HTML web pages via Google Adsense and others. It provides a way for publishers to "monetize" PDF content. Here is a quick breakdown of how it works:

1. Create your PDF content the same way you've always done it.

2. Upload your PDF to an Adobe server, where the content is analyzed and the PDF is "enabled" for ads. The ad-enabled PDF is then returned to you.

3. Post the PDF on your Web site, or distribute it via email.

4. When someone opens the PDF with Adobe Reader 8.1 or later, they will see content-sensitive ads displayed in a separate column to the right of each page of the PDF. (Click here for a screen shot). If the PDF is opened with an older version of Reader, the user is given the option to upgrade to Reader 8.1. If they do not upgrade, the PDF still opens, and they will not see the ads.

Again, this is technology that is currently in Beta. But start learning about this now, and think about if it makes sense with your business model to try to obtain revenue from your content in this manner.

Monday, November 26, 2007

Selecting the table "character" in InDesign

Tables in InDesign are "Inline Graphics" meaning that they appear in the text flow, and move as the surrounding text in the text frame gets longer or shorter.

Sometimes it's necessary to select the table as a "character", or to position the text cursor to the immediate left of the table. But it can be difficult to position the text cursor precisely between the left edge of the table and the left edge of the text frame. Here's a better way:

With the Type tool, click to the left of the first character of the text in the upper-left cell in the table. Then, when you have a flashing text cursor there, just press the left arrow key on the keyboard. This will move the cursor out of the table, and into the surrounding text, positioning it directly to the left of the table. If you then press the right arrow key on the keyboard, the cursor will skip over the table and position itself to the immediate right of the table.

This might seem obscure, but I've found it helpful on numerous occasions while working with tables. I hope you find it useful as well.

Friday, November 16, 2007

Updates for Bridge, Photoshop & Camera Raw

Adobe has released updates for Photoshop (10.0.1), Bridge (2.1.1) and Camera Raw (4.3). In particular, the Bridge update claims to address a couple of things that can cause Bridge to crash. Access the updates through Help > Updates in any Creative Suite application.

Cool InDesign Server example

Visit www.beasuperhero.com.au to see a neat example of Adobe InDesign Server in action. This clever and entertaining site was created by XMPie as an example of what can be done with InDesign Server and XMPie technology to create personalized cross-media communications.

Tuesday, November 13, 2007

Exporting JPEGs from Illustrator

Below is the quickest, easiest way to save Illustrator CS3 artwork to JPEG format. This method will allow you to export just the selected artwork, or the entire file. It makes no difference if the artwork is on or off the Artboard.

1. Select the artwork you want to export.

2. Double-click on the Crop Area tool (or press Shift-O [the letter O, not zero] and then return)

3. Choose Fit Crop Area to selected art for the Preset

4. Click the OK button. You may need to manually adjust the crop boundary if your image contains a mask.

5. Choose File > Export

6. In the Export dialog box, choose JPEG for the Format. Give the file a name and a location to save it to.

7. Click the Export button.

8. Fill in the JPEG Options dialog as desired, and click the OK button.

To remove the crop boundary, select the Crop Area tool, and then hit the Delete key.

Wednesday, November 07, 2007

Multi-file Place

InDesign CS3's Multi-file Place command makes short work of placing multiple files into your layout. But what if all the files you need aren't in the same folder? Here's how to place images from multiple folders at once with Multi-File Place:

On the Mac, use List view instead of Column view in the Place dialog box. (List view is the one with the "flippy triangles" that allow you to view the contents of multiple folders simultaneously). Then flip open the folders you need, and command-click to select multiple files.

On Windows, you will need to switch to the "Adobe Dialog" by clicking on the Use Adobe Dialog button in the bottom-left corner of the Place dialog box. Then, use the icon in the upper-right corner to switch to Details view. Now you can open multiple folders simultaneously by clicking on the plus signs to the left of the folder names, and then control-click to select multiple files.

Monday, November 05, 2007

Some round, some not

It's easy to round the corners of a selected frame in InDesign via Object > Corner Options, but this command rounds all the corners of the frame. What if you want just some of the corners to be rounded?

The easiest way to do this is to select a frame and double-click on the CornerEffects script found in InDesign's Scripts panel (Window > Automation > Scripts). The script is installed by default in InDesign CS3. It's included with InDesign CS2, but not installed by default. The CS2 scripts can be downloaded here.

When you run the script, a dialog box appears asking you what type of corner effect to apply, the "Offset" (radius), and the Pattern. If you choose first point for the Pattern, the upper-left corner of the frame will be rounded. If you choose second point, the upper right will be rounded, and so on, proceeding counter-clockwise around the frame. You can also choose options such as "first two", "second and third", etc.

Note that this script can also be run on polygons, stars, and other non-rectangular frames, leading to some interesting results.

Monday, October 29, 2007

Why didn't I think of this earlier?

Today I was laying out a page in InDesign, and the text that I was using had been typed by someone who Loved To Capitalize Each And Every Word!

Of course, InDesign's Type > Change Case > Lowercase command makes short work of fixing this without retyping, and I use this command frequently. But today, it finally dawned on me to add a custom keyboard shortcut for this command to make life a lot easier. Here is how to do this, in case you've never created a custom keyboard shortcut:

1. Choose Edit > Keyboard Shortcuts

2. Choose Type Menu for the Product Area

3. Choose Change Case: lowercase

4. Click in the New Shortcut area, and press the keyboard shortcut you want to use (I used option-L).

5. Click the Assign button, and then the OK button.

Wednesday, October 24, 2007

InDesign's Info Panel to the rescue

I encountered a head-scratcher today. As I helped a client with a layout, we were trying to locate an elusive image on their file server. We were using Adobe Bridge (of course!) to browse the files visually, but we noticed that some of the images with a .JPG extension did not display thumbnail previews.

Photoshop gave me an error when I tried to any one of these images. But the same images could be placed in an InDesign layout. That seemed strange, so I selected a placed image and looked at the Info Panel (Window > Info) in InDesign. Sure enough, the Info panel said that the image Type was PNG, not JPEG. Someone had tried to change the image from PNG format to JPEG format by simply changing the filename extension. This, of course doesn't work. To change image file formats you need to use a conversion utility or open the image in Photoshop and choose File > Save As.

Without this bit of information in the Info Panel, I probably would have wrongly concluded that the files were damaged. Changing the filename extension back to PNG allowed the image to be opened in Photoshop.


Sunday, October 14, 2007

False InDesign Preflight report with placed AI files

For a number of reasons, AI (Adobe Illustrator format) is the preferred file format instead of EPS for placing Illustrator artwork in InDesign. However, there is one small drawback to the AI format. If you have an AI file that contains only black or spot colors, and you place the AI file in InDesign, the Preflight command (File > Preflight) gives a false report. In the Colors and Inks section of the Preflight report, process C, M and Y will be listed as being used, even if they are not used in the AI file.

This is unfortunate, since in this case Preflight is no longer helpful as a way to see if you mistakenly used process colors in your layout. The best workaround is to choose Window > Output > Separations Preview, and examine the C, M, and Y separations individually to make certain that no objects using these colors appear on your pages.

Tuesday, October 09, 2007

InDesign & InCopy 5.0.1 update

Today, Adobe released InDesign and InCopy 5.0.1 updates, which promise to fix a number of bugs discovered since the initial release of InDesign and InCopy CS3. I have not yet installed and tried the update, but wanted to give you a quick heads-up. A list of the bugs that were fixed is available here for InDesign and here for InCopy.

Note that one of the bugs that Adobe lists as being fixed is the InDesign CS3 backspace bug fix first described here on 04-27-2007.

Monday, October 08, 2007

InDesign & InCopy fractions

I've been a long time user of Dan Rodney's useful and free "Proper Fraction" script for InDesign. Now Dan has released Proper Fraction 2.0, which is available in a free and a "Pro" version. For a measly $75, the Pro version will automatically format all the fractions in a document, use OpenType fraction formatting if available, automatically stroke the numerator and denominator slightly to improve the appearance, allow you to set custom kerning pairs for fractions, and more.

Both the free and the Pro version work in InDesign and InCopy CS2 or CS3.

If you ever create fractions in InDesign or InCopy, you need at least the free version of the script. I'd strongly encourage you to check out the additional functionality of the Pro version.

Tuesday, October 02, 2007

Use GREP to find URL's

In a previous Blog entry I wrote about the GREP search capability in InDesign CS3. GREP searches are great for making a computer recognize complex patterns. I recently developed the following GREP string for a client, and thought I'd share it here, hoping you might find it useful or educational.

The procedure below will allow you to quickly search for all URL's (Web addresses) in your text, and format them as non-breaking, or blue, or whatever formatting you wish.

1. Start InDesign, and choose Edit > Find/Change

2. Type the string below into the Find what: field (all on one line)

(?i)(http|ftp|www)(\S+)|(\S+) (\.gov|\.us|\.net|\.com|\.edu|\.org|\.biz)

3. Copy the string below into the Change to: field

$0

4. Click on the More Options button, and then click on the magnifying glass icon next to the Change Format area. Enter whatever formatting you would like here, then click the OK button.

5. Click on the small disc icon at the top of the Find/Change dialog box, and give the Query a name. Now, any time that you want to find and change URL's, you can just choose this name from the Query drop-down list, indicate the scope of the search, and click on the Find button. Another GREP example is here.

Monday, September 24, 2007

Better Bridge previews with Illustrator's Crop Area tool

When you save artwork as an Adobe Illustrator (AI) document with the Create PDF Compatible File option selected, the preview that appears in Adobe Bridge is of the entire Artboard (typically a letter-size page). To make Bridge preview only the artwork, and not the entire page, do the following:

1. In Illustrator CS3, double-click on the Crop Area tool, or press Shift-O (the letter O, not the number zero) followed by return or enter.

2. Choose Fit Crop Area to Artwork Bounds from the Preset drop-down list at the top of the Crop Area Options dialog box.

3. Save the file normally, with the Create PDF Compatible File option selected.

This will make Bridge previews of your Illustrator files larger and more useful.


Monday, September 17, 2007

Breaking facing-pages into single pages

A question I get asked frequently is how to take a document that has been created as a facing pages document in InDesign, and change it to a single-page, non-facing pages document without messing up master page items. This is needed in some prepress workflows where objects bleed into the gutter (the left side of right-hand pages or the right side of left-hand pages).

Here is one way to do this:

1. Open a document that has been created as a facing pages document.

2. In the pages panel menu, choose Allow Document Pages to Shuffle (CS3) or Allow Pages to Shuffle (CS2) (this should uncheck, or deselect this option).

3. Grab the right-hand page of each spread, and pull the page to the right of the spread until you see a vertical black bar appear and then release the mouse. This will separate the page from the spread, but the page will remain a right-hand page.


Wednesday, September 12, 2007

Removing Version Cue from Bridge

One way to simplify Bridge CS3 and remove some visual "clutter" is to remove unused icons from the "Favorites" list. To do this, just right-click (or ctrl-click) on a Favorite, and choose Remove from Favorites. If you ever want an icon to return, it can be added in Preferences.

This works well, except for the Version Cue favorite. If you don't use Version Cue, there is no reason to keep the icon around, but it keeps popping back like an uninvited guest each time you start up Bridge. To banish the Version Cue icon from Bridge once and for all, go to Preferences (in the Bridge menu on the Mac, the Edit menu in Windows) and choose the Startup Scripts category on the left. Deselect Adobe Version Cue in the list on the right, and click OK. The Version Cue icon will disappear from Favorites, never to return until invited back!

Friday, September 07, 2007

InDesign's Break Link to Style command

Ever have this happen to you? You copy a text frame in InDesign CS2 or CS3, and then paste it into another InDesign document, and the text formatting completely changes on the pasted copy?

The most likely cause of this is a paragraph or character style (or styles) that is applied to text in the source file (perhaps the pesky Basic Paragraph style). If this same style appears in the destination document with different formatting attributes, the pasted text will take on the attributes of the destination document.

The solution? Select the text in the source document, and choose Break Link to Style from the Paragraph Styles panel menu. Next, choose Break Link to Style from the Character Styles panel menu. This will "unapply" the style from the text, but leave the formatting intact. Now you can copy the text frame and paste it into the destination document, and the formatting will survive the trip.

Tuesday, September 04, 2007

Twin Cities InDesign User Group meeting

If you are in the Minneapolis, MN area, don't miss the next meeting of the Twin Cities InDesign User Group, scheduled for Tuesday evening, September 18 from 7:00 p.m. - 9:00 p.m. More information about the meeting can be found here. The event is free, but be sure to register to attend on the IDUG Web site.

InDesign's non-joiner character

InDesign CS3 allows you to enter a "non-joiner" character in text by choosing Type > Insert Special Character > Other > Non-joiner. A non-joiner character is a character that has no width. Tim Cole explains the intended use for the non-joiner character here.

I've discovered another use for this character from a recent project. I had a list of items, to which I had applied bullets using the automatic bullet feature (Type > Bulleted & Numbered Lists > Apply Bullets). On one of the items, I needed to make the first word red. But this caused the automatic bullet to become red also, since automatic bullets inherit the formatting of the first character of the paragraph.

Creating a character style for the bullet would fix this, but that was overkill for this simple project. Instead, I inserted a non-joiner character at the beginning of the paragraph, selected the non-joiner, and made it black. Problem solved.

Since the non-joiner has no width, it is tricky to select. The best way is to position the cursor to the immediate right of the character, and then hold down the shift key while you hit the left-arrow cursor key.


Friday, August 31, 2007

Handy CMYK reference chart

It can be maddening trying to get an exact color match on your color desktop or office printer. One easy way to achieve this is to choose a color from a CMYK swatch book that you have printed on that device. Visit Kodak's RealTimeProof Web site to download either a letter- or A4-size CMYK swatch book. Print this PDF on your color printer, and then keep it handy when you need to specify a color for output on that device. Simply enter the CMYK values from your chosen color on the chart into InDesign, Quark, Illustrator or Photoshop.

While this will allow you to get predictable color from your laser or inkjet printer or copier, this will not necessarily be the same color you will get on another device, or on a printing press. To specify CMYK colors accurately for offset printing, use either the TruMatch Colorfinder Fanguide or the Process Color Manual.

Wednesday, August 22, 2007

Scaling objects in InDesign CS3

The way that objects are scaled with the Control panel and the Transform panel has changed in InDesign CS3.

If you look in either of these panels, you will see four important fields: width and height fields (indicated by a W: and H:, and scale x/y percentage fields (next to the width and height fields, with fields displaying 100%). There are three important things to remember here:

1. You may enter a measurement in inches, picas, millimeters or centimeters in any of these fields (width, height or scale x/y). You may also enter a scale percentage in any of these fields (width, height or scale x/y). Just enter an i, ", p, pt, c, mm, or % after the value you enter.

2. You may enter mathematical expressions into any of these fields. So you can enter *5 to make the object five times larger, or /2 to make it 50% smaller, or +1i to make it 1 inch larger.

3. Values entered into the width/height fields will cause the selected frames(s) to scale, but not the contents (text or graphics) of the frames, nor the weight of any strokes applied to the frames. Values entered into the scale fields will scale the frames as well as the contents of the frames and the stroke weights.

Thursday, August 16, 2007

The "Start Meeting" button

Don't overlook the "Start Meeting" button in the Favorites panel in Bridge CS3, or the File > Start Meeting command in Acrobat 8. Clicking this button or choosing this command launches Acrobat Connect. Acrobat Connect is a subscription service from Adobe for "virtual" collaboration and online meetings. Here is how it works:

1. You sign up for an Acrobat Connect account with Adobe. Service starts at $39/month, payable monthly with no long-term contract necessary. For this amount, you can hold an unlimited number of meetings per month with up to 14 other people  in each meeting. Each meeting may have different groups of attendees.

2. Once you are signed up, to hold a "meeting", choose Start Meeting in Bridge or Acrobat, and Acrobat Connect is launched. You are asked for the email address of the people you want to invite to the meeting. An email is automatically sent to each person, inviting them to the meeting and giving them a URL to click as well as dialing details for the phone conference (audio) portion of the meeting.

3. When the attendee clicks on the URL, the Flash Player is started on their system, and they are taken directly into the "meeting".

4. Once everyone is assembled for the meeting, they are able to see either your entire screen, just one application, or just a single window, depending on your preference. You can also give attendees control of your cursor, if you desired.

This is a fantastic way to collaborate "virtually", without everyone being in the same location. It blows simple phone conferencing away whenever you need to collaborate visually. I use this to deliver small group remote training sessions to clients, for individual technical support, and to collaborate with clients on design and layout issues.

Note that each attendee only has to have the Flash Player installed. It doesn't matter what operating system, browser version or Acrobat version they have installed.

Wednesday, August 15, 2007

Formatting phone numbers in InDesign

In a previous Blog entry I wrote about the new GREP search capability in InDesign CS3. Today I hammered out the following GREP string for a client, and thought I'd share it here, hoping you might find it useful.

The procedure below allows you to search for U.S. phone numbers in almost any format, and replace them with numbers in the format (800) 555-1212 with a non-breaking space after the area code and a non-breaking hyphen before the last four digits. This is a variation on the GREP string included with InDesign that formats phone numbers in "dot" format.

1. Start InDesign, and choose Edit > Find/Change

2. Copy the string below into the Find what: field.

\(?(\d\d\d)\)?[-.\s~~]?(\d\d\d)[-.\s~~]?(\d\d\d\d)

3. Copy the string below into the Change to: field

($1)~S$2~~$3

4. Click on the small disc icon at the top of the Find/Change dialog box, and give the Query a name. Now, any time that you want to find and change phone numbers you can just choose this name from the Query drop-down list, indicate the scope of the search, and click on the Find button.

Friday, August 10, 2007

New Microsoft fonts

Windows Vista and Microsoft Office 2007 ship with seven new type families (Calibri, Cambria, Candara, Consolas, Constantia, Corbel and Cariadings) known as the Microsoft ClearType Font Collection. An overview of these OpenType fonts with type specimens is available here. If you need a copy of these fonts to use on Windows XP or Macintosh computers, you can purchase the fonts on-line in OpenType format from Ascender Corporation.

Tuesday, August 07, 2007

Deleting Preference files, revisited

In a previous entry, I described how (and why) to delete the preference file automatically as InDesign, InCopy, Photoshop or Bridge start up.

Well, it turns out that this works in Illustrator also. You just don't receive a confirmation dialog box in Illustrator that anything has happened, but your Illustrator preference file will indeed be deleted. Just hold down the same key sequence (command-option-shift-control (Macintosh) or control-alt-shift (Windows)) immediately after you click the Illustrator icon to launch Illustrator, and keep holding the keys until Illustrator has finished starting up.

If your copy of Illustrator is misbehaving in any way, this is always the first thing to try. The only downside is that you will lose any custom settings that you have applied in the Preferences dialog box.

Thursday, August 02, 2007

Illustration with type

Veer has created a cool Flash video containing images constructed entirely of type characters. (Click on the "Type City" link on Veer.com).

See also "Type City: A Visitor's Guide", a PDF containing the illustrations in detailed print format.

Wednesday, July 25, 2007

The InDesign Gradient Feather tool

If you are using InDesign CS3, you have probably noticed that the Transparency palette is gone, and is replaced by the new Effects panel.

Among the new effects in this panel is the Gradient Feather effect, which is great for fading a photograph into a white page or a colored frame beneath the photo.

What you may not have noticed is that there is also a Gradient Feather tool, buried underneath the Gradient Swatch tool in the tool panel (or press Shift-G. This tool allows you to control the direction and length of the Gradient Feather effect interactively. More information about the Gradient Feather tool can be found here.

Tuesday, July 24, 2007

InDesign Place shortcut

Here's a cool new feature of InDesign CS3: You've just chosen File > Place, and you have the "loaded" graphics cursor indicating that you have a graphic to place somewhere on your page. You know that if you click on an empty frame, the graphic will go into that frame. If you click outside of a frame, a new frame will be created to contain the graphic. But if you hold down the Option or Alt key and click on a frame that already contains a graphic, the existing graphic will be replaced with the new graphic. Sweet!

Friday, July 20, 2007

Free Illustrator symbols

The Integration and Application Network at the University of Maryland Center for Environmental Science has developed a set of free Illustrator symbol and swatch libraries of environmental and life sciences topics. There are over 1500 symbols of agriculture, plants, fish, reptiles, birds, animals, insects, boats, buildings, mapping, weather and more, as well as 100 custom swatches. These high-quality color vector symbols and swatches can be used in Macintosh or Windows Illustrator 10 or newer.

If you work in a life sciences-related field, you definitely need these. If not, you still will probably find a few things you can use here. More information about working with symbols in Illustrator can be found here.

Monday, July 16, 2007

Find "famous" fonts

Have you ever wanted to identify a corporation's typeface or been intrigued by the font used for a movie title? Check out these resources:

TypoWiki lists the corporate typefaces used by hundreds of companies from Accenture to Xerox.

Famous Fonts lists fonts used in TV shows, movies, publications, and other media and products. If a freeware or shareware likeness of the font is available, Famous Fonts has it available for download. See also Sharkshock fonts for more freeware famous font knock-offs.

Play the Retail Alphabet Game to test your eye for corporate/retail typefaces.

Thursday, July 12, 2007

Deleting Preference files

A common troubleshooting step in many programs is to delete the "preference" file for an application that is acting up. This file (or files), which stores your user preferences, such as your preferred measurement system, color of your guides, etc., can be come corrupt and make the application unstable or behave strangely. When the file is deleted the application creates a new, fresh copy of the file.

To easily delete the preference file in InDesign, InCopy, Photoshop or Bridge, hold down command-option-shift-control (Macintosh) or control-alt-shift (Windows) immediately after you click the icon to launch the application. Keep holding the keys down until you see a dialog box asking you if you want to delete the preference file.

Tuesday, July 10, 2007

Contact sheets, revisited

Want to create contact sheets, photo albums, or coffee table books of your photos? Want to make a catalog of all of your vector artwork? Download a reprint of my most recent article for InDesign Magazine: Quick and Easy Photo Contact Sheets (4.3mb PDF file) to learn how. I've also created scripts and templates to accompany the article (906k zip file). I blogged about this previously, but just received permission from the good folks at InDesign Magazine to post a reprint of the entire article.


Wednesday, June 27, 2007

Printing booklets in InDesign

Both InDesign CS2 and CS3 have a feature that will quickly rearrange the pages of a "reader spread" document into "printer spread" order, and then print the pages on a duplex (double-sided) printer.

The CS2 feature is located in File > InBooklet SE. By checking the Create New Document option, InDesign will create a copy of your document in printer spread order. You can then use the normal InDesign print dialog box to control duplexing, printing front sides only, etc.

In CS3, the feature is located in File > Print Booklet. This command always rearranges the pages into printer spread order as the document is printed, which works fine as long as you have a duplex printer. If you don't, you will need to print the "front" side of each spread, then flip the pages over, reload them into the printer and print the "back" side of each spread. You can't do this with the File > Print Booklet command in CS3. Here's a slick workaround:

1. Create a PDF of the document in reader spread page order.

2. Open the PDF in Acrobat 8.

3. Choose File > Print.

4. In the drop-down list next to "Page Scaling", choose Booklet Printing, choose Front Side Only for the "Booklet subset" and print the spreads. Repeat for the back sides after reloading the paper in the printer.


Monday, June 25, 2007

InDesign templates

When you save a file as a Template in Macintosh InDesign CS or CS2, the file is saved as a Mac OS X "Stationery Pad" file. This is a dumb feature of Mac OS X that is poorly implemented. Every time that you open the template, a new file is automatically created. If the template is named "foo.indt", a file named "foo copy.indt" is automatically created in the same folder as the original file.

This is really clunky, because a) it is unlikely that you will want to leave the file named "foo copy.indt"; and b) the filename still carries th .indt filename extension, which indicates that it is still a template file, which is untrue.

The workaround is to save the file as a Template in InDesign, and then close the file. In the Macintosh Finder, select the file copy that is created, and choose File > Get Info. In the Info dialog box, deselect the Stationery Pad option, and select the Locked option.

The next time you open the file, it will open as a "Read-Only" file. When you choose File > Save, you will automatically be prompted for a new file name.

Windows InDesign CS and CS2 doesn't have this limitation, nor does InDesign CS3 on Macintosh or Windows.

Tuesday, June 19, 2007

Check out Adobe Magazine

The June 2007 issue of Adobe Magazine is now available as a free download. The current issue is a 33-page PDF formatted for on-screen viewing. I haven't read it through yet, but it looks like it contains some interesting content.

If you want to read about what is happening in the Quark world, download the latest issue of X-Ray Magazine, also in PDF format.

Wednesday, June 13, 2007

InDesign "Import Options" shortcut

If you check the Show Import Options choice in the Place dialog box when you are importing text or graphics into your layout, you will be see some options before the file is placed. If you are placing a Word file, the dialog box will let you choose how much formatting to import with the text, whether or not you want to convert quotes to typographer's quotes and how to map paragraph styles. If you are placing a PDF file, you can choose which pages of the PDF to place.

The trouble is, once you check this box, you will see the options dialog box every time you place text or graphics files, until you deselect the box.

The solution? Just leave the Show Import Options choice deselected, and hold down the shift key while you click the Open button when you want to see the Import Options dialog box. This will affect only the current graphic or text file you have selected. The next time you place a file, the Import Options dialog box will not appear, unless you hold down the shift key again.

Tuesday, June 12, 2007

Create contact sheets in InDesign

I've written an article for the June/July 2007 issue of InDesign Magazine about how to use the Tools > Create InDesign Contact Sheet command in Adobe Bridge to create contact sheets.

First of all, if you are serious about becoming a "Jedi Master" of InDesign, you should subscribe to InDesign Magazine. (Enter the discount code "BACKPAGE" to subscribe for $39 (1-year) or $69 (2-years). Each issue packs in an unbelievable amount of InDesign-specific information.

The Create InDesign Contact Sheet command is a great way to automate contact sheet, photo album, catalog and coffee-table book production with either InDesign CS2 or CS3. Since the Create InDesign Contact Sheet "command" is really a Bridge script, its features are largely undocumented. That is where my article is useful.

The Create InDesign Contact Sheet command also contains numerous bugs and doesn't quite work as expected. For this reason, I rolled up my sleeves and dug into the JavaScript code, and produced a much-more-useful version of the script for InDesign and Bridge CS3, as well as some other helpful scripts and templates for both CS2 and CS3. Again, all the background information you need for using these scripts and templates is in the InDesign Magazine article. However, if you want just the scripts and templates, you can download them here (906k zip file).

You can also read more about this at InDesign Secrets.

Friday, June 08, 2007

GREP searches in InDesign CS3

The Find/Change dialog box in InDesign CS3 has several new features, including the ability to do "GREP" searches. GREP searches use “regular expressions” to allow you to search for patterns in text. For example, you could use a GREP search to find all the email addresses in a document and make them blue, or find all telephone numbers, regardless of format, and reformat them with periods like 888.555.1212.

Today, while preparing a quick reference guide for one of my classes, I needed to search through a file that contained about 1200 paragraphs, and delete the 900 or so paragraphs that contained the phrase "none defined". Entering ^.*(none defined).*$ into the Find what field of the GREP section of the Find/Change dialog tells InDesign to find each occurrence of the phrase "none defined" and then select the entire paragraph containing the phrase. In the Change to field I entered nothing, clicked on the Change All button, and was done. A huge time saver.

The GREP syntax is pretty twisted. If you like programming, scripting or Sudoku you will be able to learn GREP as needed. Here are a few resources to get you started:

First, visit the GREP section of the Adobe help resource center. Then download a handy GREP quick reference guide in PDF format. Issue #17 of InDesign Magazine has a great non-technical article by Sandee Cohen on how to begin learning GREP. Here is good GREP reference site.

If you don't care to tackle learning GREP , at the very least, keep a text file on your hard drive that contains examples, like the one above, that you can copy and paste as you need them. You don't have to understand GREP to use examples that closely match what you need.

Wednesday, June 06, 2007

Why you should care about 3D

Adobe's recent release of new tools for working with 3D images has me all jazzed about the possibilities for designers working in 2D design. Consider this scenario:

Tom is a product designer. He's hired by a large retailer to design a new table lamp. Tom creates a lamp prototype in 3D modeling software such as 3ds Max, Maya or SolidWorks.  Instead of showing the client hard copy or a regular PDF file that shows only static views of the lamp, Tom instead uses Adobe Acrobat 8 3D to create a 3D PDF file that can be opened with Adobe Reader. When the client opens the PDF file, they can grab the image of the lamp, select different preset views, rotate the lamp freely, see an exploded view of the pieces of the lamp, view cross sections, everything short of picking up the lamp and dropping it on the floor. All this with just Adobe Reader. Here are some examples of this in action.

Meanwhile, a graphic design firm is working on the early layouts for a product catalog using Adobe InDesign. Rather than importing a sketch of the lamp to use for the layouts, the designers can use the Photoshop CS3 Extended Plug-In for Google 3D Warehouse to quickly locate a generic lamp in the vast Google 3D Warehouse, rotate and scale it to the proper size and orientation, and produce a PSD, TIF or JPEG image to import into the InDesign catalog layout for concept approval.

Once the client approves the lamp design, Tom sends the original 3D "object" file to the manufacturer to begin production of the lamp. It may take several months for the actual lamps to be produced, but the advertising agency need images of the lamp now for a teaser campaign to begin building the public's appetite for this wonderful new lamp. No problem. Tom can send the same 3D object file to the designers at the advertising agency. The designers there can use Photoshop CS3 Extended to open the object file and rotate the lamp in 3D space, scale it, and composite it with a photograph of a desk. They can easily change the color and texture of the surfaces of the lamp, and map a logo onto the lamp's surface, all in Photoshop. Once the photo looks "real", it can be saved and placed in the InDesign layout for the advertisement.

This is the beginning of 3D data being exchanged as easily as clip art and stock photography is used now.

What do you think? Do you agree? Do you think this is something you will use? I'd like to hear your feedback.


Monday, June 04, 2007

Four updates from Adobe

Four notable announcements from Adobe in the last few days:

1. Adobe Acrobat 3D Version 8. In addition to all the features of Adobe Acrobat 8 Professional, this version lets CAD users in architecture, engineering, manufacturing and product design create PDF files from 3D "object" files. Users with the free Adobe Reader can then view the PDF files and grab, rotate, examine and annotate the objects in the PDF.

2. Adobe Photoshop CS3 Extended Plug-In for Google 3D Warehouse at Adobe Labs. This cool plug-in for Photoshop CS3 Extended lets you search and download thousands of 3D models from the Google 3D Warehouse into Photoshop CS3 Extended. This technology should be on the radar of all designers, even those firmly in the 2D print world. I'll blog more about why this is important in a future post.

3. Bridge CS3 2.1 update. This update adds performance improvements as well as a couple new features. The update can be downloaded and installed via Help > Updates in any CS3 application.

4. Camera RAW 4.1 update for Adobe Photoshop CS3. This update adds support for a slew of new digital cameras, but also adds a few feature improvements.

Thursday, May 31, 2007

Convert a color PDF to grayscale

Have you ever had a color PDF file that you needed to convert to grayscale? Acrobat 8 Professional has a simple-but-not-obvious way to accomplish this.

1. Open a color PDF file in Acrobat 8 Professional. The file may contain a mix of CMYK, RGB or spot color objects.

2. Choose Advanced > Print Production > Preflight.

3. Click the right-pointing triangle next to PDF Fixups, and select the Convert to Grayscale option that appears.

4. Click the Execute button. The entire PDF file will be converted to grayscale.

Tuesday, May 29, 2007

Ejecting a stuck CD

While I was traveling last week, a CD became stuck in the drive on my MacBook Pro laptop. No matter what I tried, the CD would not eject. Every time that I opened the laptop for a training session, the CD would spin and start draining the battery.

Today, back in my office, it occurred to me to do a quick Google search on "stuck cd"+macbook. I quickly found a Web site where someone suggested picking the laptop up, turning it so that the CD-ROM slot faced downward, and shaking the laptop after hitting the eject key. Could it be so simple? Sure enough, on my first try the CD popped out and hit the floor.

Thank goodness for Google and low-tech solutions! I should think that this would be worth a try on any slot-loading Macintosh or Windows laptop in a similar situation.


Thursday, May 24, 2007

Free font ID tool

Visit Galaxy Gauge to download a free PDF version of their handy tabloid-sized Galaxy Font I.D. 2.0 font identification guide. This is a nice concise guide to hundreds of popular typefaces, grouped according to font classification. While visiting the Galaxy Gauge web site, check out their line of high-quality, useful graphic design gauges and color tools.


Wednesday, May 23, 2007

Make your voice heard at Adobe

If you have a great idea you'd like to see implemented, or you've found a bug in any of the Adobe software programs that you use, don't just sit and stew about it. Instead, use the Feature Request/Bug Report Form at Adobe.com to make your voice heard.

This is time well-spent. Adobe employees do read, consider and compile these requests and bug reports. The lead time on software development can be long, so even if your idea is a great one, it may be a long time before your feature request makes it into a product.

In my experience, Adobe does an good job of listening to its customers, and this process is one example of that.

Friday, May 18, 2007

InDesign, Illustrator, Photoshop and Acrobat plug-in guide

A PDF guide to all known InDesign, Illustrator, Photoshop and Acrobat third-party plug-ins is available here. The number of plug-ins available to extend the functionality of InDesign, in particular, is growing all the time. Check it out. You just might find a plug-in to save you a lot of work on your next project.

Wednesday, May 16, 2007

Transparency and PDF, part 2

Continuing the discussion of InDesign transparency and PDF files from the last post: If you create pages that contain transparent objects, such as drop shadows, that interact with spot color objects in InDesign, you may get unexpected results.

Specifically, the transparent effects may disappear completely or be replaced by an opaque white box when you create a PDF file and view it in Adobe Acrobat or Adobe Reader. This will only happen if you create a "flattened" Acrobat 4 (PDF 1.3) file.

This is typically only an on-screen anomaly in the PDF file. InDesign sometimes must use overprinting to simulate transparent effects. To make the effect display correctly in Acrobat, turn on overprint preview. This is available as a preference in Adobe Reader 8 and all versions of Adobe Acrobat Standard and Professional. In Acrobat 8 overprint preview is located in Advanced > Print Production > Overprint Preview. When this is turned on, the transparent effects should display correctly.

Under normal circumstances, these effects should print correctly. One exception is if someone takes your PDF file and places it as a graphic in a Quark document. So always proof transparent effects closely.


Friday, May 11, 2007

Transparency and PDF, part 1

When you create pages that contain transparent objects (drop shadows, glows, feathers, bevels, blend modes, etc.) in InDesign, you may get unexpected results when you make a PDF file and view it in Adobe Acrobat or Adobe Reader.

One thing that can go wrong is that you might see very thin vertical or horizontal white lines in your images. These lines are no cause for panic. They are just an on-screen anomaly in Acrobat. The lines will not print, and they will only be visible on the screen if you:

a) print to PostScript or the Adobe PDF driver to create the PDF file

or

b) choose File > Export in InDesign to create the PDF file, and choose Acrobat 4 (PDF 1.3) for the Compatibility.

If the lines bother you on the screen, you can make them disappear in Acrobat by choosing Edit > Preferences (Windows) or Acrobat > Preferences (Macintosh). Select the Page Display category, and deselect the Smooth Line Art option.

Wednesday, May 09, 2007

New fonts included with CS3

CS3 includes largely the same set of Opentype fonts that are included with CS2 with the exception of Arno Pro and Hypatia Sans Pro.

Arno Pro is an new serif typeface from Robert Slimbach, with many different weights and styles and an extensive character set.

Hypatia Sans Pro is a new geometric sans serif typeface by Thomas Phinney that contains many new advance OpenType features. This typeface is not included in the CS3 box, but is available free as a "registration incentive" when you register Creative Suite 3 or any individual CS3 product.

Monday, May 07, 2007

Twin Cities InDesign User Group

If you are in the Minneapolis/St. Paul, MN area don't miss the next InDesign User Group meeting on Tuesday evening, May 8 at 7:00 p.m. at the Minneapolis College of Art and Design. This will be a big "CS3 Launch Meeting," with Adam Pratt, a Senior Systems Engineer from Adobe coming to showcase the new features of InDesign CS3. As of today, there are almost 250 people registered to attend this exciting event.

If you are not in the Twin Cities area, see the InDesign User Group Web site to locate a chapter near you.

Thursday, May 03, 2007

User guides & manuals online

See www.adobe.com/support/documentation for complete user guides and manuals for almost all current Adobe products. The manuals are in printable Adobe PDF format.

This is a fantastic resource for anyone who wants to "preview" specific features of a product, or judge the level of difficulty of a product before purchasing. It's also handy if your IT department has filed away your original product CD/DVD, and you neglected to first make a copy of the documentation.

Wednesday, May 02, 2007

Viewing all folders in Bridge

One of my favorite features in Bridge CS3 is easy to overlook...the no folders button in the Filter panel (Window > Filter Panel).

Lets say you are viewing the contents of a folder in Bridge, and that folder has five subfolders. You want to see thumbnails of all the images in each subfolder, without opening each subfolder individually. Just click the no folders button in the Filter panel, and your view of all the subfolders will be "flattened". You will see the contents of all five folders together.

Don't be alarmed, no folders will be harmed by this button. Clicking the button only affects your view of the folder contents, not the folders themselves. The contents of the folders remain in their original folders.

Friday, April 27, 2007

InDesign CS3 backspace bug fix

If you are using InDesign CS3, you should be aware of this: InDesign CS3 will crash if you: a) have the Info panel displayed, b) are editing text in a story of more than 500 characters, and c) backspace quickly to delete a bunch of text characters.

Adobe has promised to fix this in a future patch, but in the meantime, the workaround is simple: close the Info panel when you don't need it.

The story behind this bug is kind of interesting:

Yesterday InDesign CS3 crashed repeatedly every time that I backspaced quickly to delete text in a lengthy file I spent all day editing. Each time that it crashed, I obediently submitted a description of the problem using the Adobe Crash Reporter.

Much to my delight, I received an email today from Adobe thanking me for submitting the reports, and informing me that after looking into it, they discovered the cause of the crash. They advised me to close the Info panel, and promised to fix the bug in a future dot release.

This is quite a nasty bug, but closing the Info palette DOES work around the problem. I was absolutely floored and amazed by the quick, personal reply to my crash reports. This prompt, customer-facing attitude is one reason why Adobe is successful.


Explore the world of Kuler

Visit kuler.adobe.com to view thousands of color themes created by a huge community of users. Create and contribute your own color themes, and download themes that you like as Adobe Swatch Exchange files for easy use in InDesign, Illustrator or Photoshop.

The interface used in Kuler to create new color themes is similar to the new Live Color feature in Illustrator CS3, which lets you create a color and then quickly find complementary colors, split complements, analogous colors, etc.

Illustrator CS3 communicates directly with Kuler via the new Kuler palette (found in Window > Adobe Labs > Kuler) in Illustrator.

Mac users can download the Kuler Dashboard Widget from the Kuler web site for another easy way to quickly access Kuler.

Tuesday, April 24, 2007

Adobe Swatch Exchange (ASE) files

InDesign, Illustrator and Photoshop CS2 and CS3 all support the exchange of colors via ASE files. In other words, you can easily use colors you've created in Illustrator in an InDesign project, or colors you've created in Photoshop in an Illustrator project, or vice versa. Here's how:

1. In any of these three applications, select the colors in the Swatches palette that you want to exchange.

2. In the Swatches palette or Swatches panel menu of InDesign, Illustrator or Photoshop, choose the following:

  • InDesign CS2: Save Swatches for Exchange
  • InDesign CS3: Save Swatches
  • Illustrator CS2: Save Swatches for Exchange
  • Illustrator CS3: Save Swatch Library as ASE
  • Photoshop CS2/CS3: Save Swatches for Exchange

This will create a small .ASE file that you can store wherever is convenient. Then, to use these colors in another InDesign, Illustrator or Photoshop project:

1. Choose one of the following from the Swatches palette or Swatches panel menu in InDesign, Illustrator or Photoshop:

  • InDesign CS2/CS3: Load Swatches
  • Illustrator CS2/CS3: Open Swatch Library: Other Library
  • Photoshop CS2/CS3: Load Swatches

2. Navigate to where you previously saved the ASE file, and select it. The colors you saved in the ASE file will be loaded into your swatches palette, ready for you to use.

Swatches in any color model (CMYK, RGB, PANTONE, etc.) can be saved and exchanged between projects in this manner. Tints of colors and gradient or pattern swatches cannot be saved as ASE files.

Friday, April 20, 2007

Adding color to grayscale images in InDesign

InDesign allows you to easily add color to a placed image, with certain restrictions:

  • The image must be saved as a grayscale or bitmap image. (Choose Image > Mode > Bitmap or Image > Mode > Grayscale in Photoshop).

  • The image must be saved in PSD, TIF, BMP or JPG format.

  • If the image is in PSD format, it may contain multiple layers, but the bottom layer must be opaque. In other words, you cannot apply color to a PSD image with a transparent background in InDesign.

To add color to an image, select the image with the Direct Selection (white arrow) tool, and then select a color from the Swatches palette or the Color palette.

Wednesday, April 18, 2007

Missing buttons in Acrobat 8

When you first run Adobe Acrobat 8 Standard or Professional, you will notice the new, streamlined interface. However, on closer examination, you may be frustrated because some of the buttons in the toolbar that you have become accustomed to in Acrobat 6 or 7 are missing in version 8. For example, Acrobat 8 no longer displays the buttons for switching to single page or two-up view, or to go forward or back.

The good news is that in Acrobat 8, you can choose Tools > Customize Toolbars to select exactly which buttons you want to display in each toolbar.

Monday, April 16, 2007

Converting QuarkXPress files to InDesign

Not new, but I keep getting questions about this: Adobe InDesign can convert QuarkXPress 4 or older files by simply choosing File > Open in InDesign, and opening the QuarkXPress file. The Quark file is converted on the fly, and opens as an untitled document. The conversion works pretty well. In general, the page geometry (master pages, location and size of text and graphic frames, style attributes and colors) converts well. For various technical reasons, the location of text and graphics within the boxes often will move and require adjustment. For further information on what can go wrong, and how to fix it, see the handout I've prepared on the topic here.

But what do you do about QuarkXPress 5, 6 or 7 files? Get yourself a copy of Q2ID from Markzware. This is a handy plug-in for InDesign that, once installed, quietly allows InDesign to open and convert any version of Quark file using File > Open in InDesign.

Adobe begins shipping CS3

Adobe began shipping the CS3 versions of the Design and Web suites today. As previously announced, the video suite (Production Premium) is promised for the third quarter of 2007.

Thursday, April 12, 2007

Enter is not Return

I was reminded of this today by a note from a training client (thanks Laurie!): don't get the Return and Enter keys on the keyboard mixed up. They are not interchangeable in InDesign and QuarkXPress. Here's why:

When you are typing text in either program, the Return key starts a new paragraph. Hitting the Enter key (on the numeric keypad) inserts a Column Break in InDesign and QuarkXPress, which forces the text that follows to jump to the top of the next column in a multi-column text box, or to flow out of the box if it is a single-column text box.

So if you accidentally, or out of habit, press the Enter key when you should press the Return key, your text may "disappear", jumping to an unexpected location.

Wednesday, April 11, 2007

@issue: A "must read"

Work came to a halt yesterday at Gilbert Consulting world headquarters when the latest copy of @issue: The Journal of Business & Design arrived in the mail. Published twice a year by the Corporate Design Foundation and sponsored by Sappi Fine Paper, this beautiful magazine is a "must read" for anyone allied with the design industry. Vol. 12, No. 1 contains in-depth articles about the application and integration of design at Herman Miller, McDonald's, Oakley and Target. You will want to save each issue of this no-cost, ad-free journal on your bookshelf. Subscribe on-line here.

Monday, April 09, 2007

Updating InDesign tables with new text

If you frequently use InDesign tables, you've probably encountered the need to update the data in a table without losing the table formatting. Here are two great solutions:

1. For InDesign CS and CS2, get the clever PopTabFmClip script from PDS Associates. Only $25, this handy script makes it effortless to copy a range of cells from an Excel spreadsheet, a Word table, or another InDesign table, and paste these the data from these cells into an existing InDesign table. All the cell, table and paragraph formatting of the destination table is faithfully preserved.

2. InDesign CS3 has much of this same capability built-in. It doesn't preserve merged cells and paragraph styles as nice as the PopTabFmClip script, but works well otherwise. For this to work, first choose Preferences > Clipboard Handling, and select When Pasting Text and Tables from Other Applications, Paste: Text Only. Then, copy a range of cells from an Excel spreadsheet, a Word table, or another InDesign table, select the table cell in the upper-left corner of where you want the new data to be pasted, and then choose Edit > Paste. The cell, table and paragraph formatting of the destination table is preserved.

(A quick way to select a single InDesign table cell is to click inside the table cell with the Type tool, and then hit the Esc key)

Friday, April 06, 2007

InDesign Text Wrap tips

I've had a lot of questions recently about how InDesign handles Text Wraps, so I thought I'd try to clarify this.

What QuarkXPress calls a Runaround, InDesign calls a Text Wrap. In QuarkXPress, every object has a runaround turned on by default. In InDesign, all objects have text wrap turned off by default.

QuarkXPress runarounds only work if the order in which objects are stacked on the page is correct. InDesign text wraps work regardless of the stacking order of objects.

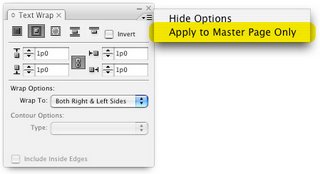
In InDesign CS2, if an object on a Master Page has a text wrap applied, it will only affect text frames that are also located on the master page. Text on document pages cannot wrap around master page items. A new feature of InDesign CS3 is the ability to choose whether text wraps applied to master page objects affect document page text. This option is located in the Text Wrap panel menu.

In InDesign, if you need to have a text wrap applied to a graphic frame, but then you need to put some text in a frame on top of the graphic, do this: select the text frame that you want to put on top of the graphic, right-click, and choose Text Frame Options from the context menu. Select the Ignore Text Wrap option in the Text Frame Options dialog box, and click OK. This will cause the text frame to ignore any text wrap that may be applied to other frames it encounters.

Wednesday, April 04, 2007

Take your text to the cleaners

Text Cleaner is an indispensable (Macintosh only) application that allows you to easily perform multiple find/change routines in text with one command. For example, you could change all multiple spaces to a single space, change all double dashes to em dashes, change three periods to ellipses and remove all extra returns in your text with one command.

Text Cleaner is a stand-alone application, but when you run it, you can tell it to "clean" the text that you have selected in InDesign or Quark. Or, to use it with other programs, you can copy text to the clipboard, "clean" it, and then paste the text back in place.

I highly recommend this handy program. The developers have told me that Text Cleaner will soon be available for InDesign CS3, as well as InCopy.

Monday, April 02, 2007

The InDesign text-scaling snafu

If you have ever encountered the dreaded parentheses-in-the-font-size-field problem in InDesign CS/CS2, you know how maddening this can be. This is where the font size field in the Control or Character palette displays something like "20 pt(11)". InDesign then refuses to allow you to enter a new exact type size in the field.

In CS2, here's how to avoid and fix the problem:

1. To avoid the parentheses-in-the-font-size-field problem, don't group your objects before you scale them. You can still scale multiple objects together without grouping them by either:

a. Command/Ctrl-Shift dragging a corner handle of a text box in your collection of multiple objects
b. Using the Scale Tool in the tool palette
c. Using the Scale fields in the Control palette or Transform palette
d. Using the Free Transform tool in the tool palette.

(In CS3, no matter how you group and scale your objects, you will never get the parentheses-in-the-font-size-field problem. You will only see this problem in CS3 if the objects were scaled incorrectly in CS2, and the file was converted to CS3.)

2. To fix the parentheses-in-the-font-size-field problem when it does occur, do the following:

a. Ungroup the objects
b. Select the text box with the Selection (black arrow) tool
c. Choose Scale Text Attributes (CS2) or Redefine Scaling as 100% (CS3) from the Control palette menu.

Friday, March 30, 2007

The importance of genuine PostScript

I was reminded today once again of the importance of having printers equipped with genuine Adobe™ PostScript™ in complex design and publishing workflows.

I was at a client site helping them troubleshoot odd, intermittent printing problems. They were printing early proofs of complex magazine layouts on an HP LaserJet 4000 printer. This printer, like many HP laser printers contains a non-Adobe PostScript "emulation". This works fine most of the time, but...

After considerable time spent trying get to the root of the problem, we finally were able to determine with confidence that the problem was the printer. I advised the client that it would be less expensive to purchase a new printer (witgenuinene Adobe PostScript than to try find a solution or develop a workaround, especially since they were able to redeploy the printer elsewhere in the company.

Black and white laser printers that contain genuine Adobe PostScript can be a little hard to find. I really like the line of Xerox black and white laser printers. I have a Xerox 4400, which has printed 169,656 pages to date faithfully with absolutely no maintenance.

The bottom line: printers with PostScript emulation will often work fine for "office" documents and simple layouts. But for graphically rich pages created with professional design and publishing software such as Adobe InDesign and Illustrator or QuarkXPress, containing a wide variety of fonts, vector artwork and transparency effects, genuine Adobe PostScript is a must-have.

Wednesday, March 28, 2007

Creative Suite 3 announced

With the announcement of Adobe Creative Suite 3 this week, lots of people are busy trying to get their heads around the many new features and benefits in the new versions of this powerful software.

I'll be writing a lot more about these various features here in the upcoming weeks. In the meantime, if you want to read detailed information about the products in PDF format, click here to download "what's new" PDF files from the Adobe CS3 Press Kit.