Thursday, December 12, 2013

Blend mode trick

I was working on an InDesign project, and was using white arrows and black arrows on top of various images to indicate swipe direction for an Adobe Digital Publishing Suite project. The white arrow worked great on dark images, and the black arrow worked great on light images. But then I ran into an image that had a half dark/half light background. What to do? InDesign's Blend Modes to the rescue.

1. Create an arrow, and fill it with white (the [Paper] color in most projects)

ScreenSnapz004

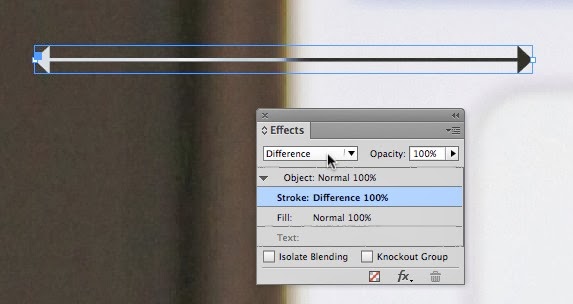
2. Use the Effects panel (Window > Effects) to change the Blend Mode of the stroke to Difference.

ScreenSnapz005

3. The result? An arrow that is light where it appears on a dark background, and dark on a light background.

ScreenSnapz006

This technique will also work in Illustrator, Photoshop, and After Effects, since these programs all feature a "Difference" blend mode.

Wednesday, November 20, 2013

How to apply multiple gradients to a Photoshop layer mask

Its easy to mask part of an image by creating a layer mask and dragging a white to black gradient on the mask. But what if you want to had 2 or more gradients in a single mask? This can be a bit of a head-scratcher. Here's how:

1. Create a new, blank layer mask by choosing Layer > Layer Mask > Reveal All.

ScreenSnapz001

2. Click on the mask in the Layers panel. 

3. Select the Gradient tool in the Tools panel.

ScreenSnapz002

4. In the Options bar, choose Foreground to Transparent for the type of Gradient, and set the other options in the bar as shown below.

ScreenSnapz005

5. Choose black for your foreground color.

ScreenSnapz004

6. To achieve the result below, I dragged from just above the center of the image to the top edge of the image, and then again from just below the center of the image past the bottom edge of the image, masking the top and bottom areas of the image and revealing the white layer underneath.

ScreenSnapz006

7. Option/Alt-click on the layer mask icon in the Layers panel to view the mask full-size. Option/Alt-click on the icon a second time to view the completed image.

ScreenSnapz007

Wednesday, November 06, 2013

Specific fonts required to run Illustrator and Dreamweaver

Beware: if you don't have all four styles of Verdana (regular, bold, italic, and bold italic) installed, Illustrator CC will crash. Many users basically ignore Verdana. Installing Microsoft Office, and perhaps other apps, may install new versions of Verdana and Tahoma, which could screw things up and cause Illustrator to crash.

More information about this can be found on the Illustrator forum.

To run Dreamweaver CC, you must have Verdana and Tahoma installed. But at least Dreamweaver notifies you of the problem.

ScreenSnapz001

Tuesday, November 05, 2013

Creative Cloud and data security

A frequent complaint that I hear is "my IT department won't let us move to Creative Cloud because of data security fears." Adobe has created a PDF titled "Adobe Creative Cloud Security FAQ for IT". Contents include answers to questions such as "Where is Creative Cloud hosted?" and "Do the provided services support encryption?"

See also the Creative Cloud FAQ for more information about security. 

Perhaps passing these resources on to your IT department will help "grease the skids" for your migration to Creative Cloud!

Wednesday, October 30, 2013

Change Photoshop's Undo shortcut to match other Adobe programs

Most of the Adobe creative applications feature unlimited undos. And to access these multiple undos, you can use the command-z (Mac) and ctrl-z (Windows) shortcuts. To redo, use command-shift-z (Mac) and ctrl-shift-z (Windows). However, Photoshop is different. Photoshop offers only a single undo. But, in its place, it features a History Panel, allowing you to move forward and back in history. But you can change Photoshop's keyboard shortcuts so that undo works like you'd expect it to. Here's how:

1. Choose Edit > Keyboard Shortcuts

ScreenSnapz001

2. In the Keyboard Shortcuts dialog box, click on the triangle to the left of the word Edit to spin the Edit category open. 

3. Click in the Shortcut field to the right of Undo/Redo, and press the delete key to remove the keyboard shortcut assigned to Undo/Redo.

4. Click in the Shortcut field to the right of Step Backward, and press command-z (Mac) or ctrl-z (Windows)

5. Click the Accept button.

ScreenSnapz003

6. Click on the Save icon at the top of the dialog box, give your shortcut set a name and click the Save button.

ScreenSnapz004

Now, command-z (Mac) or ctrl-z (Windows) will step backward through the History panel, giving you multiple Undo capability. Add the shift key to step forward through the History panel.

Monday, October 14, 2013

Non-square, high-res DPS Table of Contents icons

When you use Adobe Digital Publishing Suite to create a tablet app, a table of contents is automatically built for the app, with one entry in the table of contents for each "article", or InDesign file, in the folio.

An icon image for each entry in the table of contents is automatically created by DPS. This automatic icon is just a shrunk-down version of a square region of the first screen of the article…usually not attractive and what you want. You can customize this icon by creating a 70 x 70 pixel PNG image. Then select the article in the Folio Builder panel and choose Article Properties. In the dialog box that appears, click the folder icon under Table of Contents Preview, and navigate to the PNG image that you saved. 

ScreenSnapz001

Here are 2 cool tips:

1. The PNG image can include a transparent background. This allows you to create thumbnails that appear in the table of contents as non-square icons. Be sure to save the icon as a PNG-24 image. Here are a couple examples of this:

ScreenSnapz003


2. A 70 x 70 pixel image looks fine on non-retina displays. But to make the icon look even better on high-resolution displays such as the iPad 3 and 4, create a 140 x 140 pixel image. This is particularly useful if the icon includes type or line art. When you include an icon higher than 70 pixel resolution, you'll receive the error message pictured below, but it still works. Proceed with caution and test your app to make sure performance is acceptable.

ScreenSnapz002

Tuesday, September 24, 2013

How to make "Paste Into State" easier

If you do a lot of work with Adobe Digital Publishing Suite, you will inevitably create a lot of "multi-state objects". And, you will find yourself frequently using the "Paste Into State" command found in the Object States panel menu. After choosing this command 50 or 60 times, you'll find yourself thinking "there's got to be a better way!" Here are 3 ways to make this much easier:

1. Use the Paste Into State button at the bottom of the Object States panel.

ScreenSnapz002

2. Assign a keyboard shortcut to the Paste Into State command.

a. Choose Edit > Keyboard Shortcuts

b. Select Panel Menus for the Product Area

c. Select Object States: Paste Into State from the list of commands

d. Click in the New Shortcut field, and press your desired shortcut (I use option-v)

e. Click the Assign button

f. Click the OK button

ScreenSnapz004

3. Try the Digital Publishing Pack 1 set of handy scripts. One of these scripts automates the process of pasting selected objects into multiple states at once!

Friday, September 13, 2013

Webinar invite: The Publishing Process with DPS

Adobe has set up a free four-part webinar series covering some of the more technical aspects of Adobe Digital Publishing Suite, Enterprise Edition. On September 19 I'm presenting the second session, entitled The Publishing Process with DPS. These sessions will be tailored for people working in higher education, but open to all.

My session, applicable to both Professional and Enterprise customers of DPS, will focus on how to build build an app. In other words, beyond creating folio content, how to you build the actual app and submit it to an app store? We'll look at creating the required assets, optaining security certificates, entering marketing information, and much more.

Register for this free seminar here.

Wednesday, September 11, 2013

Twin Cities InDesign User Group meeting

I just scheduled the next meeting of the Twin Cities InDesign User Group for Wednesday evening, September 25 at 7pm. These meetings are free, fun, and a chance to geek out with like-minded InDesign users. At this meeting, I'm going to reassemble a real-life project I recently completed, and use this as a way to showcase and explain several new, not-so-new, and advanced InDesign features. Everyone is sure to pick up at least a tip or two! Click here for meeting details, and to register to attend. I hope to see you there!

Monday, August 26, 2013

6 things to know about DPS embedded video

Adobe InDesign and Adobe Digital Publishing Suite (DPS) make it easy to embed video content in mobile app projects. Here are a few things you should know:

1. Video must saved in MP4 format with .H264 encoding. Adobe Media Encoder (included with InDesign) and the free Handbrake utility are both good tools for converting and compressing video. Be careful, since some video tools add an ".m4v" extension to the file name when you save an mp4 file. InDesign won't allow you to place a file with an m4v extension. You''ll need to change the extension to mp4 in order to place it in InDesign.

2. Compress video to a maximum of 10mb/minute. To keep file size and download speeds reasonable, you'll want to compress your video as much as possible, while retaining acceptable quality. If your .mp4 file is more than 10mb in size for each minute of video, use Adobe Media Encoder or Handbrake to further compress the video.

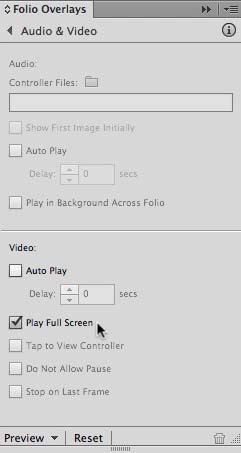
3. Video can play full-screen. Select the video, and specify this in the Folio Overlays panel. For the best quality full-screen video results, size your video to 1024 pixels wide. Even though the iPad 3 and 4 feature screens that are 2048 pixels wide, saving video at this resolution results in huge file sizes with only a very marginal increase in quality. In fact, if you need to save file size, consider saving full screen video at 800 pixels wide. You may be satisfied with the quality, and save some significant file size. If your app is portrait orientation, full-screen video will play 768 pixels wide, but the built-in video player on the iPad will allow the users to rotate the iPad when viewing full screen video, so you should test your video in landscape orientation.
ScreenSnapz001

4. Video can't be cropped or resized in InDesign. Well, actually, you can crop and resize video in InDesign, but when the video plays, it will ignore the cropping and resizing. In other words, videos will always play at the exact pixel dimensions they were created at, (except for full-screen video). So, if you want a video to play in a 200 x 300 pixel area on the screen, you will need to crop and scale the video to those exact dimensions. Note: You can crop and scale video in Photoshop CS6 and newer as easy as cropping and scaling a still image .

5. Video is its own button. In other words, simply tapping a video object in a DPS app will cause the video to play. This is really handy. It means that typically, you don't need to create buttons to play and pause video. For example, if you place a 300 pixel wide video that you want to play in a 300 pixel wide frame, just place it in InDesign, and it will play as soon as it is tapped. In the example below, tapping anywhere on the video will cause it to play.

ScreenSnapz002

You can use this to your advantage to easily make a full-screen video play. In the example below, I've placed a video, and then set the "Poster" to None, so that the video is invisible. Be sure that Frame Edges are displayed (View > Extras > Frame Edges) so that you can see the video "content" of the frame.
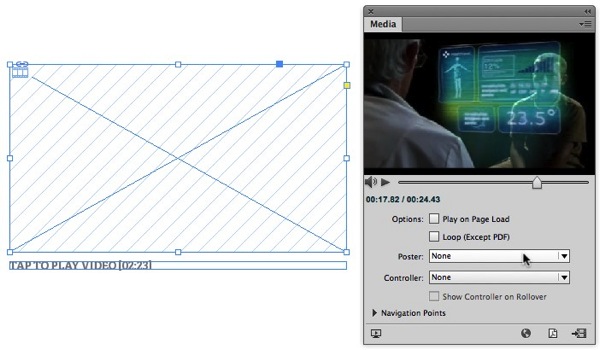
ScreenSnapz003

Next, double-click on the frame to select the contents, and resize the contents to the size that you want to be the tap region. Since the video is going to play full-screen anyway, you can scale and stretch the video to any size you wish.
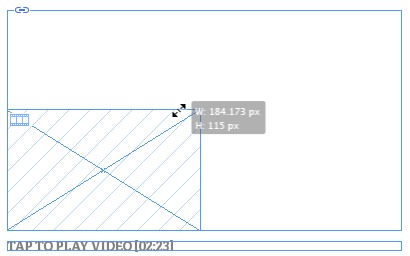
ScreenSnapz004

Last, select the frame and resize the frame to fit the content (Object > Fitting > Fit Frame to Content), and position a play symbol (an InDesign polygon) on top of the video. Done. Video is its own button.

ScreenSnapz005


6. Video always jumps to the front of other page objects when it plays. This is good and bad. Good, because you can use this to your advantage. In the example below, I've placed an InDesign polygon on top of a video clip that is not set to play full-screen. In this case, when the user taps the video, since the video will jump to the front when playing, the triangle will disappear when the video plays, and reappear when it is finished. This is nice. However, the fact that video jumps to the front when playing means that if you wish to mask a video by placing a shape on top of a video, you will need to use the trick described here.

ScreenSnapz006

Monday, August 12, 2013

How to determine DPS tool versions

Adobe Digital Publishing Suite is currently on a 2-3 month update cycle. Each new version is given a new release or version number such as "r27" (for release 27) or "v27" (version 27); the terms "release" and "version" being used interchangeably. Here's how to determine which version of the various DPS components you have installed.

DPS Desktop Tools

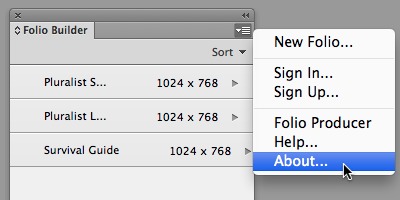
In InDesign, choose Window > Folio Builder to display the Folio Builder panel. In the Folio Builder panel menu, choose About.

ScreenSnapz001

You will see a dialog box displayed similar to the one below. I've highlighted the version number of the Folio Builder panel in dark blue, and the date of the folio builder panel in light blue (YYYYMMDD). I've highlighted the version of InDesign in red, and the version of the Folio Producer Tools in yellow. In InDesign CS6 and later, the Folio Builder panel and Folio Producer tools are installed together with a single installer.

ScreenSnapz002

Desktop Viewer

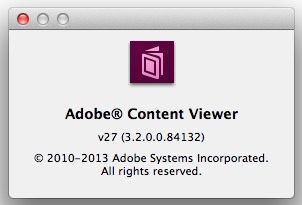
If you need to check which version of the Desktop Viewer is installed, either preview an article or folio on the Desktop, or run Adobe Content Viewer, located in your Applications > Adobe folder. Choose About Adobe Content Viewer from the Adobe Content Viewer menu (Macintosh) or the Help menu (Windows).

ScreenSnapz004

A dialog box with the Adobe Content Viewer version number will be displayed.

ScreenSnapz005

DPS App Builder

To check the version of DPS App Builder, find the DPS App Builder app in your Applications folder, and choose About DPS App Builder from the DPS App Builder menu (Macintosh) or the Help menu (Windows). Unfortunately, the DPS App Builder version number doesn't follow the same numbering system as the other components.

ScreenSnapz006

Adobe Viewer on your tablet

To determine which version of Adobe Viewer is installed on your tablet, open a folio in Adobe Viewer. Tap once in the middle of the screen to display the top and bottom bars of the DPS app interface. Then, tap twice quickly on the name of the app that is displayed at the top of the screen, and it will be replaced by the version number.

2013 08 12 21 28 42

2013 08 12 21 28 47

Wednesday, August 07, 2013

Beware of DPS slideshows that bleed

File this one as a bug, using Adobe InDesign CS6 and Adobe Digital Publishing Suite tools r27.

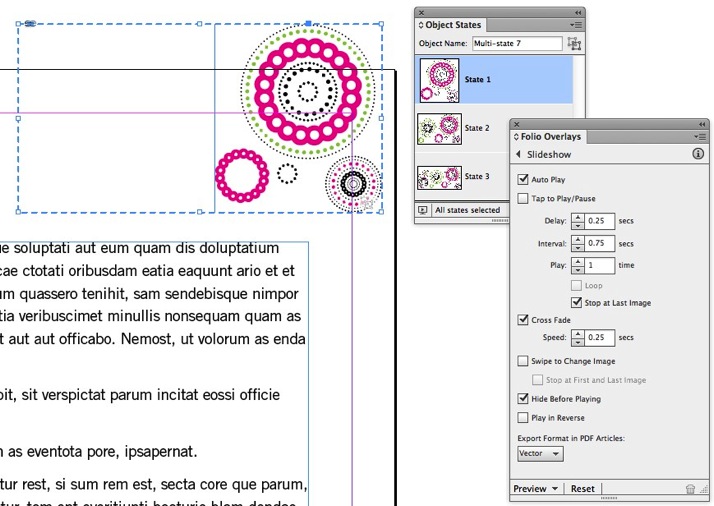
A client had a 3-state multi-state object (MSO) that bled off the top of the page, like this:

ScreenSnapz001

As you can see, the object in State 1 of the MSO, (as well as the objects in State 2 and State 3) bleed off the top of the page. The Slideshow is set to "Auto Play" in the Folio Overlays panel. But it refused to autoplay.

It turns out that Auto Play is ignored if any of the objects in the MSO bleed off the top or the bottom of the page. Simply cropping the objects to the edge of the page solves the problem.

ScreenSnapz002

I filed this as a bug using Adobe's Bug Report form.

Thursday, July 25, 2013

Measuring in Adobe Acrobat

I was setting up an InDesign template yesterday, and I had to match certain aspects of a client-provided PDF, such as margins, distance between various lines, etc. Sure, I could print the PDF and measure the items with an old-fashioned ruler. Or, I could place the PDF on a separate layer in my InDesign document, lock it, and position objects on top of it. Or, I could open the PDF in Illustrator and measure things there. But for this project, I found the measurement capabilities built in to Acrobat X and Acrobat X1 Pro to be the simplest. Here's how I did it:

(By the way, Acrobat has had measuring tools since Acrobat 8 pro, but the location and function of the measuring feature may be different in versions prior to Acrobat X).

1. In Acrobat, click on Tools to reveal the Tools pane.

ScreenSnapz001

2. In the Panels menu, choose Analyze to display the Analyze pane.

ScreenSnapz002

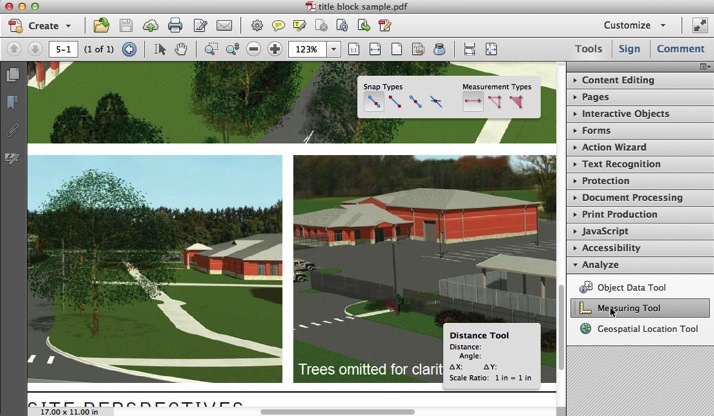
3. Select the Measuring Tool. 

ScreenSnapz003

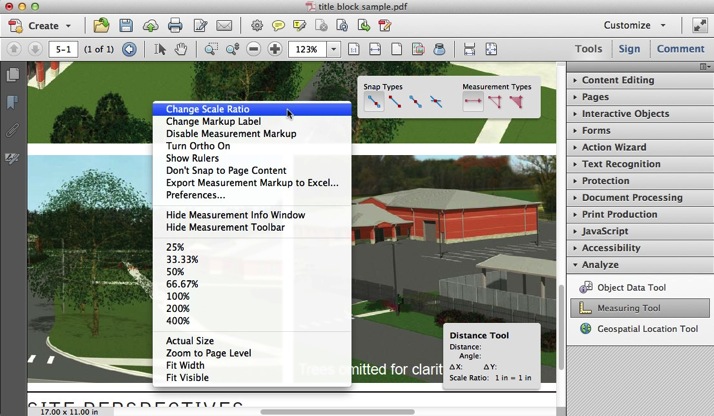
4. Right click on your document, and choose Change Scale Ratio to specify the measurement system you wish to use.

ScreenSnapz005

5. Click where you want to begin measuring, then click again where you want to end measuring. Click a third time to finalize the measurement, and you will see the distance displayed not only on the PDF file, but also in the Distance Tool "heads up display" on the screen.

ScreenSnapz004

Learn more details about the Acrobat Measuring Tool here.


Wednesday, July 17, 2013

Adobe looking for student reps

Adobe is "recruiting Adobe enthusiasts to help spread the Adobe Creative Cloud love on campus!"

According to Adobe, "as an Adobe Student Rep, you will teach your friends, classmates, and community tools and techniques to help them stand out with Adobe Creative Cloud. If you’re passionate about design or video and want hands-on marketing and event planning experience with a company that is changing the world through digital experiences, this program is for you."

Read more, and fill out an application here.

Wednesday, July 10, 2013

A shortcut and a warning

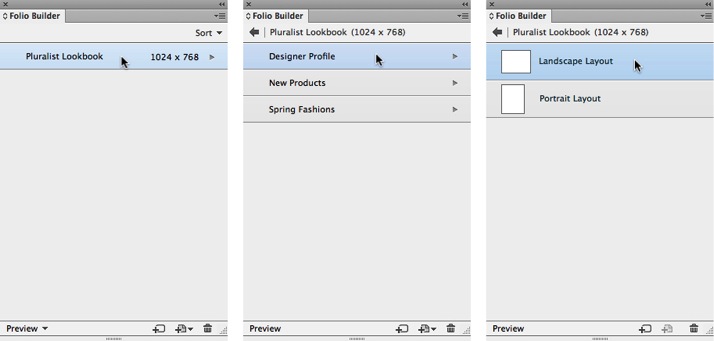
If you use InDesign and Adobe Digital Publishing Suite (DPS) to create tablet apps, you are no doubt familiar with the Folio Builder panel. The Folio Builder panel displays 3 "levels": the folio, article, and layout levels. You can navigate between these 3 levels by clicking on the forward and back arrows.

Views

A shortcut is that you can use the layout level to open InDesign files. In the article level of the panel, select the article you want to open, and click on the right pointing arrow. This will take you to the layout level. Double-click on the layout you wish to open, and the associated InDesign file will open in InDesign (assuming you haven't moved or renamed the InDesign file since you created the article). This is really handy.

However, here is the warning: If the InDesign file that you are opening with this method contains missing fonts or missing or outdated image links, the standard "missing links" and "missing fonts" warning dialogs that normally appear when opening a file with font or link problems will not appear. The missing fonts and links will still be flagged in Window > Output > Preflight, File > Package, Type > Find Font, and the Links panel, but you will not be alerted to problems as you open the file.

This is dangerous. I've filed this as a "bug report" with Adobe. Hopefully they will fix it!

Wednesday, July 03, 2013

Digital Publishing Pack scripts updated

On my web site I sell a package of scripts that I call "Digital publishing pack 1: scripts for Adobe DPS". These scripts take much of the pain out of using the Object States panel, and automates the creation of button-driven "reveal and hide" multi-state objects.

I just added a new script to the pack: this script allows you to add the selected object(s) to a selected multi-state object as a new state, with a single click. Without the script, you must copy your objects to the clipboard, select the multi-state object, select one of the states, duplicate the state, paste the objects into the state, and then delete the original objects from the state. Painful…but the script makes this painless.

If you frequently create multi-state objects for Digital Publishing Suite projects, these scripts are a "must-have". The package of 7 scripts is a bargain at $19.95/workstation. No knowledge of scripts required…full installation and use instructions are included.

ScreenSnapz001

Monday, July 01, 2013

Automatically extend a background in Photoshop

If you need to extend a photo by adding more sky, clouds, grass, snow or other organic "background", here's the easy way, using Photoshop CS5 or later:

1. Choose Image > Canvas Size. Increase the width or height of your image, choose the anchor, set the Canvas extension color to White, and click OK.

ScreenSnapz001


ScreenSnapz003

2. Choose the Quick Selection Tool (W) in the tool panel. Be sure that "Auto-Enhance" is selected in the Options bar at the top of the screen. Then select the additional white canvas you added to the photo by dragging through it with the Quick Selection Tool. 

3. Press the Delete key.

4. In the Fill dialog box, select Use "Content-Aware" for the Contents. Click the OK button.

ScreenSnapz004


ScreenSnapz005

Tuesday, June 18, 2013

18 free recycle logos

Sappi Fine Paper has a set of 18 cool recycle logos free to download here. The logos are available in high-quality PNG files with transparent backgrounds, or in vector PDF format, in English, French and Spanish.
According to Sappi "A 'please recycle' message doesn’t have to be the ubiquitous chasing arrows we’ve all seen. In fact, it can be any interpretation of the message you can think of. This is a great opportunity to flex your creative muscle while helping the planet. Put a 'please recycle' label, claim or message in a prominent place on your printed materials. We know real estate on printed materials is precious—but so is our planet!"

Recycle logos  

Monday, June 03, 2013

Creative Cloud and large organizations

Those of you working in large corporations, government, and education have unique questions and concerns about Creative Cloud. If you are in this camp, read the Top 5 Myths of Creative Cloud ***IT Edition*** for some answers. Might be worth passing this on to your IT folks also!

Thursday, May 30, 2013

New Kuler Web site and App

Adobe recently updated their Kuler Web site, and have released a Kuler App for the iPhone. I've written about Kuler previously here. Kuler is "a cloud-based application for making color themes using an iPhone or your browser."

Most notably, the Kuler Web site uses standards-based responsive design, so it works beautifully on any browser on any device. 
ScreenSnapz001


ScreenSnapz002

The Kuler app for iOS makes it super-simple to create color themes using the phone's camera. You don't even need to take a photo. Just point the camera at a scene that inspires you, and Kuler attempts to capture a color scheme from the scene.

Photo

Also, Kuler finally supports CMYK colors, in addition to RGB, HEX, LAB, and HSB!

Thursday, May 23, 2013

Dropbox file versioning and recovery

One of the best, but most overlooked, Dropbox features is the ability to easily retrieve previous versions of a file, or even deleted files.

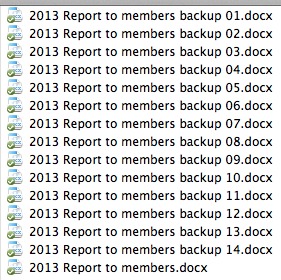
In the long dark years before Dropbox, my folders often looked like the screen shot below when working on an important project. The folder is full of what I call "paranoia saves". I would leave behind a trail of sequential versions of my files in case they became corrupt, or in case I changed my mind and wanted to revert, or "roll back" to a previous version. But no more! Now I let Dropbox take care of all this "versioning" for me, automatically!

ScreenSnapz001

Here I've made a folder in my Dropbox folder named "reports". It contains a report I've been working on for a couple of days. Notice that it contains only a couple of files...not multiple versions.

ScreenSnapz002


If I right-click on the "2012 Report to members" file and choose View Previous Versions from the context menu, you will see the file and all previous versions listed on the Dropbox Web site. Each time that you save your file, the file gets synced to Dropbox and an archive of the previous version is created.

ScreenSnapz003


ScreenSnapz004


There are two very different ways to restore a version on the Dropbox Web site:

1. If you click on the blue version number, the file will be immediately downloaded to your browser's downloaded files location. In this case, the file does not replace the original file.

2. If you click the radio button next to a file, and then click the Restore button, the file is restored to its original location, replacing the latest version of the file. So be careful with this!

But what if you've deleted a file from your computer? If the file was originally in your Dropbox folder, no problem! Just use the Dropbox menu item at the top of your screen (or in the bottom right of your screen if you are on a Windows computer), to access your files on the Dropbox.com web site.


ScreenSnapz005


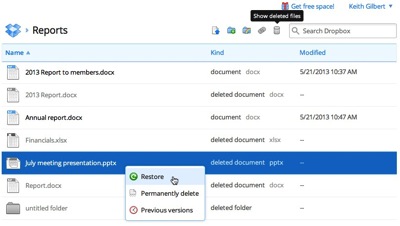
Navigate to the folder where the file you deleted was, and then click the "Show Deleted Files" icon at the top of the screen.

ScreenSnapz007


This will reveal any files that have been deleted within the last 30 days in this folder. Deleted files display in light gray type. When you find the file you want, you can either right-click on the file and choose Restore, or even click on the filename to reveal the previous versions of the deleted file!

ScreenSnapz008


Dropbox keeps deleted files and previous versions of files for 30 days. If you wish to retain files longer, you can purchase the "Packrat" option from Dropbox. This will save deleted and previous versions of files indefinitely. Packrat is included with Dropbox for Business accounts, and available for a fee with Dropbox Pro accounts.

Of course, your Dropbox storage isn't unlimited, so you may be concerned that all these deleted files and old versions of files take up space in your Dropbox account. Remarkably, they don't! Deleted and previous versions of files don't count against your storage quota.

Armed with the knowledge that you can retrieve previous versions of your saved files, and even restore deleted files using the Dropbox version history and file recovery features, you should now be able to simplify your workflow and sleep well at night, knowing that the files in your Dropbox folder are secure.