Friday, January 29, 2021

The end of the road for PostScript Type 1 fonts

Adobe is dropping support for the old PostScript Type 1 fonts in January 2023. See this announcement. Support for PostScript Type 1 fonts in Photoshop will happen even sooner (this year).

If you are still using old PostScript Type 1 fonts in your workflow, now is the time to begin planning for replacing them with OpenType versions.

Wednesday, June 26, 2019

Adobe Bridge update adds support for Dimension files

The June 2019 update of Adobe Bridge CC adds support for the Dimension .DN file format, so Dimension files can be previewed in Bridge. Previews will only appear for files that have been saved with a recent version of Dimension—older files won't preview.


More information about the recent Bridge update can be found here.

Wednesday, May 22, 2019

Adobe Dimension tutorial: Create 3D type in Photoshop and import in Dimension

Photoshop contains complex 3D modeling capabilities. But you don't have to know much about 3D in Photoshop to create some extruded type and bring it into Dimension for applying materials and lighting. Here's how:

1. In Photoshop, create a new document that is 1000 px square. The size isn't important, since we'll be creating a vector object to bring into Dimension. This is just a good starting point.

2. Use the Type tool to create a line of text, and make the type large. Again, the size isn't important.


3. Choose 3D > New 3D Extrusion from Selected Layer.


4. Use the Properties panel to experiment with Shape Preset, Extrusion Depth, and other settings. Don't worry about position, angle, shadows, color, or texture settings, as these will all be taken care of in Dimension. Just work with settings that affect the shape, such as Extrusion Depth, Twist, Taper, etc.


5. Once the model looks the way you want, choose 3D > Export 3D Layer.

6. Choose Wavefront|OBJ for the file format, and then click OK.


7. Name the file, and save it somewhere you'll remember.

8. In Dimension, create a new file.

9. Choose File > Import > 3D Model, and select the OBJ file you exported from Photoshop.

10. Choose Camera > Frame All to position the camera so you can see the entire line of type.


11. Apply materials and lighting and pose the type model in Dimension as desired.


Want to learn more about Adobe Dimension? See the Adobe Dimension CC Classroom in a Book I wrote published by Adobe Press.


Wednesday, March 20, 2019

Adobe Dimension tutorial: Import a model from 3D Warehouse

3D Warehouse is a huge repository of free 3D models. The site is run by Trimble, the maker of SketchUp 3D modeling software. Any SketchUp user can upload models to 3D Warehouse to share with others Many manufacturers of industrial parts, store furnishings, furniture, and other items upload models of their products to 3D Warehouse as well.


All of the models in 3D Warehouse are completely free to use in compositions or modify as desired, according to the license agreement. You can easily use models from this vast collection in Dimension. Here’s how.

1. Create a new file in Dimension, or open an existing file as I’ve done here. I want to place a stack of books on the coffee table in this scene.


2. In a web browser, go to 3dwarehouse.sketchup.com.

3. In the search field, type in keywords to search for. I searched for “books”, and found this model.


4. Click the download button, and choose SketchUp 2018 Model from the dropdown list. The file will be downloaded as a .skp file.

5. In Dimension, choose File > Import > 3D Model.

6. Select the .skp file you just downloaded, and click Open. The file will be imported, and placed in the scene. It may not be placed anywhere where it is visible...you may need to choose Camera > Frame Selection, or move it above other models in the scene in order to see it.

7. Position and scale the model as desired.


Want to learn more about Adobe Dimension? See the Adobe Dimension CC Classroom in a Book I wrote published by Adobe Press.


Thursday, March 07, 2019

Adobe Dimension tutorial: modifying material properties with a bitmap

You can do a lot in Adobe Dimension just using the materials found in Dimension’s Starter Assets and the materials that you can purchase on Adobe Stock. But by adding a black and white or grayscale bitmap image to your material properties, you can create an infinite variety of surface appearances. This short tutorial will show you how.

You can download the files used in this tutorial here.

1. Create a new document in Dimension.

2. In the Content panel, choose Starter Assets, and click on the Beverage Can model to place it in the scene.

3. Choose Camera > Frame Selection to fill the screen with the can model.

4. Double-click on the surface of the can to select the Can Material. 

5. In the Content panel, click the Metal material in Starter Assets to apply the metal material to the model. 

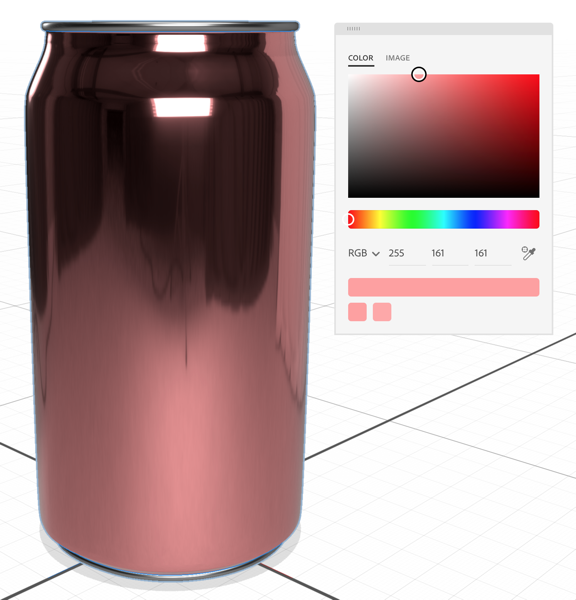
6. In the Properties panel, click the swatch next to Base Color, and choose RGB 255, 161, 161 for the color.
Screenshot 001

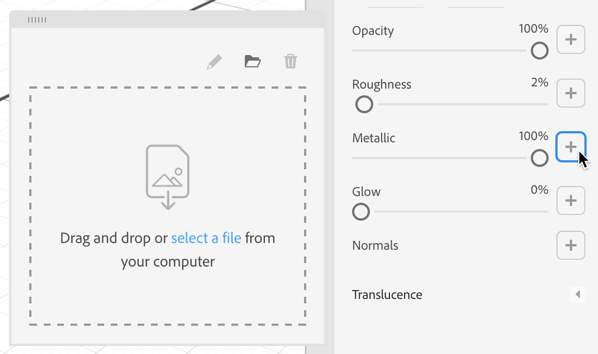
7. In the Properties panel, click the plus icon to the right of Metallic.
Screenshot 002

8. In the pop-up, click select a file, and choose the lines.png file from the tutorial files that you downloaded earlier.

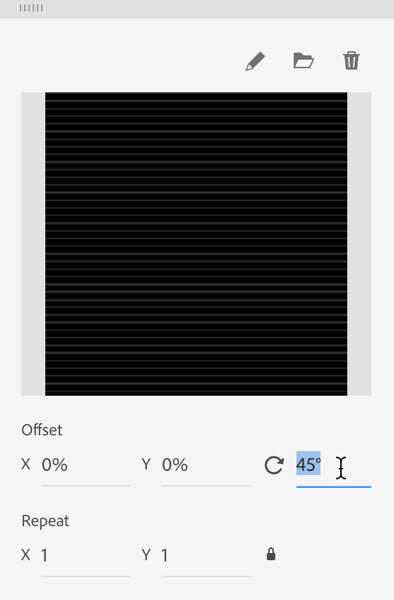
9. Change the rotation angle to 45°.
Screenshot 003

10. Close the pop-up. Use the Orbit tool to rotate your view of the can. You’ll see that the lines are “shinier” than the area between the lines. This is because when a black and white bitmap is applied to the metallic property, the white areas are 100% metallic and black areas are 0% metallic. In this case the lines are light gray, so they set the metallic property to about 80% metallic.

Screenshot 004

For further experimentation, try replacing the lines bitmap with the jive.png bitmap. This bitmap contains four shades of gray. You can also try applying a bitmap to the Opacity, Roughness, and Glow properties.

Adobe has a nice visual summary of how bitmap masks affect various properties here.

Want to learn more about working with materials in Adobe Dimension? See the Adobe Dimension CC Classroom in a Book I wrote published by Adobe Press.

Monday, February 25, 2019

Working with canvas size in Dimension

On thing that surprises new users of Adobe Dimension is that when you choose File > New to create a new file, you aren’t asked for a file size. For a product named Dimension it doesn’t seem to care much about dimensions! But the width and height of your Dimension file does make a difference and you need to pay attention to this.

When a file is open, click somewhere outside of the canvas, and in the Properties panel you’ll entries for Canvas Size width and height.

Screenshot 003

If you’re creating a Dimension scene for a real-world project, you certainly have specific size requirements. Let’s say you need the final file to be 4000px wide by 3000px high. Dimension is capable of this, but you might not want to begin your project at these dimensions. This is because the dimensions of the canvas have a big effect on rendering speed. So, in the early stages of a project, you might want to work at a lower resolution, but the same aspect ratio as your final requirements. So in this case, I’d work at 1000px x 750px size while I determined where to position my models and the basics of lighting and materials. This would allow Dimension to produce low-quality renders quickly so that I can see how the file is developing.

Then, once I’m confident of the direction that I want to take, I can increase the resolution of the canvas. Since the 3D models are vector, they will scale up cleanly to fit the new canvas size and you can continue working and complete your scene.

You can do math in any numeric field in the Properties panel. So a good way to scale up the canvas is just to enter the multiplication sign (an asterisk) followed by the multiplier. If you click the small padlock icon to the right of the height field, the canvas will be resize proportionally.

Screenshot 002

Want to learn more about Adobe Dimension? I wrote the book! See my Adobe Dimension CC Classroom in a Book recently released by Adobe Press.
Monday, February 11, 2019

How to select models in Adobe Dimension

Selecting models in Adobe Dimension is similar to selecting objects in InDesign or Illustrator, with a few unique differences that you might find confusing at first.


I've put together a short video to help you understand the various ways to select models in Dimension.


Want to learn more about Adobe Dimension? See the Adobe Dimension CC Classroom in a Book that I wrote for Adobe Press.
Tuesday, February 05, 2019

How to transform models in Adobe Dimension

In order to use Adobe Dimension effectively you need to know how to use the “transformation widget” to move, scale, and rotate models.
Adobe Dimension CC screenshot 001
I’ve put together a video that will help you understand how to use the transformation widget with the Select and Move, Select and Scale, and Select and Rotate tools.


Want to learn more about Adobe Dimension? See the Adobe Dimension CC Classroom in a Book that I wrote for Adobe Press.
Tuesday, January 29, 2019

Find free content to get started with Adobe Dimension

Adobe Dimension is a fantastic program that allows anyone to create realistic images from 3D assets for branding, identity, product shots, or just for fun!

But for many people, the barrier to entry to getting started with Adobe Dimension is locating 3D assets to use. Perhaps you’re a graphic designer and you’ve created an identity for a gourmet food company, and you want to show what the identity will look like on a variety of food packages such as jars, cans, boxes, pouches, etc. Or you want to show a screen from your Web site displayed on screens of various mobile devices, posed in realistic settings. To accomplish either of these things, you’ll need high quality 3D models of jars, cans, boxes, pouches, and mobile devices. Where can you get these?

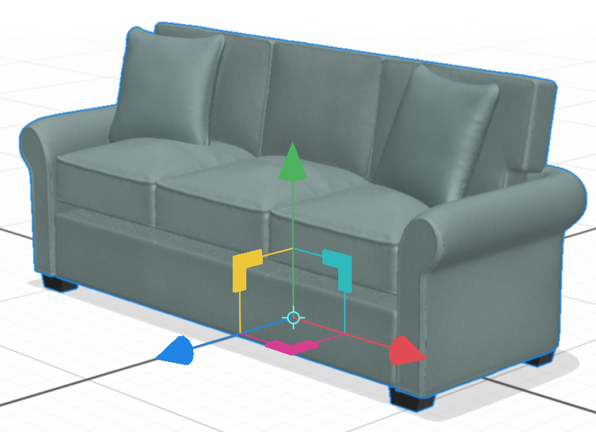
Right in Dimension you’ll see a variety of “Starter Asset” models that are free and can be used in your project with a single click.

Screenshot 2019 01 29

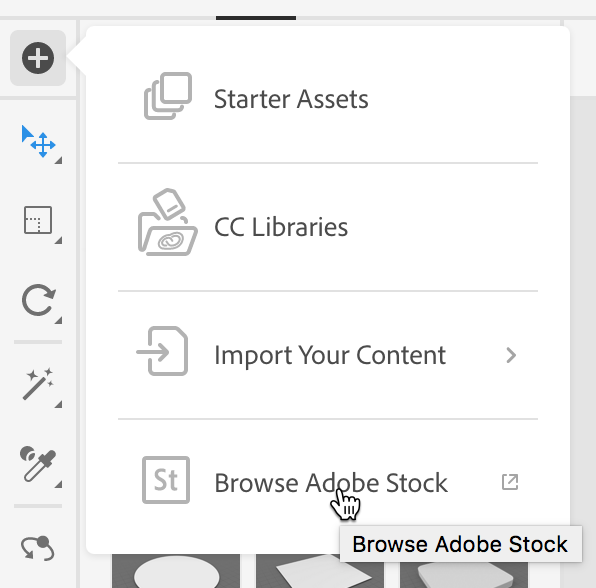
But likely you’ll need more than this. The best place to look next is Adobe Stock. You can easily access Adobe Stock from within Dimension by clicking the Add and Import Content button at the top of the Tools panel and choosing Browse Adobe Stock.

Selecting Browse Adobe Stock from the Add and Import Content button

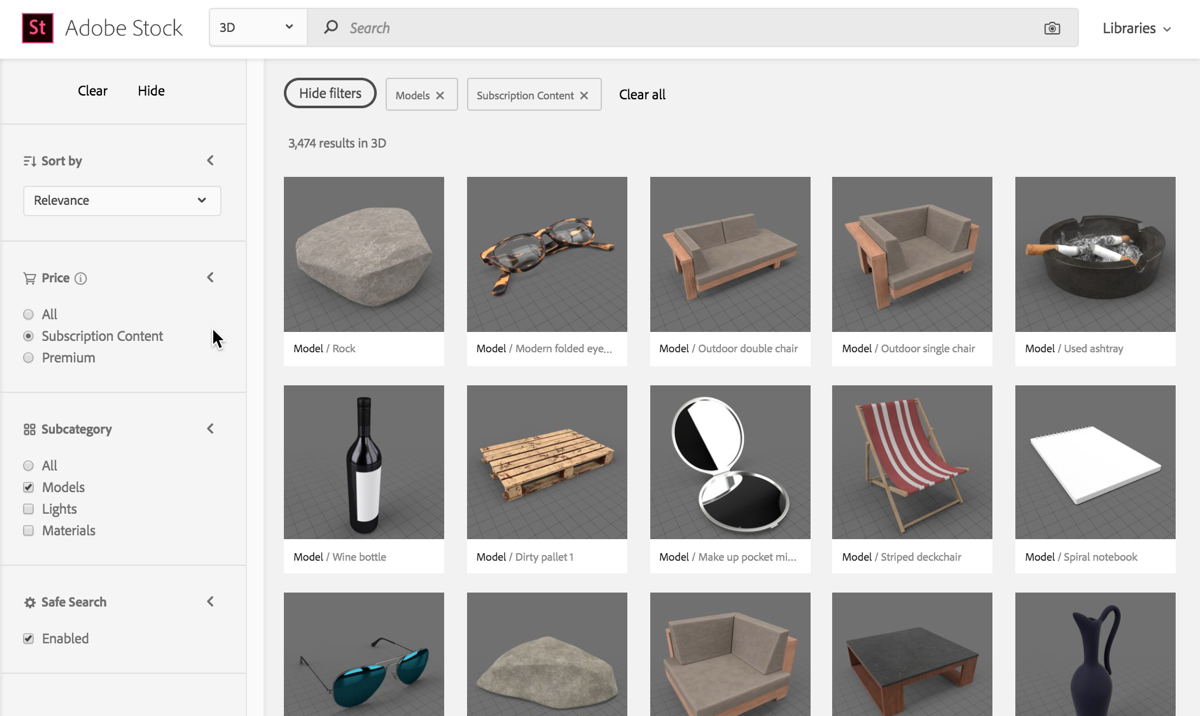
This will launch your Web browser and display a “sampler” of a few dozen free models available on Adobe Stock. 

Google ChromeScreenSnapz003

You might conclude that these are the only free models available on Adobe Stock. But there are actually hundreds of free images available! Unfortunately, there isn’t any way to search for only free images.

This link will display all of the non-premium 3D models available on Stock. As of today, that is 3,474 models, hundreds of which are free.

Google ChromeScreenSnapz004

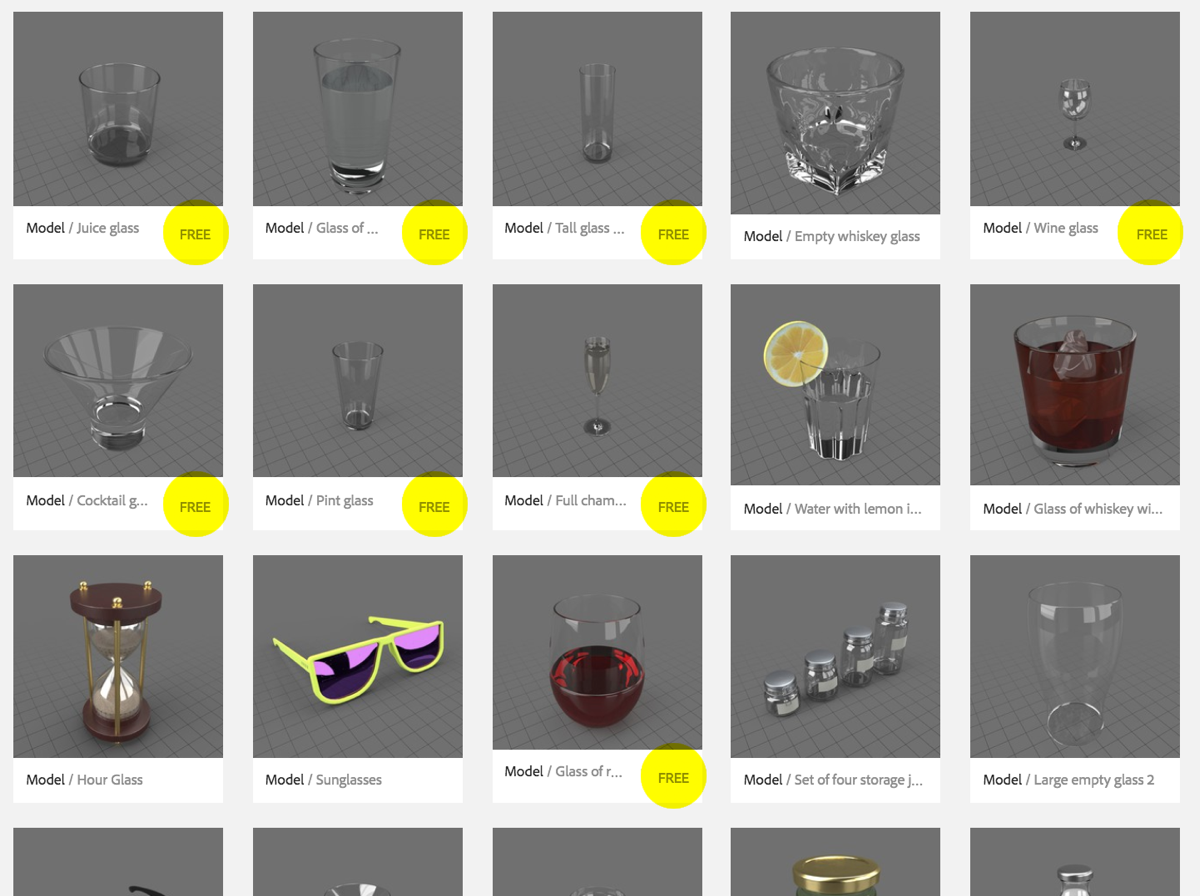
Searching for “glass”, for example, you’ll discover several free images mixed in with the results.

Google ChromeScreenSnapz005 copy

So, while there is no way to filter in Adobe Stock to display only free 3D models, there are hundreds available…you just need to dig. And, these models are optimized and tuned to work flawlessly in Dimension.

Want to learn more about Adobe Dimension? See the Adobe Dimension CC Classroom in a Book written by yours truly!

Monday, March 26, 2018

Adobe to discontinue Muse and Business Catalyst

Today Adobe announced that Adobe Muse and Adobe Business Catalyst will not be developed any further. I’m saddened by this, as I used both products, and believe they filled a specific niche in the industry. But apparently that niche wasn’t profitable or worth pursuing for Adobe.

Muse:

"On March 26, 2018 we will release the final feature improvement release of Adobe Muse. We will continue to offer technical support to all active Creative Cloud customers until May 20, 2019.” Read more here.

It appears that Adobe is considering extending Adobe Spark to allow creation of full Websites:

"Adobe Spark, powered by 30+ years of Adobe’s design intelligence, will soon bring a better way to build websites. Create beautiful, modular, and responsive websites from scratch—in minutes. Just add your text, photos, videos and more, and Spark will give you beautiful results.” Read more here. Oddly, there is no mention of, or link to, this effort in the Muse announcement.

Business Catalyst:

"Adobe is committed to delivering exceptional software and services to our customers. It’s in our nature to innovate and try new things, and it was in this spirit that we acquired Business Catalyst in 2009. As we re-focus on products that broadly provide our customers with the most value, Adobe is announcing the end of development for Business Catalyst as of March 26th, 2018. New sites will no longer be available for purchase starting with June 18th, 2018.  

Adobe will stop hosting existing sites on Business Catalyst on March 26th, 2020. Adobe encourages customers to download their data and migrate to other systems well before March 26th, 2020. Detailed how-to information and assistance is available. Customers' data will be retained by Adobe until March 26th, 2020, after which date the data will be deleted. Data retention is for the sole purpose of allowing customers to export their data and transfer to another platform.” Read more here. 

Wednesday, September 20, 2017

Have you tried Publish Online?

If you’re a Creative Cloud member, and use Adobe InDesign, you need to try the Publish Online feature. It's super easy to use, and can be a great alternative to posting a PDF to a Web site. Adobe is pulling out all the stops this week and declaring this “Publish Online Week”. See this InDesignSecrets blog post that contains lots of free content for learning Publish Online, as well as how to add sophisticated animation and interactivity to Publish Online documents.

Brian Donahue, a talented local designer, has used Publish Online for a number of projects. Here are a couple of my favorites:

The Center for Irish Music Annual Report

The Minneapolis Parks Foundation Annual Report

Also, check out the Publish Online gallery by my friend Diane Burns. 

Monday, August 28, 2017

Compatibility of InDesign scripts with future updates

One of the things that occupies a great deal of my time is writing custom scripts to automate Adobe InDesign. Most of these scripts are custom solutions to solve specific client workflows, but I have a handful of free public scripts available here.

The question I’m asked most frequently is this: “Will a script written for today’s version of InDesign continue to work in future versions of InDesign?" The short answer is “usually."

Scripts automate InDesign by accessing commands built into InDesign’s “document object model” or DOM. This DOM is an exhaustive, invisible-to-the-user list of commands available “under the hood” in InDesign that programmers can access to automate InDesign features and functions. 

There are no guarantees about what Adobe might do in the future—but this DOM has not undergone any type of wholesale change in many, many years. As Adobe adds and changes features in InDesign, typically only the commands in the DOM related to those features change.

So, for example, if you have a script that automates some sort of find/change function, you could reasonably expect this script to continue to function in future versions of InDesign until Adobe decides to change something with the way InDesign performs Edit > Find/Change. Many scripts originally written for InDesign CS3 10 years and 7 major versions ago still run perfectly today.

If Adobe does change something in the DOM that causes a script to cease working properly, typically the charge to update the script is a small fraction of the original development cost of the script.

Wednesday, June 21, 2017

Handy sources for sample data

There are a number of reasons why you might need sample database or spreadsheet data to use for a project, and you want “real” sounding records with names, addresses, credit card numbers, company names, etc. Sure, you could mock up some fictitious data yourself, but that’s time consuming and tedious. Instead, turn to the Fake Name Generator™, generatedata.com, or FreeDataGenerator. 

Perhaps you’re using Adobe XD to prototype an app, and quickly want to auto-populate a screen with random records using the Repeat Grid feature. Or you’re setting up a document using InDesign’s Data Merge feature and you don’t have the real data yet. Or you’re working on an XML or JSON project and need some sample data to work with. Or you’re teaching a Microsoft Excel or Google Sheets class and want to populate a spreadsheet with sample data.

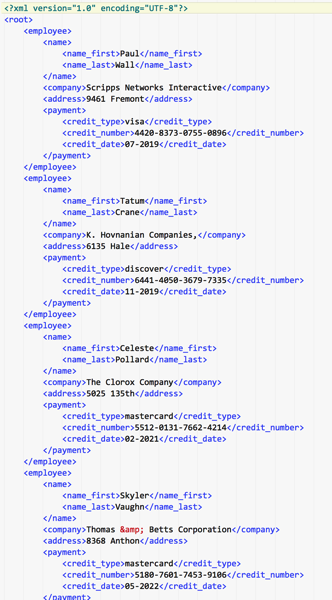
Each of these Web sites makes it easy to generate dozens or hundreds of records of sample data. Each site offers something slightly different regarding the types of data generated and the formats that it will export the data to. Here are a couple of example data sets quickly generated with these resources:

NewImage

XML data generated by FreeDataGenerator

NewImage

Spreadsheet data generated by generatedata.com

Friday, June 16, 2017

How to create a device mockup with Adobe Comp CC

Adobe Comp is one easy way to create quick mockups of your web site or app on a mobile device. Just follow these steps:

1. Download and install Adobe Comp CC on your device. The app is free, and available for iOS (iPad and iPhone) and Android tablets and phones. You will need a Creative Cloud plan to sign into the app.

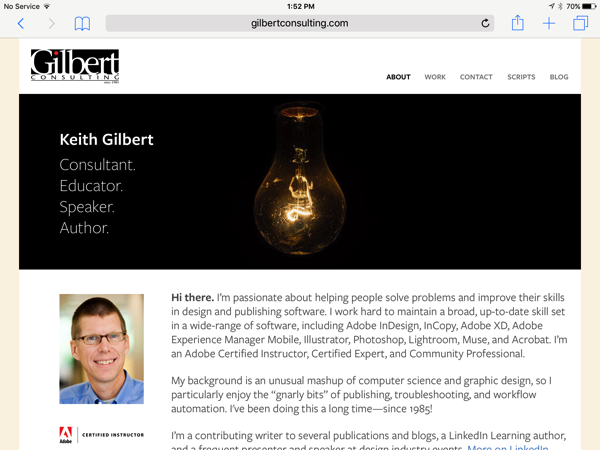
2. On your tablet or phone, take a screenshot of what you want to “pose” on the device. To take a screenshot on an iOS device, press the home button and the power button simultaneously. One most Android devices, you press the volume down and power buttons simultaneously. Instead of a screenshot, you can assemble artwork in Photoshop or any other program that you wish. Just be sure to create it at the size of your device screen. Here, I just took a screen shot of my Web site on my iPad in landscape orientation.

IMG 1153

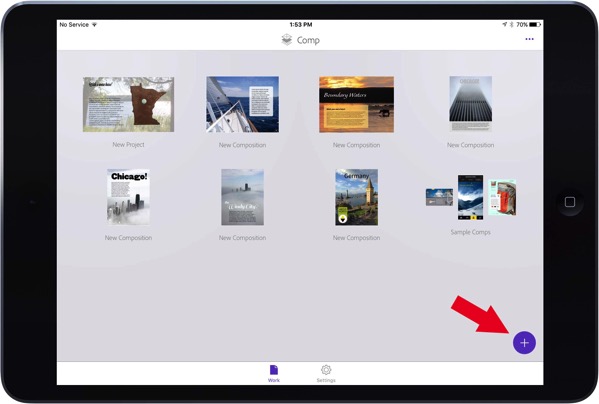
3. Run Adobe comp on your device

NewImage

4. Tap the plus icon in the lower right corner to create a new composition

Plus sign

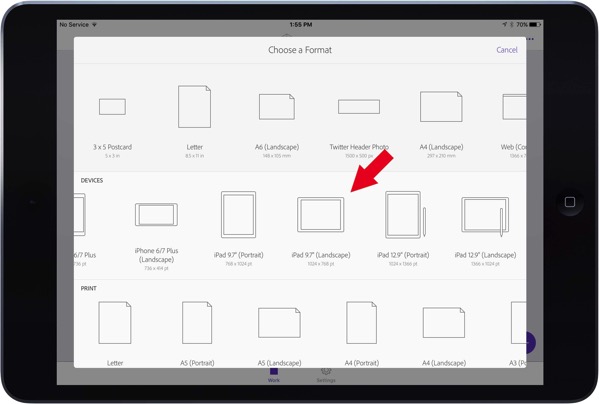
5. Choose the proper size project for your device

Page size

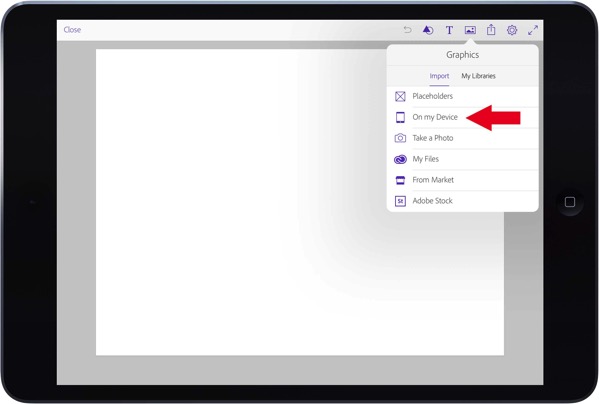
6. Tap the place image button and locate the image from step 2. In my case, the image is a screen shot, so it is “On my device"

On my device

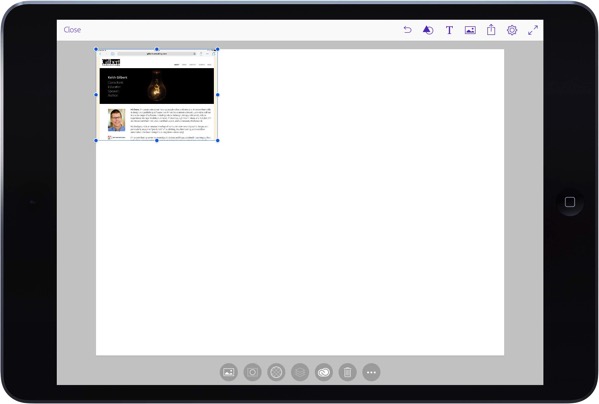
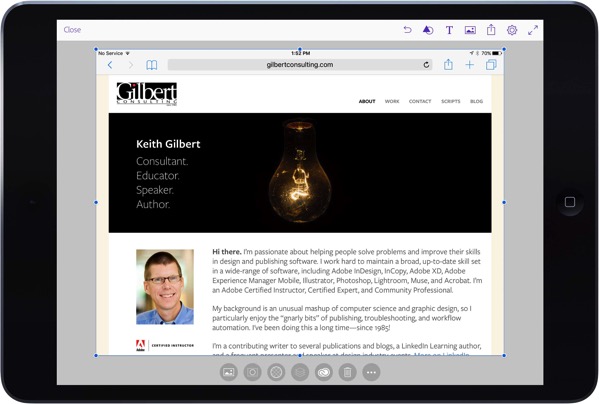
7. Drag your image to the upper-left corner, and then grab the lower-right selection handle and drag it to fill the canvas

Left corner

Full

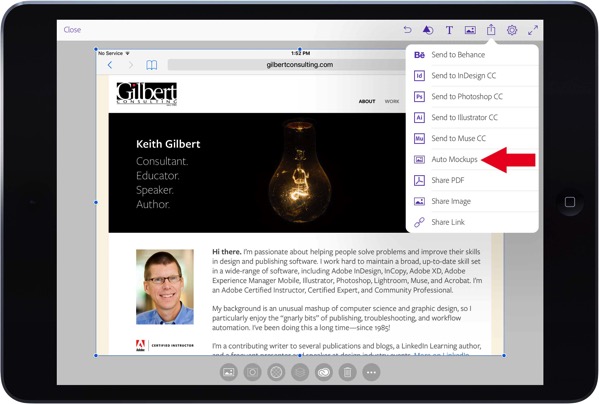
8. Tap the share button and choose Auto Mockups

Auto mockps

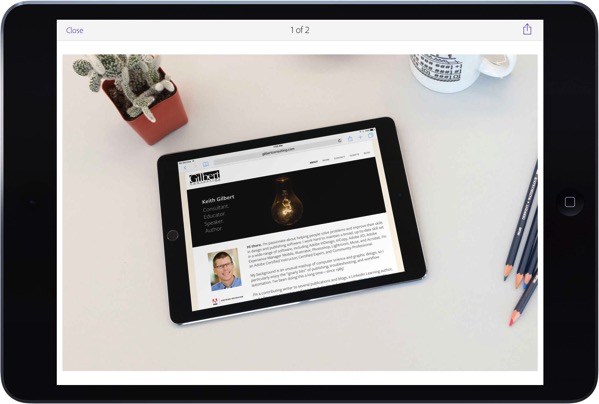
9. Your artwork will appear “posed” on a device. Depending on what device you are targeting, you may have multiple mockups available, Swipe to the left to see additional mockups.

Device1

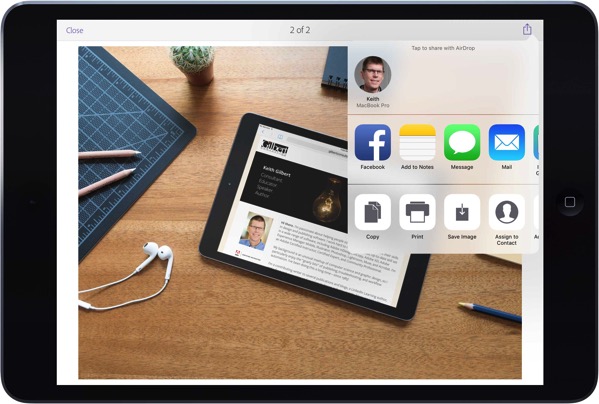
10. Tap the share button to save the image the finished mockup to local storage, Dropbox, etc.

Share

The finished project:

Project

Friday, June 09, 2017

Using gradients on strokes in Illustrator

Gradients aren’t just for fills in Illustrator. Did you know that you can use them on strokes also? Here’s how:

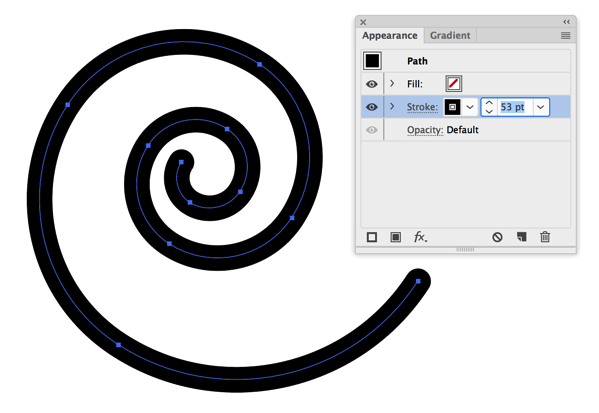
1. Draw a path with the Pen tool, Curvature tool, Line Segment tool, Spiral tool, Pencil tool, or any other tool that creates a path

2. With the path selected, give the path a stroke weight (the Appearance panel is the best place to do this)

Screenshot 2017 06 09 11 34 40

3. Choose a gradient for the stroke

Screenshot 2017 06 09 12 48 57

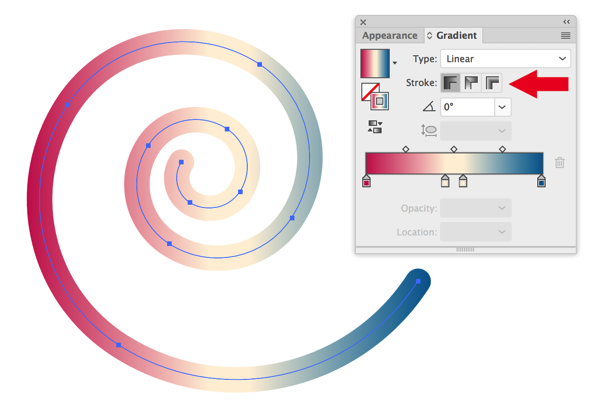
4. In the Gradient panel, there are 3 “Stroke” buttons: the left-most button creates a gradient that just goes across the object from left to right by default.

Screenshot 2017 06 09 12 49 16

5. The middle button creates a gradient that follows the curve of the stroke.

Screenshot 2017 06 09 12 49 25

6. The right-most button creates a gradient that goes across the width of the stroke.

Screenshot 2017 06 09 12 49 35

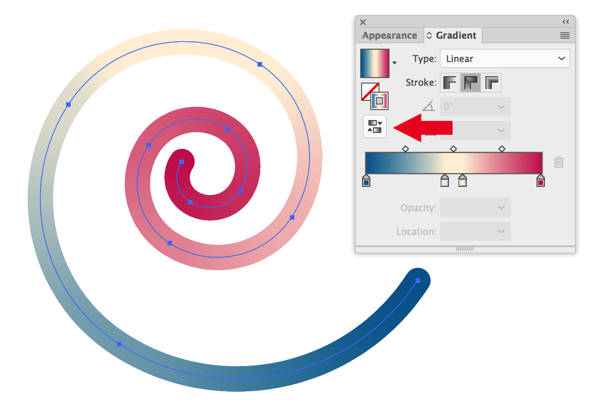
7. The Reverse Gradient button will change the direction of the gradient. This is particularly useful for gradients that follow the curve of the path.

Screenshot 2017 06 09 12 51 11

Keep in mind that the Object > Path > Reverse Path Direction command will also change the direction of the gradient if the gradient is set to follow the curve of the path or go across the width of the stroke.


Wednesday, April 05, 2017

Tips for syncing projects between Adobe Portfolio and Behance

I’ve written about Adobe Portfolio previously. Its an extremely simple (and free) way to create an attractive, responsive, easy-to-update portfolio Web site that showcases your work. If you create a Portfolio Web site, you can choose to mirror your Portfolio projects on Behance also. Why would you want to do this? What is the difference between putting your work on a Web site built with Portfolio and putting your work on Behance?

Behance is “the leading online platform to showcase and discover creative work”. Think of Behance as a way to show your work and gain visibility within the creative community, and your Portfolio Web site as a place to showcase your work to potential clients and be discovered via search engines.

When you add a project to your Portfolio Web site, you have the option to post that project on your Behance site also, and vice versa. If you stick with simple text formatting in Portfolio, assigning Header, Subheader, Paragraph and Caption styles, these styles will be mapped to corresponding styles in Behance.

Screenshot 2017 04 05 17 20 16

But here’s an important tip: When you Edit a Text Style in Portfolio, you can add space below paragraphs by specifying a Bottom Margin. But if you do this, the space below the paragraphs will disappear when the project appears in Behance. The solution? Instead of specifying a bottom paragraph margin in Portfolio, add add extra returns between paragraphs. These empty return characters will be honored in Behance also.

Screenshot 2017 04 05 17 23 07

Here is more information about how Behance and Portfolio work together.  

Here is a handout from a recent workshop that I gave about Behance and Portfolio.


Friday, February 24, 2017

How to copy a file path on a Mac

This is obscure, but I ran across this recently and thought it might help someone else out. I frequently need to copy the path to a file on my Mac or on a server, so that I can include that path in documentation or in a support email with a customer. Here’s how to do it:

1. Select the file you want in the Finder

2. Choose File > Get Info (command-i)

3. Select the full path next to “Where” in the Get Info dialog box

Screenshot 2017 02 24 08 47 46

4. Choose Edit > Copy (command-c)

The file path is now on the clipboard, and can be pasted into a text document or an email. The path will look like this after pasting:

/Users/keithgilbert/Dropbox/Stock/Vector/Open Clipart Library/openclipart-0.18-svgonly/clipart/education

UPDATE:

I just discovered by reading Dan Rodney’s excellent list of Mac Keyboard Shortcuts that if you select a file in the finder and press command-option-c the path name is copied. This method also puts the filename on the end of the path, so in my example above, the result is:

/Users/keithgilbert/Dropbox/Stock/Vector/Open Clipart Library/openclipart-0.18-svgonly/clipart/education/logaritmic_diagram_01.svg

YET ANOTHER UPDATE:

Jamie McKee at MacKey Composition alerted me to this: You can right-click on a file or folder in the Finder, and then hold down the option key and choose “Copy [filename] as Pathname”. 

Wow. I had no idea there were so many ways to do this. Good to know!


Tuesday, December 27, 2016

Translating print into digital

I’ve worked with the great folks at Experience Life over the last couple of years. Experience Life magazine is available in both a print version as well as for iPhone, iPad, and Android. I was really impressed with how the Experience Life team translated this print layout:


... into this digital layout:


This is a great example of how much better a digital version can convey complex information when it is well-designed and produced correctly. In this case, the short clips of the exercises are best saved as either an image sequence or an animated GIF, depending on the final format of the document (Adobe Digital Publishing Suite, Adobe Experience Manager Mobile, Twixl, Fixed Layout EPUB, Publish Online, etc.)

See also:

How to convert an image sequence to an animated GIF

Place an animated GIF (From the Lynda.com course InDesign: Fixed-Layout EPUB Interactive Techniques & Publish Online)

Monday, December 12, 2016

Upcoming seminar series in Minneapolis: Digital Publishing with InDesign

In cooperation with the Twin Cities Creatives Group, I’m presenting a special January seminar series in Minneapolis about Digital Publishing with Adobe InDesign.

Screenshot 2016 12 12 19 10 40

This is a low-cost 3-session seminar series for graphic designers, production artists, art directors, and other creatives and communicators who want to learn how to create multi-screen, digital output from InDesign CC. You can attend one, two, or all three sessions held on three consecutive Wednesday mornings in downtown Minneapolis.

The fee is $50 per session, or register for all 3 sessions for $130.

If you have any interest in learning how to create digital output for Web sites, Web apps, Mobile apps, or EPUB, be sure to check out the seminar descriptions. I’d love to see you in January!

Monday, November 28, 2016

Scan documents with your phone directly to Dropbox

Dropbox recently added the ability to scan documents directly to Dropbox using the Dropbox app on your iPhone. I’m finding that I use this feature several times a week. Even though I have a Fujitsu ScanSnap iX500 document scanner on my desktop (which is awesome, by the way), the Dropbox app is great for scanning receipts while on the road, or quickly sharing a print document via email or text.

Available only for iPhone at this point (not iPads or Android devices), the app works like this:

1. Download and install the Dropbox app for iPhone

2. Run the app

3. Tap the “plus” button at the bottom of the screen

IMG 6016

4. Tap “Scan Document"

IMG 6017

5. Place your document on a contrasting background, aim the camera at the document, and Dropbox will find the edges of the document. Tap the camera button at the bottom of the screen.

IMG 6018

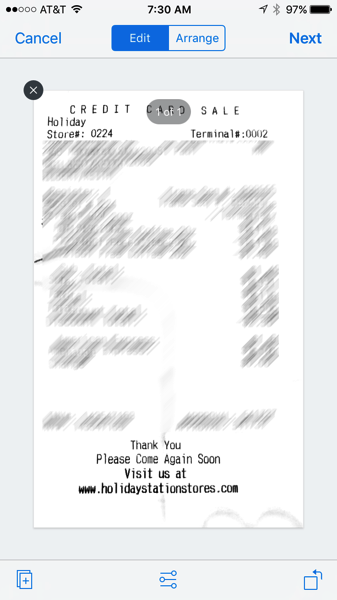
6. Once the document is captured, you can add pages, perform some basic editing, or rotate pages using the buttons at the bottom of the screen. When done, tap the Next button in the upper-right corner of the screen.

IMG 6019


7. Choose a location by tapping on “Save to”, and then tap “Save"

IMG 6021

8. The result? A PDF, filed right where you want it in your Dropbox storage.

IMG 6022

I was previously using a separate scan-to-pdf app on my iPhone, but I find the Dropbox scanning feature more quicker, easier, and more accurate.

For more info about this feature, see this Dropbox help article.

Are you taking advantage of all that Dropbox has to offer? Take a “deep dive” into Dropbox with my Up and Running with Dropbox course on Lynda.com or LinkedIn Learning.

Screen Shot 2015 12 08 at 10 43 24 AM