Wednesday, January 27, 2010

Three local educational opportunities

The InDesignSecrets Live, 2010 Tour with Anne-Marie Concepción is coming to Minneapolis on March 17. (I'll be one of the speakers at the InDesignSecrets Print and ePublishing Conference May 12-14 2010 at the Adobe Campus in Seattle, WA.) Contact me for a discount code for either of these events.

Flashbelt, a conference for "new media designers, developers and enthusiasts" is scheduled for June 13-16 2010 in Minneapolis.

An Event Apart, "an intensely educational two-day conference for passionate practitioners of standards-based web design" is coming to Minneapolis July 26-27 2010.

Monday, January 25, 2010

Pimp my Image Processor

The Image Processor in Photoshop CS4 is a simple, fast way to quickly resize and convert a bunch of images to JPEG, PSD or TIFF format. One shortcoming of the Image Processor is that if you use it to export JPEG images, they're converted to RGB. Thankfully, this Photoshop feature is written in JavaScript, which means that anyone who knows a bit of JavaScript and Photoshop can modify it.

Well, Mike Hale has done just that. He's tweaked the Image Processor script to add support for exporting CMYK JPEGs as CMYK, as well as support for exporting PNG images. You can download his modified script here. To install the script:

1. Unzip the downloaded file. Rename the Image Processor CS4 PNG.jsx file to Image Processor.jsx

2. In your Adobe Photoshop CS4/Presets/Scripts/ folder, move the file Image Processor.jsx into another folder somewhere as a backup

3. Copy the Image Processor.jsx file from step 1 into the Adobe Photoshop CS4/Presets/Scripts folder.

You can access the Image Processor script from either File > Scripts > Image Processor in Photoshop, or, better yet, from Tools > Photoshop > Image Processor in Bridge.

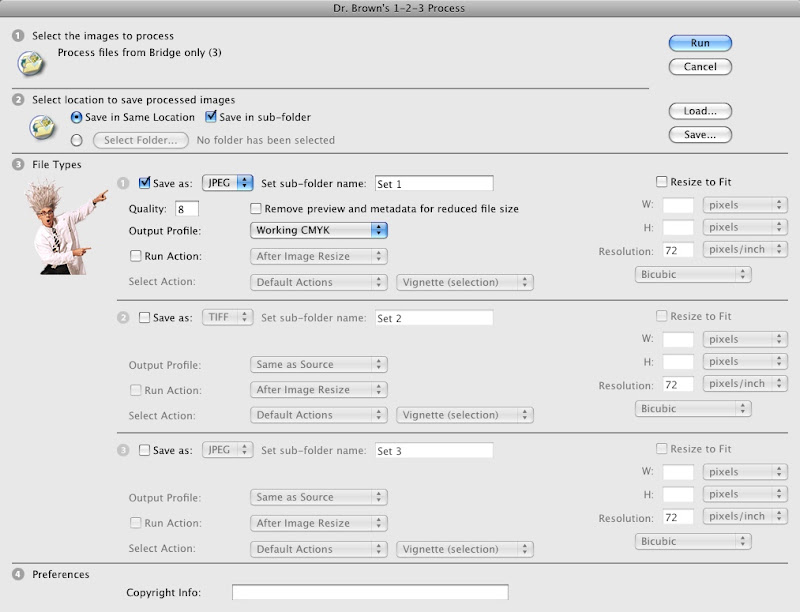
Another script for exporting CMYK JPEG images is the Dr. Brown's Services collection of scripts from Adobe's own Russell Brown. The Dr. Brown 1-2-3 Process script that's included with the collection allows you to not only export CMYK JPEGs as CMYK, but also to convert RGB to CYMK or vice versa while exporting.
Minnesota Dreamweavers User Group

A new user group has formed in the Twin Cities: The Minnesota Dreamweavers User Group. The user group is organized by Keith Gulsvig and sponsored by Central Coast Solutions and Hennepin Technical College. If you're interested in all things Web (and you should be!), this is a good free local resource.

Minnesota Dreamweavers User Group, Wednesday, January 27th.

This month's meeting will be a panel discussion focusing on where the web is today, and where it's going. The panel consists of professionals active in various aspects of website creation and management.

At the end of the evening there will a drawing for door prizes.

This meeting is FREE and open to the public.

Wednesday, January 27, 2010
7:00 PM to 9:00 PM
Hennepin Technical College - Auditorium
Brooklyn Park Campus
9000 Brooklyn Boulevard, Brooklyn Park, MN 55445

Tuesday, January 19, 2010

Make the No Break attribute visible in InDesign

Selecting some text and then choosing No Break from the Control panel menu in InDesign is a good way to keep words together or to control line breaks. The problem with this command is that there is no quick way to tell later where in your text the command has been applied.

Ideally, there would be a way to use composition highlighting (Preferences > Composition) to display where No Break has been applied, but this isn't an option.

A neat technique in InDesign CS4 for highlighting text with the No Break attribute is to create a condition called "nobreak" that consists of a colored highlight.

Next, use Edit > Find/Change to search for the No Break attribute, and assign the "nobreak" condition to the found text. You'll need to repeat the Find/Change then the text is updated and you want to view the highlighted No Break text, but this is a slick technique.

There's no reason to go to all this work by hand. Peter Kahrel, an amazing British InDesign scripter, has created a free script called Highlight No Break which automates the steps above with a single click.

Tuesday, January 12, 2010

Tooltip script for InDesign

Back in 2007 I wrote an article for InDesign Magazine on how to add PDF tooltips to an InDesign CS3 file. (Examples of PDFs that incorporate PDF tooltips can be found here and here). In InDesign CS4, Adobe completely reworked the way that buttons are created and edited. The change was for the better, except that in the process, Adobe removed the dialog box that allowed you to enter and edit tooltips. The underlying code for handling tooltips is still in CS4, but the dialog box for viewing, editing and adding tooltips is gone.

I've written a script that adds the functionality for viewing, editing and adding tooltip text to buttons back to InDesign CS4. You can download the "Tooltip" script here.