Wednesday, December 16, 2015

I've been busy!

I spent many hours the last few months writing and recording 2 brand-new courses for Lynda.com, and completely updated and re-recorded an existing course. All 3 courses have now been released. Check them out!

Screen Shot 2015 12 16 at 8 30 45 AM

In InDesign Scripting Made Easy I’ve created a course for InDesign users to learn how to obtain, install, use, create, and modify scripts to help automate repetitive design and production tasks. Every InDesign user should watch this course!

Screen Shot 2015 12 16 at 8 31 10 AM

In InDesign: Fixed-Layout EPUB Interactive Techniques & Publish Online I show how to add a wide variety of interactive effects to InDesign documents that will be output as either fixed-layou EPUB or Publish Online projects. I show how to create slideshows, animation, quizzes, audio and video, buttons that trigger actions, and much more.

Screen Shot 2015 12 16 at 8 32 17 AM

My popular Up and Running with Dropbox course has been viewed by thousands since I released it in April of 2014. Since the initial recording, a lot has changed in Dropbox-land, so I updated and re-recorded the entire course. Think you know how to use Dropbox? Watch the course, and I can almost guarantee that you’ll learn something!

Friday, December 04, 2015

How to save each Illustrator artboard to a separate AI file

A customer asked me about this recently, and for some reason I had forgotten how to do this. So I thought I’d write it down here in hopes that it might help someone else.

The problem: You have an Illustrator file that contains multiple Artboards, and you want a quick way to save each Artboard as a separate .AI file.

The solution: Simple. Just choose File > Save As, and in the Illustrator Options dialog box, select Save each artboard to a separate file.

Screen Shot 2015 12 04 at 10 01 51 AM


If your Illustrator file is named “MyIllustratorFile”, when you save the artboards, they will be named MyIllustratorFile-01.ai, MyIllustratorFile-02.ai, etc.

I think I had trouble finding this because it only shows up when you do a Save As, or the first time you Save a new file. I guess I was expecting some sort of an export artboards command or something instead. Anyway…its simple, and pretty obvious when you look in the right place!

This ability goes back at least as far as Illustrator CS6, maybe even further. Also, when you choose File > Export to output to png, swf, jpg, psd, tif, or svg, you have the opportunity to output each artboard to a separate file.

Tuesday, November 10, 2015

DPS 2015 splash screen template

Every Adobe Digital Publishing Solution app for iOS must contain 6 splash screens in the following sizes: 1536 x 2048, 2048 x 1536, 640 x 960, 640 x 1136, 1242 x 2208, and 2208 x 1242  pixels. These splash screens must be saved in the PNG format. The splash screen appears on the screen momentarily while the app loads.


Screen Shot 2015 11 10 at 8 48 20 PM


I’ve created an InDesign template to make creating these various sizes of the splash screens quick and easy. You can download the template here.


Screen Shot 2015 11 10 at 8 43 03 PM


The template contains 6 pages in each of the pixel dimensions listed above. Create your desired artwork on the pages, then choose File > Export and export the pages in PNG format. Fill in the Export PNG dialog box as shown below, and PNGs with the exact dimensions required will be output.


Screen Shot 2015 11 10 at 8 44 58 PM


If you are looking for a similar template for DPS 2014, see this post.

Monday, November 02, 2015

New tablet publishing article

The latest issue of InDesign Magazine is out, and I wrote the feature article this month! In the article “Tablet Apps InDepth” I compare 6 solutions for publishing content into native apps for tablets (and phones). I compare and contrast Adobe DPS, App Studio, Aquafadas, in5, Mag+, and Twixl Publisher, and then draw some conclusions about which solutions are best for which types of content, budget, and workflow.

IDM Issue 79 Page 01

Not a subscriber? You should be. Subscribe, or purchase single issues, at indesignsecrets.com/issues

Monday, October 26, 2015

Wow - I love Marcel Script!

Talented Twin Cities-based designer Carolyn Porter has designed a fantastic typeface, with a riveting back story. The typeface is called Marcel Script Pro, and is available from P22 Type Foundry. 

I love this script! It has extremely comprehensive OpenType support which can be accessed in InDesign, Illustrator, and Photoshop. The font consists of more than 1300 glyphs that capture the texture of ink on paper. 

Screen Shot 2015 10 26 at 8 21 22 PM

Along with the usual OpenType support such as discretionary ligatures, contextual alternates, swashes, and stylistic sets, Marcel Script Pro contains some unusual OpenType features:

A “www” ligature is included, to make that pesky and ugly world-wide-web acronym more attractive:

Screen Shot 2015 10 26 at 8 26 04 PM

You can add swashes before and/or after almost any glyph by typing @ and # one or more times to adjust the length of the swash:

Screen Shot 2015 10 26 at 8 31 04 PM

With Stylistic Set 11 applied, some cool things happen:

Typing ink* creates an ink spot. The font cycles through different spots each time you press the asterisk key:

Screen Shot 2015 10 26 at 8 36 05 PM

Typing “orn!” creates an ornamental swash. Each type you press the !, a different swash from a list of about 20 appears:

Screen Shot 2015 10 26 at 8 40 24 PM

The font has such a great back story: Here’s a short summary from the P22 Web site:

The font Marcel is named in honor of Marcel HeuzĂ©, a Frenchman who was conscripted into labor during World War II. During the months Marcel was in Germany, he wrote letters to his beloved wife and daughters back home in rural France. Marcel’s letters contain rare first-person testimony of day-to-day survival within a labor camp, along with the most beautiful expressions of love imaginable. The letters — stained and scarred with censor marks — were the original source documents used by designer Carolyn Porter to create a script font that retains the expressive character of Marcel HeuzĂ©’s original handwriting. 

In fact, the story is so compelling that it prompted Carolyn to write a book titled “Marcel’s Letters”. Read more about Carolyn's fascinating book project here.

I can’t imagine the labor of love this font must have been, and the countless hours that Carolyn put into researching and crafting the font. Good work Carolyn!

Wednesday, September 30, 2015

BBEdit and "Text Factories"

I recently used a very powerful feature of BBEdit, the venerable text editor from Bare Bones Software for the very first time, and wanted to share this because it is so cool.

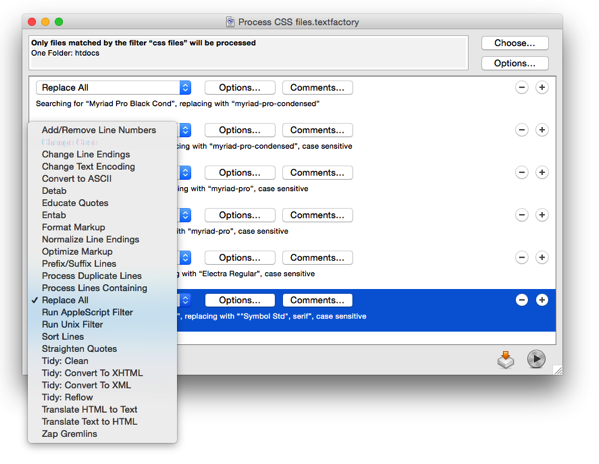
I had several hundred CSS files and I needed to do a series of 6 search and replaces on each file. I also had several hundred HTML files that needed a chunk of code inserted into the <head> element of each. After spending about an hour learning about BBEdit’s Text Factories feature, I was able to set it up and process all the files in a matter of minutes.

The Text Factories feature lets you create a list of text “transformations” such as changing case, adding prefixes or suffixes to lines, complex GREP find/change, sorting, fixing quotes, and more.

Screen Shot 2015 09 30 at 3 30 14 PM

Once you’ve created your list, you can apply it to the current document or selection, or to a specific list of files and folders.

Screen Shot 2015 09 30 at 3 37 30 PM

Subfolders within a folder can filtered, so you can specify certain top-level folders, but then restrict the text factory to only specific types of subfolders or files.

Screen Shot 2015 09 30 at 3 30 27 PM

As part of this project, I also used a little program called Hazel from Noodlesoft to solve another challenge. I was given a folder that contained thousands of files and subfolders. I needed to delete all the files of certain types within the folders, move certain files to new locations, and rename certain files. Hazel let me set up rules specifying what should be done to what type of file where, and then with a single command make it so. Very handy! 


Monday, September 14, 2015

My thoughts on the just announced iPad Pro

On September 9 Apple unveiled the iPad Pro, announcing that it will be available “in November”. Here are my initial thoughts on this device (before having an opportunity to see or test one), and its potential impact on digital publishing.

Of course the screen size and quality is the primary specification that we care about in Digital Publishing. The screen on the iPad Pro is 12.9” measured diagonally, or "78% more display area than an iPad Air 2” according to Apple, with a resolution of 2732 × 2048 pixels, .

The screen is the same 4:3 aspect ratio found in all previous iPads. What is interesting is that the “short side” of the iPad Pro is the same number of pixels, and the same dimension, as the “long side" of an iPad Air 2. So the “retina” resolution, or the number of pixels per inch on the iPad Pro is the same as the iPad Air and Air 2.

The biggest bonus of the consistent aspect ratio? Digital publications designed with InDesign for Adobe DPS or other digital publishing solutions shouldn't require any rework to display beautifully on the iPad Pro screen.

IPads

It will be interesting to see what it is like to read digital publications on this large device. Apple says it weighs 1.57 pounds. The first model iPad weighed 1.5 pounds, which feels incredibly heavy when you lift one today, compared to the relatively light iPad Air 2 at .96 pounds. It is remarkable how much of a difference a half a pound makes. Will it be comfortable to “curl up” with this device and read?

I’m most excited about with the new iPad Pro as a content creation tool. I love what Adobe is doing to deliver creative content creation tools such as Adobe Comp CC, Adobe Illustrator Draw, and Adobe Photoshop Sketch on tablets. But using these tools on a 10 inch tablet has always seemed awkward and confining to me. The expect that the extra screen real-estate on a larger iPad will make these apps much more compelling.

Apple Pencil, announced with the iPad Pro, is the icing on the cake. Up until now, Adobe Ink comes the closest I’ve seen to being a precise, responsive pen for use with the iPad. But Apple Pencil could be more precise, responsive and integrated with the hardware and OS. If Apple Pencil works as well as it appears to in the videos, it could turn the iPad into an amazing content creation/ideation platform for illustrators, artists, and designers.

The iPad Pro is expensive. But if a great pen and great software turns it into a serious content creation/ideation platform, it could become an essential, must-have tool for illustrators, artists, and designers. Start saving those pennies!

Wednesday, June 24, 2015

How to convert an image sequence to an animated GIF

Image sequences are an excellent way to create animation for Adobe Digital Publishing Suite. But an image sequence will not work in content exported to fixed layout EPUB from InDesign, or content exported using the new Publish Online functionality in InDesign CC 2015. So you might need to convert an image sequence to an animated GIF, which does work in fixed layout EPUB and Publish Online. Here’s how to do it.

1. Launch Photoshop (these instruction are written using Photoshop CC 2015, but the process is similar in several recent versions)

2. Choose File > Scripts > Load Files into Stack

3. Click Browse to select all the PNG or JPEG files in the image sequence, then click the OK button. If you have a lot of files making up the sequence, this step may take a few minutes.

Screen Shot 2015 06 24 at 11 53 24 AM

4. When it is finished, you’ll see that a single file has been created, with each image loaded into a separate layer. Choose Window > Timeline to display the Timeline panel.

5. Click the Create Frame Animation button in the Timeline panel. This will create a single frame in the Timeline panel.

6. In the Timeline panel menu, choose Make Frames From Layers

7. Choose File > Export > Save For Web

8. Choose one of the GIF Presets, choose the desired Looping option, and then click the Save button.

Screen Shot 2015 06 24 at 12 02 01 PM

Friday, May 22, 2015

A fix for the disappearing File Info dialog in InDesign

I’ve had a recurring problem for awhile where occasionally the File > File Info dialog box in InDesign CC gets “stuck” somewhere outside the bounds of my monitor. In other words, I’ll choose File > File Info, and the dialog box will apparently launch, because all my menu items get grayed out and I can’t do anything, but the box isn’t visible on the screen. But, since hitting the Esc key cancels any dialog box, I’m able to hit Esc and continue working.

But I need the File Info box for my work.

I discovered today that there is a file named “DVADialogPrefs.xml” located in the User Library folder in Preferences/Adobe InDesign/Version 10.0/en_US/DVADialogPrefs. (Hold down the Option key and choose Go > Library in the Finder to display the Library folder). Quitting InDesign, deleting the “DVADialogPrefs.xml” file, and restarting InDesign fixes the problem, and allows the File Info dialog box to display properly.

I suspect that InDesign gets confused about how many monitors I have, and where they are located, because I’m constantly plugging into different projection systems as I travel to do training and seminars. Hopefully this won’t happen to you, but if it does, at least you know how to fix it!

Wednesday, May 20, 2015

Creative Cloud, OS X, iMacs, and more

Today’s post is courtesy of my friend Ed Klemz at Central Coast Solutions. It contains useful, actionable information about Creative Cloud, OS X, the iMac, and more. I highly recommend Ed and his team for your Macintosh and networking support needs. - Keith

A lot has happened recently on the Apple and Adobe front, so here’s the latest:

Many of you have likely received the notice that all future releases of Adobe Creative Cloud (CC) will only be supported on OS X 10.9.5 and newer, so if you have 10.8 or older now, updating is no longer an option but a requirement. All Macs aren’t 10.9 or 10.10 ready though, and we should review to make to sure the RAM is at 16GB or more and the hard drive is either a Solid State Disc (SSD) or “Fusion” hybrid standard/SSD device. Upgrading OS on a Mac lacking those items will tend to make it quite slow, and may cause stability issues. We can do these upgrades for you at a fraction of the price of buying a new machine, and the upgrades make it nearly as fast.

As for “Yosemite” OS X 10.10, the 10.10.2 release was pretty good, and I was just about to let people know it was OK to do, then they came out with 10.10.3. After heavy prompting my Apple contacts tell me there are memory issues still “under the hood” and older software issues (Adobe CS6 & CC, Office 2011, Firefox and Chrome browsers, etc), security software issues, Library and Finder issues… Lets just say they are still working on it, and at this time I can’t recommend it as the “go to” OS X version yet - but 10.10.4 is on the way. If you are running, we can certainly optimize it for you.

My .02 today is if you are at 10.8.5, let get you to 10.9.5, as much RAM as your machine will hold and install a SSD drive. 10.9 isn’t available to buy any longer, but of course we have it, and can do the hardware and software upgrades for you, and extend the life of your existing Mac by years - far less than buying new hardware. Lets build an upgrade plan for 2015 that meets your needs and budget.

Apple today released the long-awaited updates to the iMac line, and removed some of the “mid-level” options we once had - so you can only get the performance-based i7 Processor in the top-end 21 or 27-inch machines. Of course all these models will only run OS X 10.10 so that should be considered when looking at your existing software. Many older apps won’t run on it, or will be crashy nightmares to use, so we need to plan ahead before blindly updating hardware or OS version. None of the iMacs come with built-in DVD drives either - only external - so remember that if you need the ability to read or burn media.

TECH BIT: What is “mach_kernel”? Here’s a “fix” for a common request we get from clients running OS X 10.7, 8 and 9 when they open the main directory of their hard drive and see a document named “mach_kernel”. Don’t delete it! This important normally hidden system file appears after an Apple Security Update is run, and its not supposed to be visible. (Thanks for messing that up, Apple!)

To hide this, go to /Applications/Utilities and launch the Terminal application (scary, but you can do it!) You will get some text saying you are logged in and it will leave you at “%" prompt. Copy and paste in the following command into Terminal:

sudo chflags hidden /mach_kernel

Then press return (enter). It will give you a warning about using the sudo command and then it will ask you to type your user password. Type it in, but note that the cursor won't move as you're typing (so that people can't see your password if they're looking over your shoulder.) Press enter after typing your password and the “mach_kernel” file will be hidden again as it should. Easy!

Hmmm, I wonder if I wanted to hide a file or folder from view if I could use the “sudo chflags hidden" command to hide it, and “nohidden" to make it visible again...

If you’d rather not dive too deep into stuff like this, or we haven’t seen you recently, we should get a system maintenance/update day planned and we can take care of it for you.

As always, we are here to help. Let us know what’s next for your business and we’ll help you get there.

Best,

Ed Klemz and your team at:

Central Coast Solutions, Inc.
10303 Bittersweet Street NW
Minneapolis, MN 55433
763-422-3922 Office
www.centralcoastweb.com

Thursday, April 16, 2015

Upcoming speaking engagements

It’s that time of year…conference season. I’m excited to be speaking at these upcoming events in the next couple of months:

May 14: AAF-CM InDesign seminar (St. Cloud, MN)

The American Advertising Federation of Central Minnesota runs a seminar series, and on May 14 I’ll be doing a half-day session on InDesign Tips and Tricks.

May 15: MMPA Summit & Expo (Minneapolis, MN)

I’ll be presenting 4 sessions at the annual Minnesota Magazine & Publishing Association annual Summit & Expo. My sessions are titled Creative Cloud paradise!Troubleshooting - what to do when things go wrongA Colorful CloudInDesign in Workgroups-sharing and syncing.

June 1-4: PePcon: The Print + ePublishing Conference (Philadelphia, PA)

PePcon is my absolute favorite conference every year. It is a total “love-fest” for designers creating digital OR print work. Conference hosts David Blatner and Anne-Marie Concepcion work hard to foster a sense of community at this event, and the results are spectacular. It is so much fun to talk with attendees and other speakers between sessions and over meals. I’m presenting 3 sessions at PePcon: A Jargon-Free Guide to Compressing and Editing Video, Must-Know Interactive Effects for Tablet Apps (with Bob Levine), and Publishing Interactive Apps for Tablets. I can’t recommend PePcon enough. Use code SPK73W when registering for a $50 discount on your registration.

Monday, April 13, 2015

Creative Cloud Mac OS X requirements

If you are a Macintosh Adobe Creative Cloud user, you need to know this: Adobe has been trying to get the word out that the “next major release” of Creative Cloud will require Max OS X 10.9 (Mavericks) or higher. As of this writing, the latest version of OS X is 10.10 (Yosemite). 

Mac OS X updates are free, so for some people this is no big deal. But for users with old computers, or who are prevented from updating their operating system for other reasons, this could present difficulty.

This does not mean that if you don’t upgrade you won’t be able to use Creative Cloud. Users running older versions of OS X will still be able to install and run the versions of Creative Cloud applications they are using today, and the Creative Cloud Desktop app will still be compatible with OS X 10.7 and above. If you don’t upgrade to OS X 10.9 or newer, you just won’t be able to install the next versions of InDesign, Illustrator, Photoshop, etc. when they are released.

Like it or not, I think this is the new reality. Now that Apple has been offering OS X upgrades free, and development cycles are being shortened, we will all need to keep our operating systems more up-to-date than we perhaps have in the past.

Monday, February 16, 2015

10 things you can do with the Creative Cloud desktop app

1. Launch an app. Click on Apps, and then choose the app you want to launch.

2. Uninstall an app. Click on Apps, hover over the app you want to uninstall, and choose Uninstall from the drop-down menu next to the gear icon.

1

3. Access tutorials. Click on Apps, and click View tutorials under any app name.

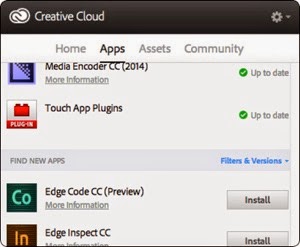
4. Discover and download new apps. Click on Apps, and scroll down to the Find New Apps section.

2

5. Locate and install older versions of apps. Click on Apps, scroll down to the Find New Apps section, click on Filters & Versions, and choose Previous Version from the drop-down menu.

3

6. View the files in your Creative Cloud storage. Click on Assets, then Files. From there, you can either open your local Creative Cloud folder, (the folder that syncs with Creative Cloud), view your assets on the Web, or view archived versions of your files.

4

7. Manage your synced TypeKit fonts. Click on Assets, then Fonts. There you will see all the TypeKit fonts that you've currently synced. Click on Add Fonts from Typekit to add new fonts or Manage Fonts to remove synced fonts.

5

8. Search and download free assets from Creative Cloud Market. Click on Assets, then Market. CC Market contains thousands of pre-built design elements such as UI elements, patterns, icons, brushes, vector shapes, and product and packaging mockups.

6

9. Quick access to the BÄ“hance community. Click on Community. From there you can post new work to BÄ“hance, search BÄ“hance, view your activity feed, and more.

7

10. Pause File Syncing. Click on the gear icon in the upper-right corner, and choose Pause File Syncing from the drop-down menu. If you use the Creative Cloud file syncing feature you many want to pause syncing when you are in environments with limited bandwidth such as airplanes or coffee shops.

8

Monday, January 26, 2015

The best way to mirror an iPad screen to a Macintosh screen for presentation or recording

The best new feature of Mac OS X 10.10 (Yosemite) is tucked away in QuickTime Player that provides a rock-solid, reliable way to display an iPad or iPhone screen on the screen of a laptop or desktop computer. 

Requirements:

* A Macintosh computer running Mac OS X version 10.10 or later

* The QuickTime player app (installed with Mac OS X, should be in your Applications folder)

* An iOS device with a Lightning connector running iOS 8 or later (devices with the old 30-pin connector will not work)

* A Lightning to USB cable

How to:

1. Connnect your iOS to your Macintosh with the Lightning to USB cable

2. Run QuickTime Player

3. Choose File > New Movie Recording (command-option-n)

4. In the display that appears, choose iPad for the Camera in the drop-down menu. This will cause the iPad to mirror onto the Macintosh screen. If the iPad screen doesn’t appear on the Macintosh screen, you may have to swipe once on the iPad screen to make it appear.

Screen shot copy

The advantage of this approach over wireless solutions that use Airplay is that it doesn’t require access to wifi. 

Friday, January 02, 2015

What you need to know about logging into the DPS Folio Builder panel

When you create article content for Adobe Digital Publishing Suite projects, you will probably need to use a different Adobe ID to log into the Folio Builder panel than you use for your Creative Cloud account. If you are a designer creating DPS content for a client, the client may provide you with a specific Adobe ID to use for the project. If you are working on a DPS project for your company, you will want to create a separate Adobe ID for each DPS app that you create. You can learn more about this here.

If you are running InDesign CC, you will be logged into Creative Cloud with the Adobe ID associated with your Creative Cloud account. You can verify this Adobe Id by looking in the Help menu where you will see Sign Out (YourAdobeID)

Screenshot1

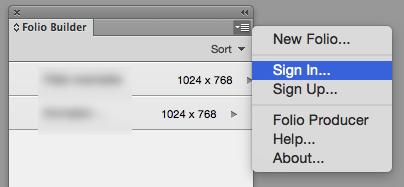
When you first open the Folio Builder panel in InDesign, InDesign will attempt to log you into DPS with your Creative Cloud ID. If this is not the Adobe ID you want to use, you will need to choose Sign Out from the Folio Builder panel menu:

Screen Shot 2015 01 02 at 3 32 08 PM

And then choose Sign In from the Folio Builder panel menu:

Screen Shot 2015 01 02 at 3 34 21 PM

When you choose Sign In, it can be confusing because the dialog box that appears says “Creative Cloud” at the top. But you can sign in with any valid Adobe ID that is associated with a DPS account.

Screen Shot 2015 01 02 at 3 36 18 PM

Once you have done this, the next time you start InDesign, the Folio Builder panel will automatically sign you in again with the last Adobe ID that you used.

This can be confusing if you are working on multiple DPS projects which require different Adobe IDs. Here are a couple small visual cues that can help you with this.

First, you can tell at a glance if you are signed into the Folio Builder panel by looking to see if the bullseye icon is displayed. If it is, you are signed in. 

Screen Shot 4

Second, you can hover over this icon to see which account you are signed in with. Unfortunately, it doesn’t display the actual Adobe ID, just the name associated with the account, but it may still be helpful.

Screen Shot 2015 01 02 at 3 43 00 PM